WordPress and Wix is a famous CMS platforms. Wix users realize that the options for their customizations are limited & adding more features for customization is expensive. That’s why most people are using WordPress. Maximum 43% WordPress powers over the website on the internet. Have you migrated from Wix to WordPress?
However, Migrating to self-hosted WordPress is a good choice if you want more features and flexibility without the high costs & low-cost budget. You can also see the comparison between Wix vs WordPress which one is better for you.
There are also different ways to switch from Wix to WordPress. So we are going to illustrate to you step by step. The migration can take up to an hour depending on how many pages you have on your Wix site.
If you need any technical support or want to contact a human who can help you resolve your WordPress Migration issues. You should be trying calling our toll-free number +1-888-738-0846
Steps to migrate from Wix to WordPress
Step 1: Sign Up for the WordPress Web Hosting
For starting a WordPress blog you will require a web hosting account for your website. Web hosting is your website’s home on the internet and this is where all of your files and data are stored.
You will also require a domain name such as www.yoursite.com. As this is your website’s address on the internet. When you use Wix they host your site for you. WordPress is free software so you’ll have a place to install it. And that’s why you need to purchase web hosting and a domain name.
However, we highly suggest that you use Bluehost as they are an official WordPress.org recommended hosting provider. In case you want to look at more options then we have a list of the best WordPress hosting providers that you can select from.
In this guide, we’ll use Bluehost for screenshots and examples. When signing up with Bluehost you can enter your existing domain under the “I have a domain name” option.
Step 2: Setup Your New WordPress Site
You’ll need to install WordPress after purchasing your new hosting plan. Also, Bluehost offers a simple one-click installation tool for WordPress inside the cPanel.
Just log in to your account and scroll down the website section where you will see the WordPress icon.
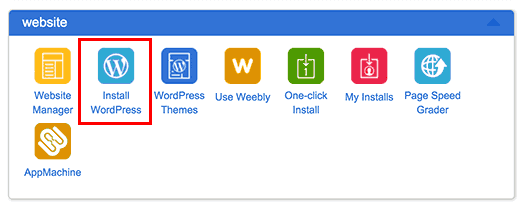
Tap on the install WordPress button and just follow the onscreen instructions. For detailed instructions, you can refer to our guide on 4 simple steps to install WordPress. After proper installation, it’s a good idea to set your WordPress permalinks.
Your permalink settings will regulate the address of each blog post. For example, instead of publishing a blog post:
www.yourblog.com/2018/16/blog-post-title
You can publish it to:
www.yourblog.com/blog-post-title.
You can also change your permalink settings by navigating to Settings » Permalinks in your WordPress dashboard. Once you have selected the structure you need, tap on the Save Changes button at the bottom.
Step 3: Customize Your Site’s Design
Up next you can customize the appearance of your website. It’s quite easy to do that using WordPress themes. WordPress themes are used to define the appearance and display of a WordPress-powered website same as Wix templates.
There are hundreds of themes available for WordPress both free and paid. Some themes are very basic and minimalist while others will add lots of new features to your website.
Wondering how to decide on a theme? Check out our article 7 Top WordPress Themes Marketplaces to Find the Best Themes for tips and advice.
Read More: 10 Ways to Improve Usability On Your WordPress Website
Step 4: Import your Wix Blog Posts to WordPress
Wix is a closed platform and it doesn’t give an easy way to users for moving their content away from Wix. However, we can still automate the process by importing your Wix RSS feed in spite of recreating each blog post manually.
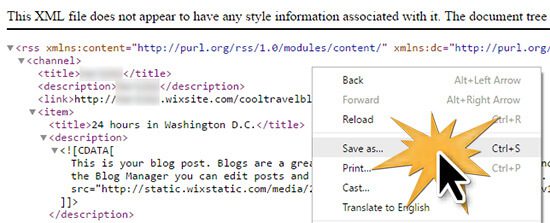
You’ll need to download your Wix RSS file to get started. Locate the file by adding /feed.xml to your Wix website URL. If you are not having a custom domain with Wix, then you can find your RSS feed at username.wixsite.com/blogname/feed.xml, where “username” is your Wix username and “blog name” is the name of your blog.
If you have a custom domain like www.yourwixblog.com then you can find your RSS feed at www.yourwixblog.com/feed.xml. You should see a page full of code after navigating to the proper URL. Move ahead and right-click anywhere on the page and click Save As to store the file on your computer.
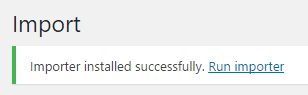
Now that you have your RSS file you can log in to your WordPress dashboard and click on Tools » Import. Up Next click the Install Now link under the RSS heading.

You’ll see a link at the top of the page to Run Importer after a few seconds just click the link.
Click the Choose File button and select the feed.xml file you just saved to your computer. Tap on the Upload file and import button. If you have a lot of blog posts to import, then it may take a few moments to import them all.
Then after you’ll see a confirmation message. For checking your blog posts and to make sure they have been exported from Wix accurately just navigate to Posts » All Posts and click View below each post.
Also, the content of your blog posts has been transferred at this point but there’s one issue:- any images in your post are still hosted with Wix.
You can also view this for yourself if you edit a post and tap on the Text tab to see the code. Fortunately, there is an easy way to fix this and move your images over to WordPress. You have to install and activate Import External Images plugin.
However, Plugins are like apps for WordPress that lets you add new features. For more information refer to our guide on how to install a plugin in WordPress.
After the installation, you can navigate to Media » Import Images. Next, click the Import Images Now button to get started.
The process may take a few moments depending on how many images you want to import. When it’s completed, you’ll see a confirmation message that says “Import Complete.”
Step 5: Import your Wix Pages to WordPress Site
After importing your blog post next you have to transfer Wix pages over to your WordPress site. As Wix doesn’t provide an automated way to do this so we’ll have to recreate each and every page in WordPress.
Can you transfer Wix to WordPress? Highlight all the content except for the page title. Then right-click and click on Copy. Login to your WordPress dashboard and navigate to Pages » Add New to recreate the page.
You can type in the page title at the top of the page. Then you can right-click and click on Paste as plain text for recreating the content. Using Paste as plain text in spite of just Paste will keep any irrelevant junk code from cluttering up your site.
However, it also strips all the formatting. It means you need to recreate any colors, links, and styles.
You can click the Publish button to publish your page on your new WordPress site after you finish styling your page. Although if you have plenty of content you might want to speed up the process by using Broken Link Checker for fixing any broken links.
Read Also: 7 easy steps to migrate from Squarespace to WordPress
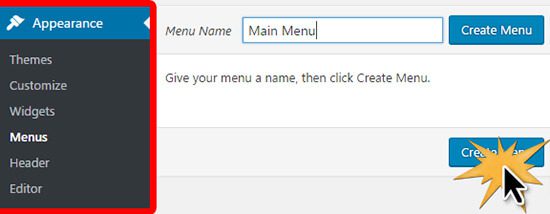
Step 6: Create Your Main Navigational Menu
Just make sure that your visitors can simply navigate through your new website using your primary menu. You can create a navigational menu by going to Appearance » Menus. Type in a name for your menu and click one of the Create Menu buttons.
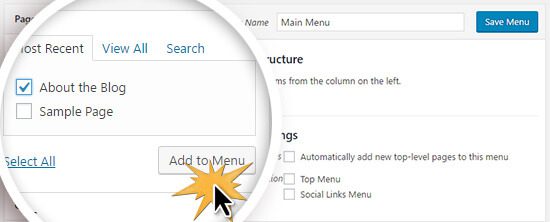
Also, select whichever pages you wish to add to your main menu and click the Add to Menu button. After you added all the pages you want, click the blue Save Menu button on the right.
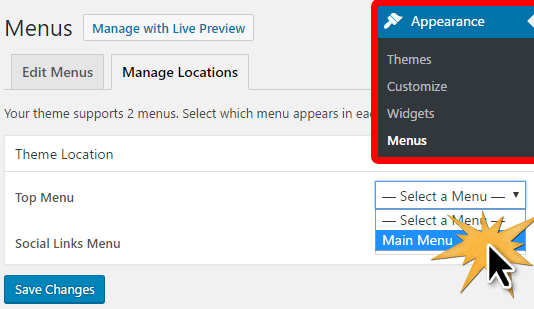
Now your menu has been created, but you still require to place it on your site. For doing this click the Manage Locations tab and the locations shown will distinctly be relying on your WordPress theme.
However, in the default WordPress theme, Twenty Seventeen the Top Menu location is the main menu which shows at the top of the page. It might be called a different name in other themes such as “Main Menu” or “Header Menu.”
For placing your new menu in the Top Menu location you have to click the drop-down field and select the name of your menu. Then click the blue Save Changes button.
Step 7: Redirecting Wix to WordPress
Now your new WordPress site is complete and you’re ready to allow your readers to know about your move.
It’s necessary to not only announce your move to your readers but also set up proper redirection. And this will also allow search engines to know that your old website has moved to the new location.
Important Note: If you had a custom domain on Wix then you can only redirect users to your new WordPress Website. In case you were using a Wix website subdomain then you cannot redirect users to your WordPress site.
Firstly open a plain text editor like Notepad and paste the below-given code:
| var hashesarr = { “#!about-us/c1it7”:’/about/’, “#!contact/ce54”:’/contact/’, “#!random-article/c1mz”:’/random-article/’ };for (var hash in hashesarr) { var patt = new RegExp(hash); if (window.location.hash.match(patt) !== null) { window.location.href = hashesarr[hash]; } } |
In this code we have added three example URLs in the following format:
“#!about-us/c1it7”:’/about/’,
While the first part of the line looks for a string in the URL and this will be the URL your Wix users will be coming from. And the second part of the line is the WordPress slug for the same page.
Unfortunately, you will have to manually add each URL in this format. After finishing it you need to save this file as redirects.js. Then after uploading this file to your WordPress theme’s /js/ directory using an FTP client.
If your theme does not have a /js/ directory just create one.
Also, edit your theme’s functions.php file and add the below-given code at the bottom of the file:
| function wpb_wixjs () { wp_enqueue_script( ‘wixredirect’, get_stylesheet_directory_uri() . ‘/js/redirects.js’, array(), ‘1.0.0’, true); } add_action(‘wp_enqueue_scripts’, ‘wpb_wixjs’); |
Save all your changes. That’s all you can now try visiting a URL from your old Wix site to see the redirect in action.
Note: These redirects will not redirect search engines and are not very SEO-friendly.
Lastly, don’t forget to inform your readers of your new address. You can do this by announcing your move on social media, writing a blog post about it, and sending out a notice to your email newsletter.
Step 8: Add Essential WordPress Plugins
WordPress plugins let you add more features to your website. Plugins work like Wix apps and there are hundreds of plugins available (free or paid). You can check out our articles about the Top WordPress Plugins for SEO if you’re not sure where to start.
Concluding Remarks:
Moving your website from Wix is not easy but it can be done in a few different ways:
- Sign Up for the WordPress Web Hosting
- Setup Your New WordPress Site
- Customize Your Site’s Design
- Import Your Wix Blog Posts to WordPress
- Import Your Wix Pages to WordPress Site
- Create Your Main Navigational Menu
- Redirecting Wix to WordPress
- Add Essential WordPress Plugins
In this article, we’ve given you a complete overview of those different options. All that’s left is for you to select the right one for you and get to work. If you have any questions or concerns relating to the process, please don’t hesitate to get in touch using the comments section below. As we’ll be happy to help.
You can also seek help from WordPress technical support number if you encounter any trouble. Just dial our Toll-Free number +1-888-738-0846 and get the instant support services.