Most of the primary webmasters use Squarespace for their initial projects. Squarespace is the best tool to simply building a beautiful looking website. It even takes care of hosting and domain name registrations so you could concentrate on creating your site.
However, Squarespace’s learning curve is not that steep compared to WordPress. But while Squarespace is great for basic sites, it has quite a few limitations:
- Very limited e-commerce integration and hard to extend the functionality
- Limited themes and customization functionality
On the contrary, WordPress is a more flexible, open-source platform that can overcome the above-mentioned limits and can provide you anything you wish to do on your website.
So, have you created a website on Squarespace but decided it’s time to move from Squarespace to WordPress as it’s a more desirable platform? Then, we will tell you how to do so.
In this post, We’re going to explain to you a step-by-step guide on how to move your site from Squarespace to a WordPress one.
Getting to Know WordPress
WordPress is a powerful platform with marvelous flexibility. There are thousands of professionally designed WordPress themes (free and premium) that you can use on your site. The actual power of WordPress also comes from its thousands of plugins. As these plugins add more features to your WordPress site.
WordPress also connects you with an extremely helpful global community of WordPress users. You can also ask for help in the WordPress support forums.
Getting Started
If you are having a Squarespace site and you’re serious about growing your business and leveraging your website to build your audience then it is a good idea to consider moving from SquareSpace to WordPress.
However, Squarespace usually hosts your websites on their own servers. If you are moving to WordPress then you will require hosting your own website.
Firstly find a WordPress hosting company. Head over to our guide on How to choose the best WordPress Hosting. We suggest Bluehost, as they are the official WordPress hosting partner.
In case your Squarespace site has its own domain name, then you may need to transfer that domain to your new web host as well or just register a new domain for our suggestion such as Bigrock, Namecheap, etc;
How to Migrate From Squarespace to WordPress?
Step 1: Installing WordPress
After completely signing up with a web host, the next step is to install WordPress.
Look at our guide on how to install WordPress
Most WordPress hosting providers like Bluehost, Hostgator, Siteground etc offer quick 1-click WordPress installation.
Step 2: Exporting Squarespace Content
The next step is to export your content from Squarespace after installing WordPress on your new web host.
Also, Squarespace offers limited export functionality. Depending on what content you have on your website some of it will be exported. The remaining content will remain on your Squarespace built-in domain. You will have to manually copy-paste it.
Here is the content that will be exported:-
- Your entire basic pages will be exported as WordPress pages.
- One blog page will be exported, and it will show on WordPress pages as Blog.
- Entire blog posts on that one blog page will be exported as WordPress posts.
- Your Gallery pages will be exported.
- Text, Image and Embed blocks will be exported
The following content will not be exported:-
- Album pages, Product pages, and Event pages will not be exported
- The Audio, Video and Product blocks will not export
- custom CSS and Style changes
- Folders and index pages will be left out
- If you had more than one blog page, then only one of them will be exported
Let’s go ahead and export the content so you can have a fresh start with WordPress where you have all the freedom.
Log in to your Squarespace account and move to Settings » Advanced » Import/Export menu.
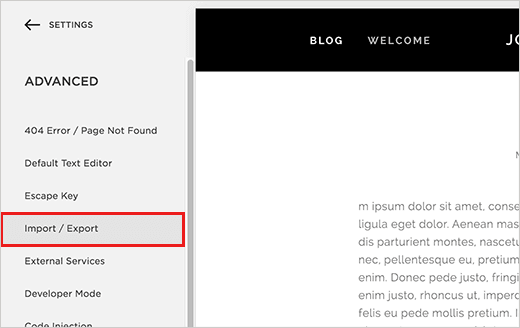
This will display you the import/export settings. Just click on the export button to continue.
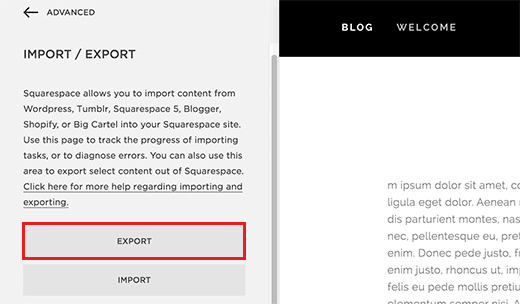
Now Squarespace will show you a popup with WordPress logo on it. Squarespace currently only exports content in a format suitable for WordPress only. Just tap on the WordPress logo to initiate the export process.
You will view the progress of the export on the left under the import-export buttons. After the export is finished you will see a button for downloading your export file.
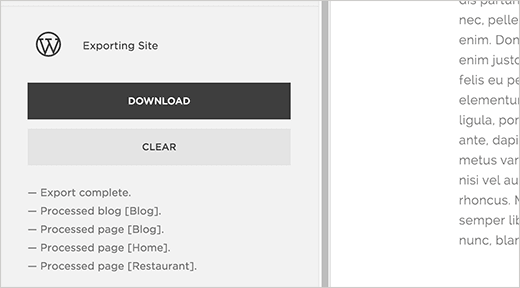
Download the export file to your computer. You will require it in the next step when you import content into your new WordPress site.
Step 3: Import Content From Squarespace to WordPress
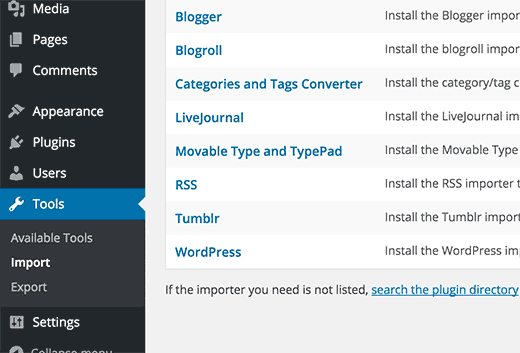
In next step import the content you downloaded from Squarespace into your WordPress site. For doing this, login to your WordPress admin area and then go to Tools » Import page. You will see a list of platforms to select from.
However, Squarespace exports content in a WordPress compatible XML file format so Squarespace will not be listed there. You need to click on WordPress to continue.
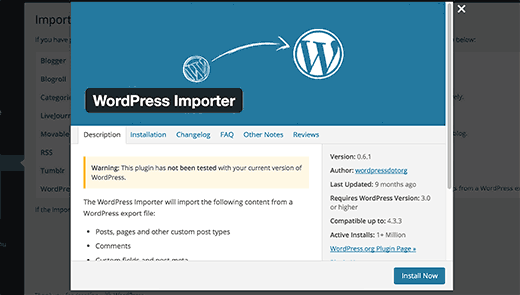
This will show up a popup where you will be asked to install the WordPress Importer plugin.
Installing the WordPress Importer plugin
Install the plugin and click on the ‘Install Now’ button.
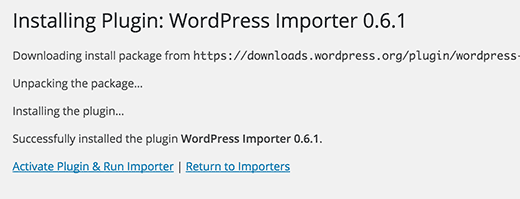
WordPress will now download and install the WordPress importer plugin. After the completion, you will see a success message. Just click on ‘Activate Plugin and Run Importer’ link.
You need to click on the choose file button on the next screen and then select the Squarespace export file you downloaded before. Then after clicking on upload file and import button to continue.
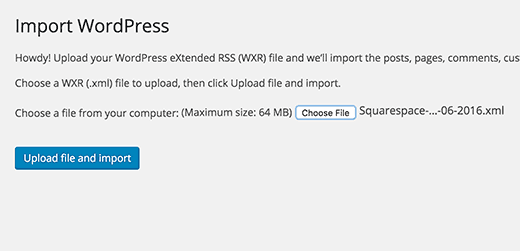
WordPress will now upload and examine your Squarespace export file. It will show you the import settings page if everything is in order.
This is where you will select an author name for the imported content. WordPress can import the Squarespace user and add them as a subscriber on your WordPress site. You can choose an existing admin user as an author or even create a new user.
You will see that there is an option for importing attachment images. This option may not work at all. Just leave the checkbox checked always, hoping that maybe in some future version this issue will be resolved.
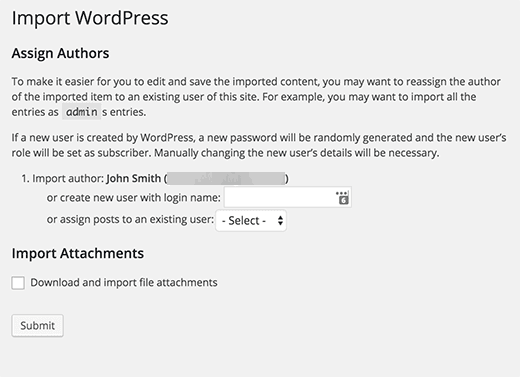
Tap on the submit button. However, WordPress will start importing content from your Squarespace export file. You will be able to see the success message when it’s done. For reviewing the imported content just visit the pages and posts in WordPress.
Step 4: Importing Images from the Squarespace
First of all install and activate the Import External Images plugin in WordPress.
Have a look at our step by step tutorial on how to install a plugin in WordPress.
After activation, visit Media » Import Images page for running the plugin.
Step 5: Fix Permalinks
For fixing Permalinks just make sure that you don’t miss traffic coming through the links from your old Squarespace website. WordPress uses SEO friendly URL structure which lets you customize the link structure in many different ways.
The goal here is to make our link structure exact to your Squarespace website. Also, it uses year/month/day/post-name as the link format for blog posts. Squarespace also uses a prefix like a blog or blog-1 in the post URLs.
A typical blog post URL using the default built-in Squarespace domain name may look like shown below:
In case you were using your own domain name with Squarespace then a typical blog post URL may look like this:
Visit Settings » Permalinks page in the WordPress admin area. You will notice a list of URL structure options and the closest match to your old Squarespace URL is Day and Name.
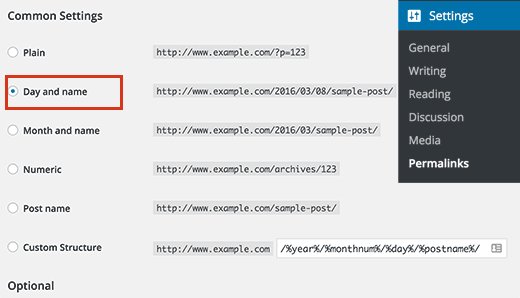
Next tap on the Day and Name option. After that move down to custom structure. You will be able to see that the custom structure section will be automatically filled with the year, day, month number and post name tags.
You are required to add the blog-1 prefix before everything else. As shown below:-
/blog-1/%year%/%monthnum%/%day%/%postname%/
Thus, to save your settings click on the save changes button. And this step makes sure that users visiting your website from search engines and other sources are redirected to correct posts and pages on the new WordPress site.
Importing the Other Content from Squarespace to WordPress
Squarespace only lets you export limited content. In case you were using their eCommerce features, events or hosting audio video files then you will have to import all of them manually to your WordPress site.
However, this process can take some time depending on how much content you have there. For products, you will require a WordPress eCommerce plugin, like WooCommerce.
For your video files, we suggest you host them on third party video hosting services, for example, YouTube and Vimeo.
Wrapping Up
In this tutorial, you have learned how to fully move from Squarespace to WordPress. If you really feel that WordPress Website has quite an upper hand to its Squarespace counterpart and finds this blog very useful in terms of a perfect WordPress migration then you are probably right to share your thoughts in the comment section provided below.
We hope now you get the comprehensive knowledge for a perfect migration from Squarespace to WordPress, if you need any technical support with respect to WordPress Migration issues. Just dial our toll free number +1-888-738-0846.
You can also seek help from our WordPress support team if you encounter any problem in the process. Just dial our Toll-Free number +1-888-738-0846 and get the instant support services.
Thanks for your time!