

For most WordPress site owners, SEO seems entirely complicated. But, that does not have to be. Because there are a lot of plugins to makes it easier, Yoast WordPress SEO plugin is one of them that makes it quite easy with their own distinct features.
As plugin is defined as a type of software that contains a group of functions that can be added to a WordPress website. They are used to provide additional functionality to your application.
However, there is a lot of value to hire a highly professional SEO expert. It’s better than you can do on your own by using the well-built WordPress SEO tools and customizable CMS (Content Management System). As, CMS is a system which allows users to easily create, edit, organize and publishing content.
As we all are aware that, each & every WordPress site needs an SEO plugin. And when it comes to SEO plugins, Yoast SEO is one of the best for your site.
Often WordPress SEO newcomers make the mistake of underutilizing the WordPress plugins for SEO. More often than not newcomers would be reading a few online guides on effective ways of starting their own website or blog and they would be performing all the steps mentioned mechanically without understanding clearly how to effectively implement them.
However, it is just not enough to know how to install a plugin, but also, you should know how to use a plugin. Because it is essential for the blogger to do quite a bit more for optimizing his blog posts.
Here are a few effective tips that SEO novices must follow to optimize all the on-page SEO factors for ranking a blog post using the Yoast SEO Plugin.
In this post we have covered up shown-below topics:
- What is Yoast SEO
- Tips to use Yoast WordPress SEO Plugin
- Using the Yoast SEO meta box
- Exploring the Yoast WordPress SEO dashboard
- Advanced guide to Yoast plugin
- How to properly use Yoast WordPress
- Some common issues of WordPress plugin
- Some other Yoast plugin versions.
The very first, let’s get a bit overview on Yoast WordPress SEO plugin.
Yoast SEO – What it is?
With more than three million installations, Yoast WordPress SEO is the most popular plugin, worldwide. Basically, it can do everything in the aspects of SEO that an SEO professional want. It comes with plenty of features that make your site search engine friendly.
Further on the Yoast WordPress can be installed on any self-hosted WordPress site. It is the most comprehensive, well-thought plugin make things easier like managing meta title, meta description, focus keyword, sitemap and so much. It’s completely free, but also has its premium version in which a lot of additional features are included.
Bending towards the point! Now, you have a good chance to use Yoast WordPress plugin throughout this beginners WordPress SEO tutorial.
So, let’s have a look:
Tips to use Yoast WordPress SEO Plugin
Using the Yoast SEO configuration wizard
The very first thing you should know how to install Yoast SEO plugin. To install it, go to your WordPress dashboard and click on the Plugins>>Add New. Thereafter, search for Yoast SEO, then install and activate it.
After the activation process, open your WordPress dashboard and click on ‘SEO’ tab to access the Yoast SEO dashboard.
If you are using the plugin the first time, then you will see a big notice. As soon as you click on configuration wizard link, you will get a complete guided notice that helps you for setting up all basics SEO settings.
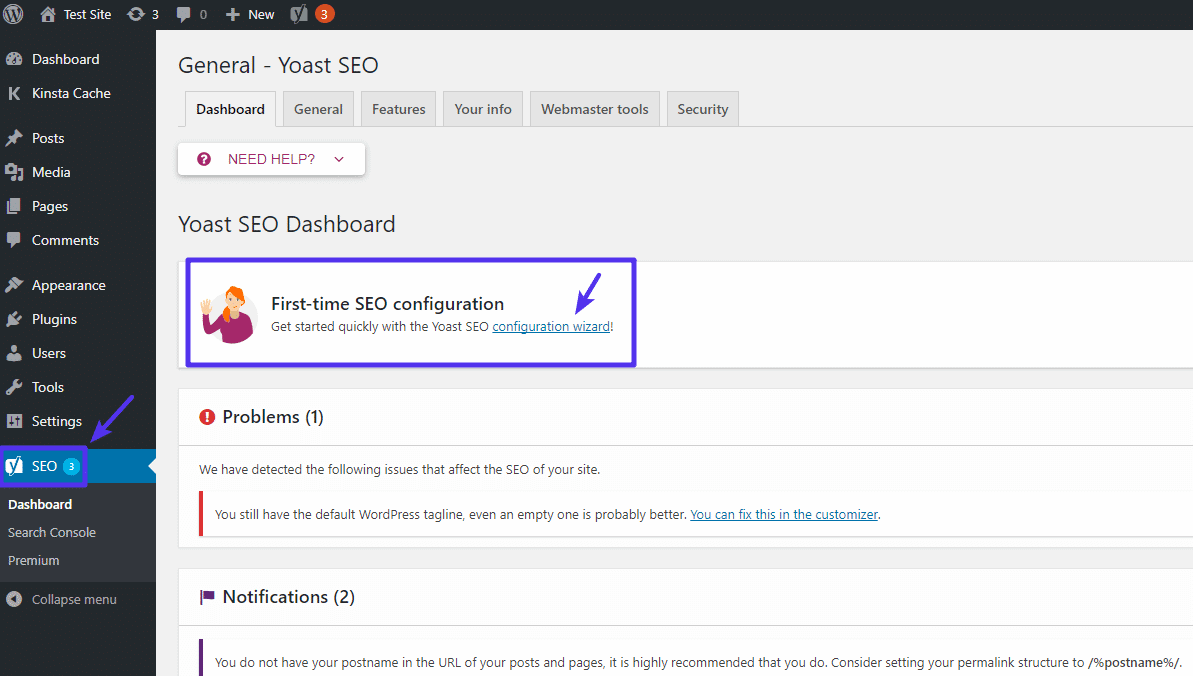
Thereafter, on the first page of the wizard, click on the “Configure Yoast SEO” button. It will bring you in the next phase or second phase of the configuration wizard.
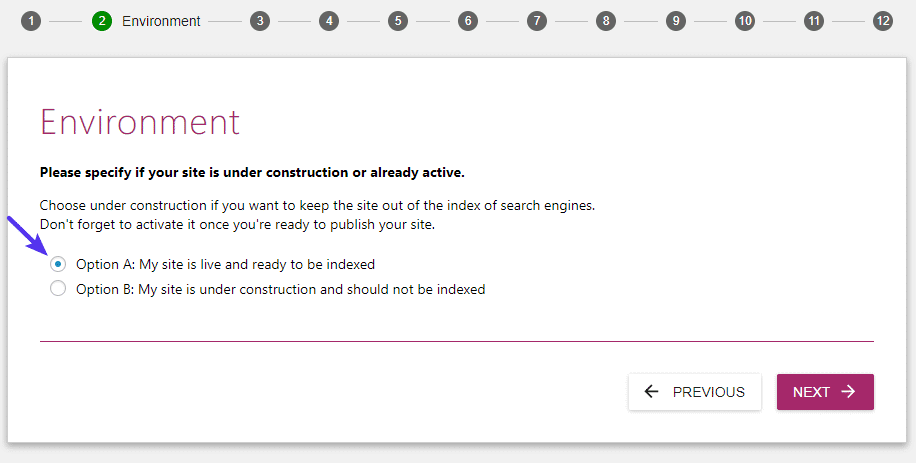
Environment
In this phase, you will appear two option – option A and Option B, but you will always select option A unless or until you are working on a development site.
Site type
Here, select type of site that best suits your site.

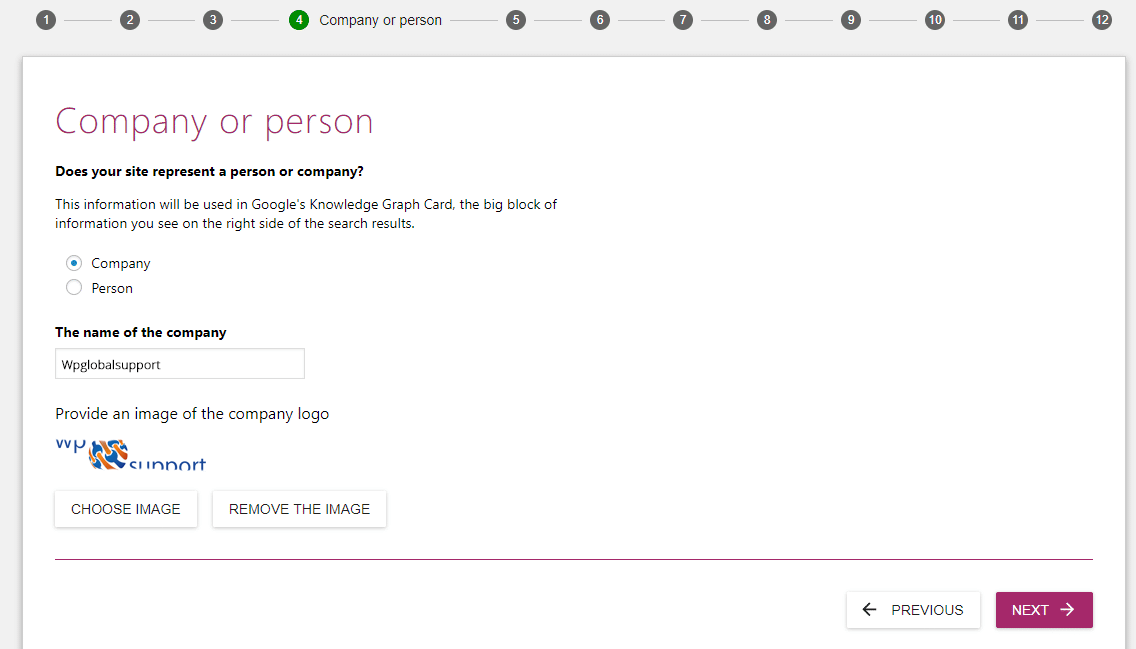
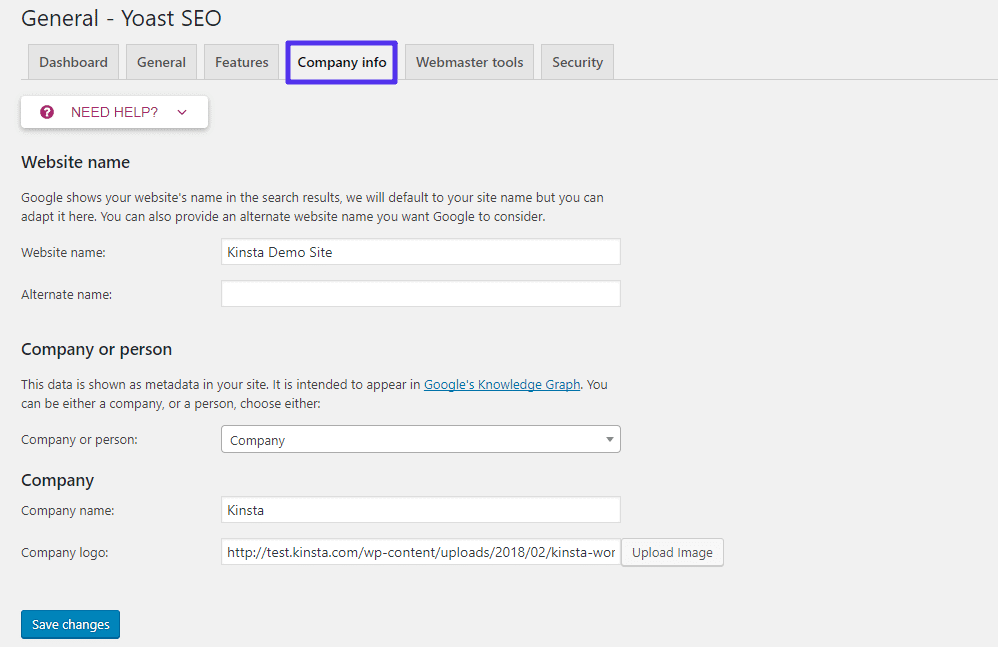
Company or person
In this phase, you have to select a company or a person what’s your website represent. In case you choose the company, you will need to enter some information that it asked you.
- Name of the company
- Company logo
If you select a person, you will just enter only the name of a person.
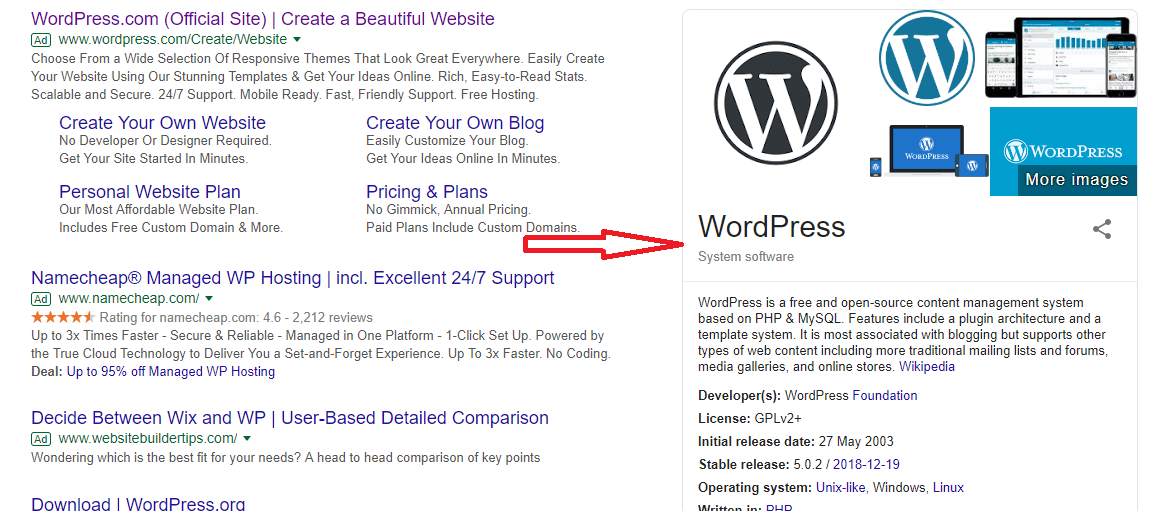
Note: This section helps to Yoast plugin to give extra information to Google so that it can create a Knowledge Graph Card. These ‘Knowledge Graph Cards’ are amazing so each & every small information helps. See in the given-below screenshot:
Social Profiles
Under this phase, introduce all your social media profiles. As we have discussed above, it also helps Google for generating Knowledge Graph.
If you are creating a site for a company, so it will be social media profiles of your company or if for a person, it will be details of that particular person.
Don’t select all of them, choose those social media platform on which you want to promote your site.

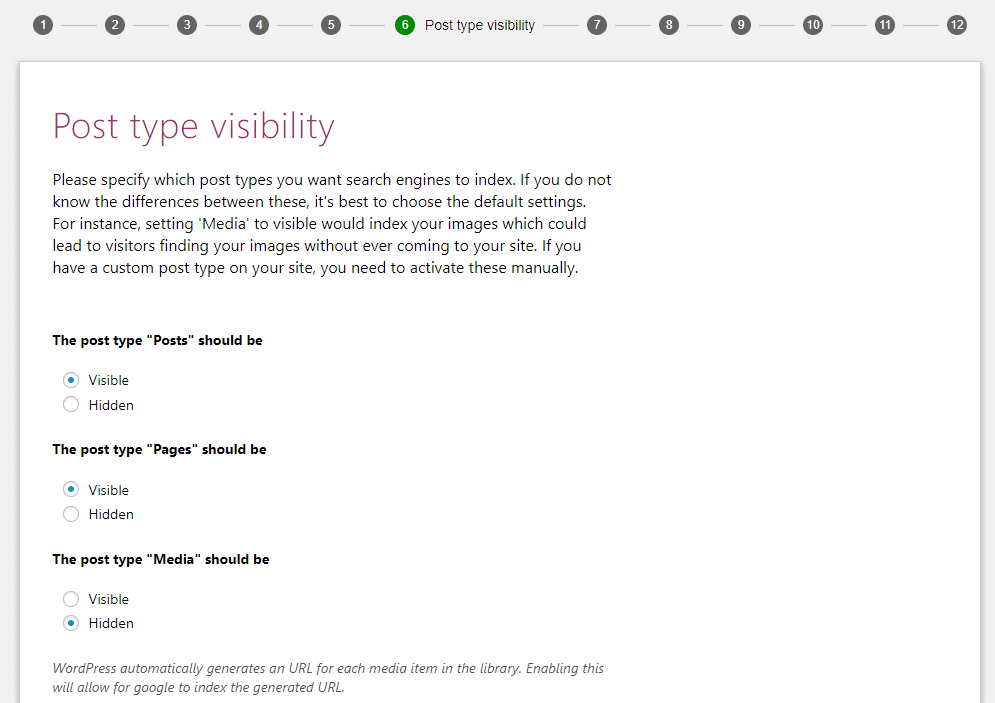
Post type visibility
In this phase, you can allow certain types of content or post to be indexed in the search engines. As search engine is a service which allows all internet user to search for any content, query, and product throughout the world wide web.
Where, The articles posted by the admin of a WordPress site are called posts.
Most of the time you leave these as defaults until you know what you are doing.
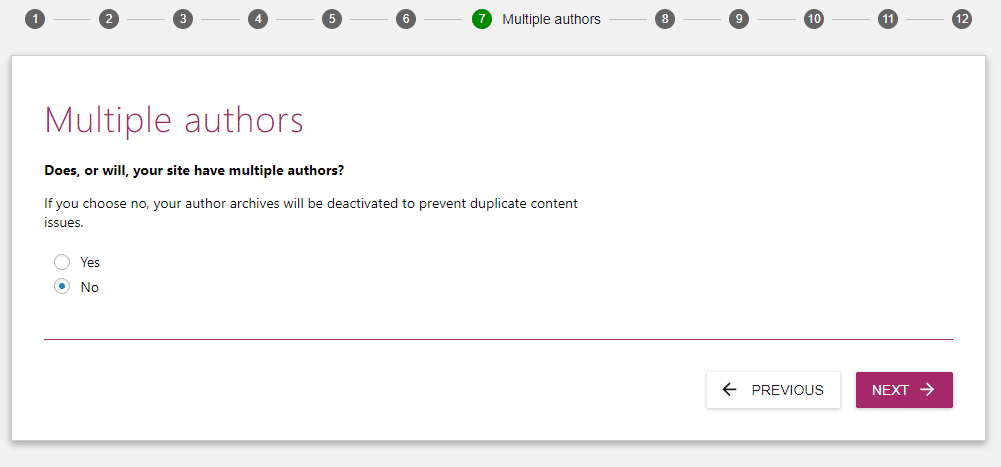
Multiple authors
In case, you are the only single person as an author writing posts on your WordPress website, so the Yoast WordPress SEO plugin automatically show your author archives as noindex to prevent from duplicate contents (noindex inform search engines, that particular page is not to index.)
The reason of this, on a single author blog, the author archives 100% similar to your real blog index page.
If you want you to have multiple authors for writing on your site, choose ‘yes’ button so that people can find a particular post archive of an author in search results.
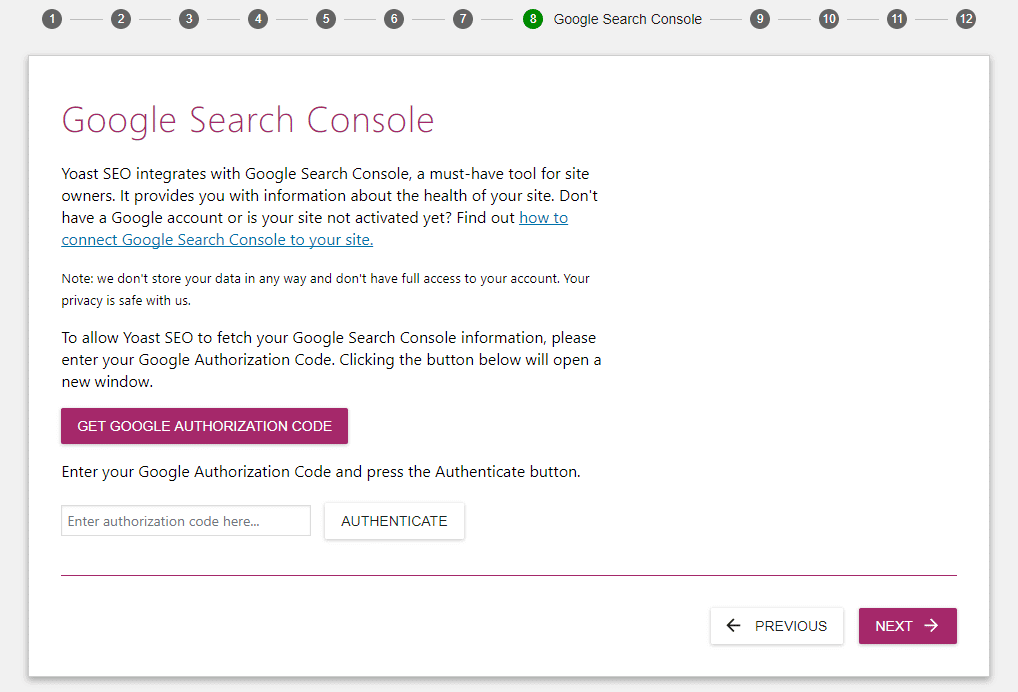
Google Search Console
First, let’s get a bit information over Google Search Console.
Google Search Console is a free tool provided by Google that allows you to know your site status. Means how your site performs on Google? It shows only the organic search result.
If you are already familiar with Google Search Console, click on the Get Google Authorization Code and enter the code. Thereafter, Yoast WordPress SEO plugin will import your information.
And in case you are not familiar with Google Search Console, don’t worry, just click the ‘Next’ button and skip for now. But it’s necessary for SEO you should have Google Search Console knowledge.
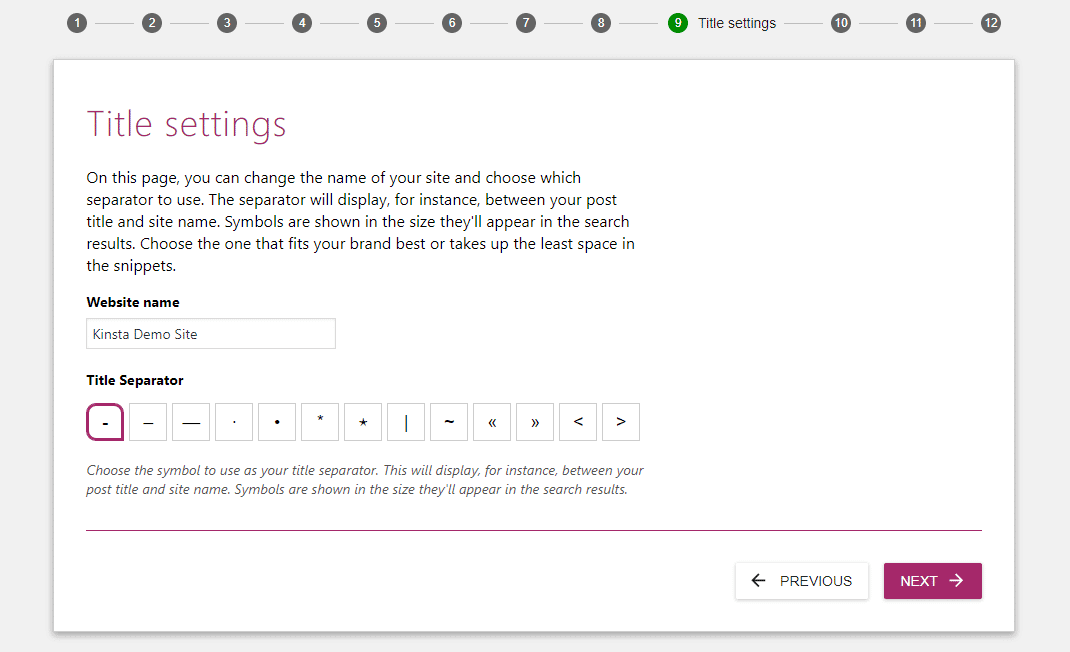
Title settings
Having your site ‘Title’ is compulsory because it is the main headline that appears in SERP (Search Engine Result Pages).
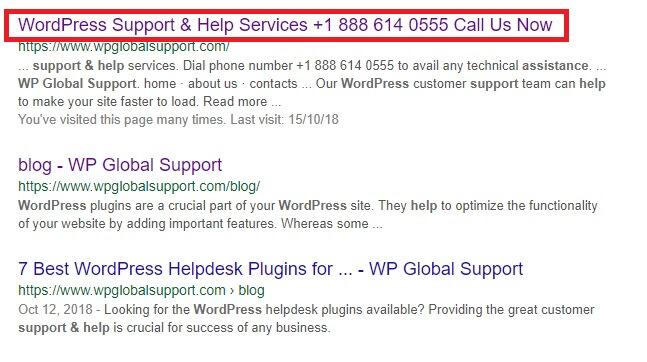
But the best thing is Yoast WordPress SEO makes your Title by default.
| Post Name *Separator* website Name |
Here, in this phase, you can also select:
- Your Website Name
- And The *Separator*
Let us consider an example if you have any post that title is “How To Use Yoast SEO ”, according to the above settings your site would look like this in Google:

That’s it!
In phase 10 and 11, Yoast WordPress SEO will ask you to:
- Sign Up for the Yoast SEO newsletter.
- And buy Yoast seo premium.
But, you don’t require such types of thing, that’s why click the ‘next’ button until you will reach phase 12. Thereafter, click the “Close” button.
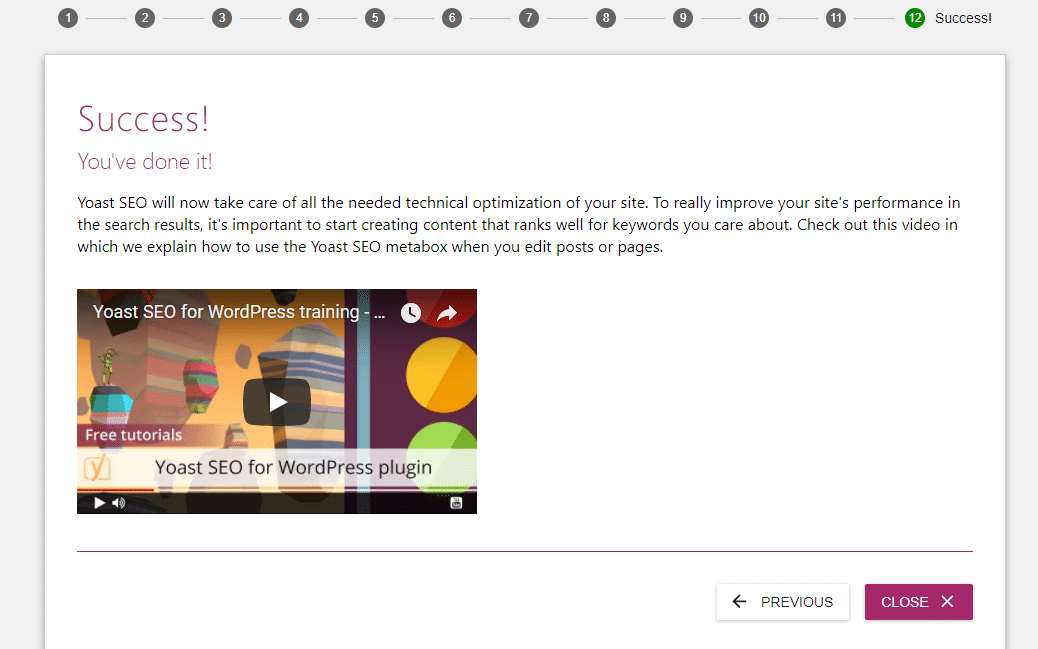
Now you have successfully configured Yoast seo.
After the configuration process, times to know how we can use Yoast SEO Meta boxes?
Using The Yoast SEO Meta Box
The Yoast WordPress SEO meta boxes help you to:
- Analyzing your post: it’s readability and SEO quality.
- And allow you to configure settings for how your post or content works in Google and Social media platforms.
However, the meta box appears below the WordPress post edit screen. But the actual location depends on your plugin and theme.
As, theme is a group of stylesheets and templates that are used to describe the appearance and display of a WordPress site. And templates are those files which control how your WordPress site will be displayed on the Web.
There are two methods to interact with Yoast WordPress meta box:
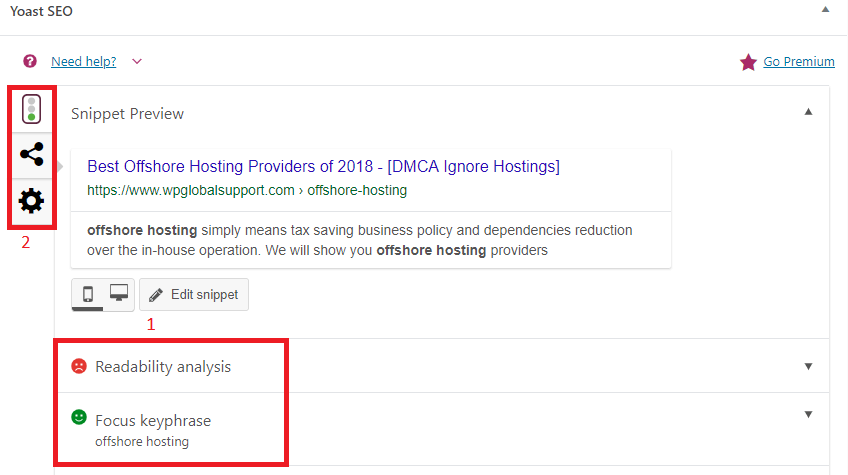
- It allows you to switch between Readability and SEO analysis.
- And also allows you to access additional settings for social media and advanced options.
Yoast SEO Analysis Tab
Here, in this SEO analysis area, you need to enter your Focus Keyphrase or Focus Keyword to analyze your content.
Remember that a focus keyword is supposed to be the main keyword. But, visitors may not always search every time by using only the focus keywords. They can also be used your focus keyword’s synonyms. That’s why plug your keyword after some basic keyword research.
Focus keyword could be used on search as an important part of a long-tail keyword. Such versions of the focus keywords are often referred to as the long-tail keywords and all these longer versions of your main keyword would be gaining a much higher ranking as compared to the focus keyword. Furthermore, the Yoast SEO plugin could help you optimize effectively for just one single focus keyword.
However, the Premium Yoast SEO would be capable of optimizing as many as five diverse keywords. This would be assisting you in optimizing effectively all your on-page factors, as well as, rank for the long-tail or multi-focus keywords or even their synonyms.
Now come to the point! As soon as you enter your focus keyphrase into the meta box, Yoast seo will analyze your content and show you how well you have optimized your content for that particular keyword.
It will also show you what you have done good and what needs to be improved.
You can also edit your post’s SEO Title and Meta description manually by clicking on ‘Edit Snippets’ button. As soon as you edit your information, you can see a live preview just above the edit snippet button.
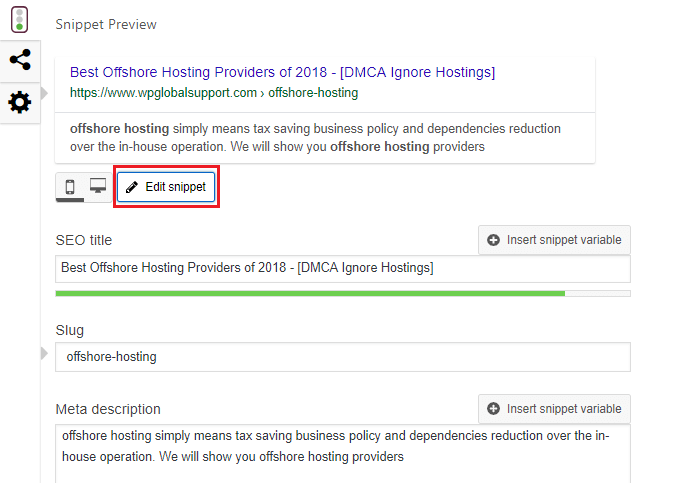
SEO Title: Remember that, the heading or the title of your blog post is practically the first thing that user could encounter on search engines.
Therefore, it would help in making or breaking your image. So pay a lot of attention to the title. Here are a few dictates:
- Your blog post title must necessarily be catchy. It must include the focus keyword. Yoast would be suggesting the focus keyword to be the very first keyword present in your title.
- The title must contain around 50-60 characters or even less in length. The title could become really catchy if it could clearly convey the benefits of reading your blog post as compared to your other competitors or business rivals.
Meta Description: Some newcomers do not realize the importance of Meta descriptions. But you simply cannot overlook the pivotal role they play in helping you gain higher rankings on SERP.
Users could see the Meta descriptions and titles only on the SERP. It would also be appearing on various social media platforms like Facebook, Google+, and Twitter etc.
Write the Meta description for the article in a manner similar to summarizing the content for a third party.
Finally, an effective meta description would be conveying a lot about your blog post or article. It is effective in making search engines understand the nature and content of your article.
Note: Putting this information is utmost important because Google shows up these in their search results.

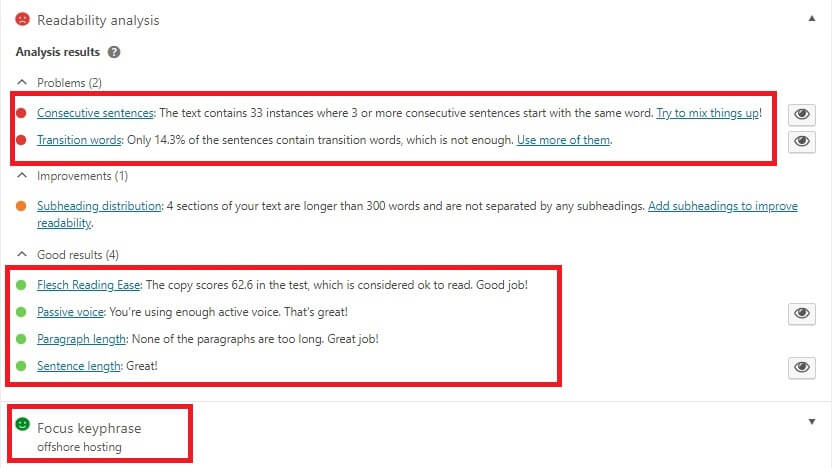
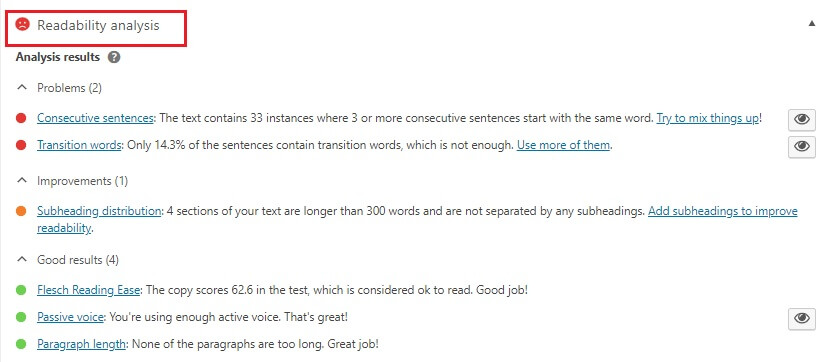
Yoast SEO Readability Tab
As we have discussed above ‘SEO Analysis Tab’ – It is described that how your content optimized for search engines. But, Yoast SEO Readability Tab defines how readable your content will be to human visitors and then show problems to improve content readability.
Yoast SEO Social Media Tab
Here, you can configure manually that how your post look while you sharing it on Twitter or Facebook.

However, this is the information that a social media platform generates automatically when you shared a URL.
Most of the time, you don’t need to check manually this information because this plugin will automatically generate it based on your SEO title and your content featured image.
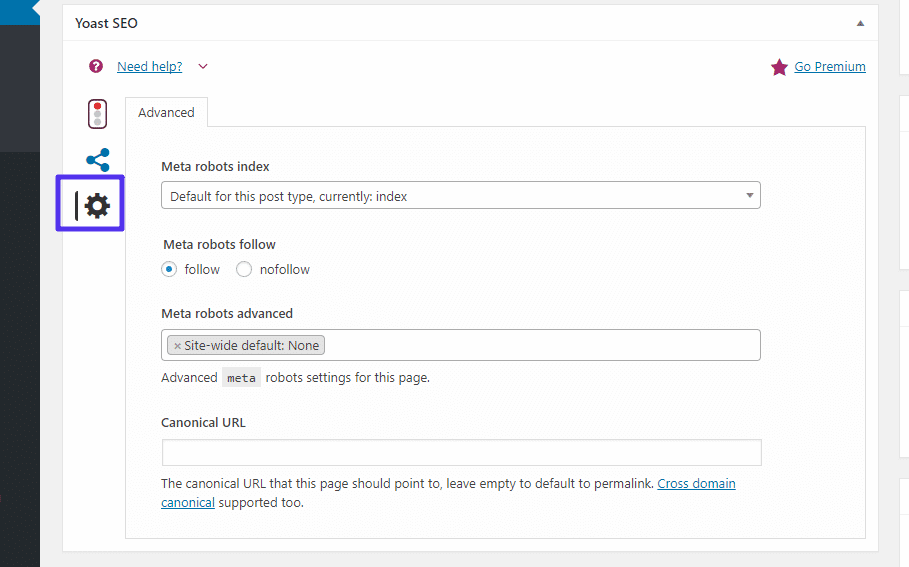
Yoast SEO Advanced Tab
Most of the time, you don’t look ‘Yoast SEO Advanced Tab’. But in case you need to stop Google from indexing a post and specify a canonical URL to prevent from duplicate URL, you can use this tab.
Now that you have configured Yoast WordPress SEO and its meta box. Over to this, now we will explain you the Yoast WordPress SEO dashboard.
Let’s have a look:
Describing The Yoast SEO Dashboard
The good thing is that on the dashboard front page Yoast seo indicates you about any potential SEO errors on your site. For example, when the test tagline of our site is still the default text, so Yoast seo does not like it and show an error. You can see given-below screenshot.

And also it gives you instructions on how to fix it. If you don’t want to fix, you can ignore it.
General Tab
However, the General Tab is not much important, but it allows you to access the configuration wizard. Next, it counts the number of internal links of a particular post.
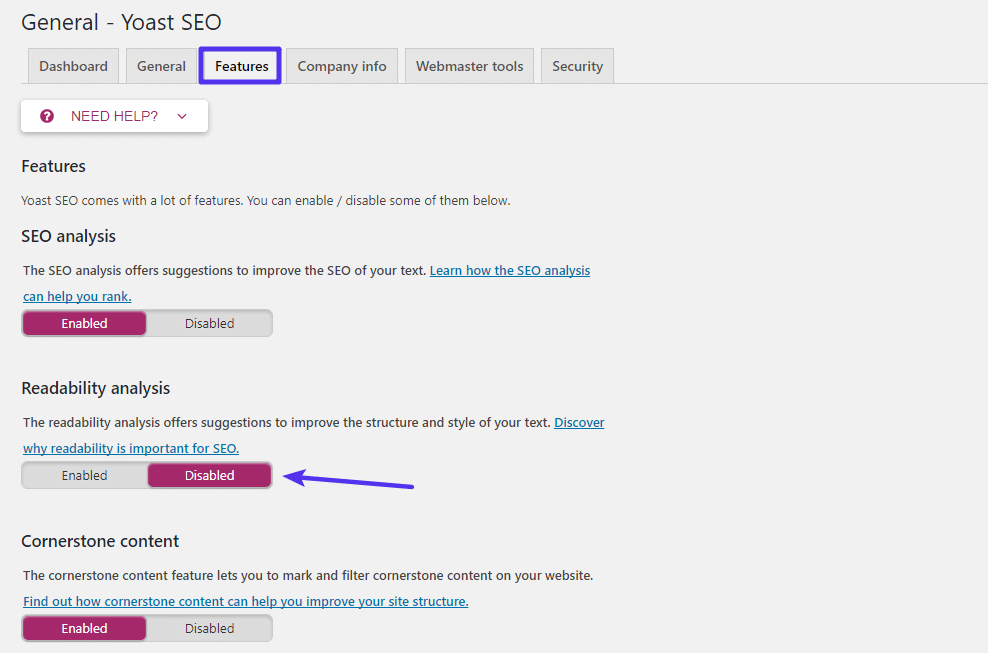
Features Tab
Here, in this tab, you can activate or deactivate any Yoast SEO plugin’s features. Means to say, in case you don’t find any feature of Yoast SEO plugin, so you can turn it on & off here:
Company info Tab
Under this tab, edit the company details that you want to set up at the time of configuration wizard.
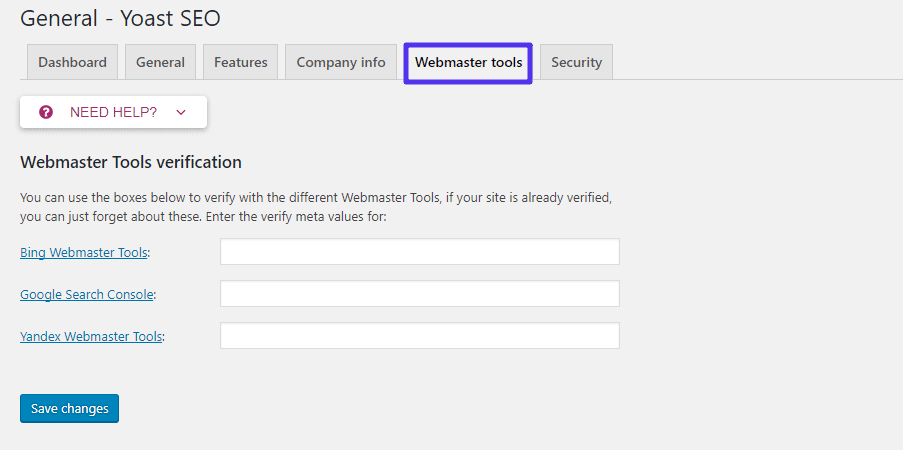
Webmaster tools Tab
Here, with the help of Yoast SEO, you can verify your WordPress website with different search engine’s webmaster tools.
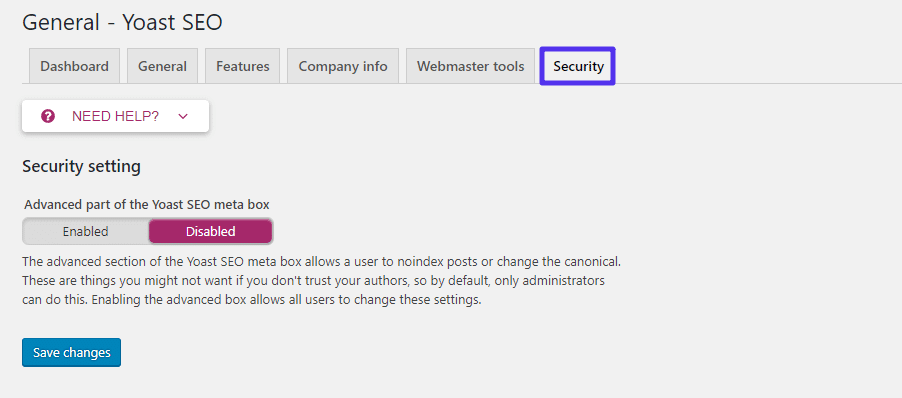
Security Tab
Security is the advanced part of the Yoast SEO meta box. Under this tab, you can select who has advanced area access in Yoast SEO meta box. By default, only administrators have access.
That’s it! Now times to know bit information about Advanced Yoast SEO Plugin.
Advanced Guide To Yoast SEO
Here, in this advanced guide, we will tell you some advanced settings of this plugin that Yoast WordPress SEO keeps hidden away. The very first:
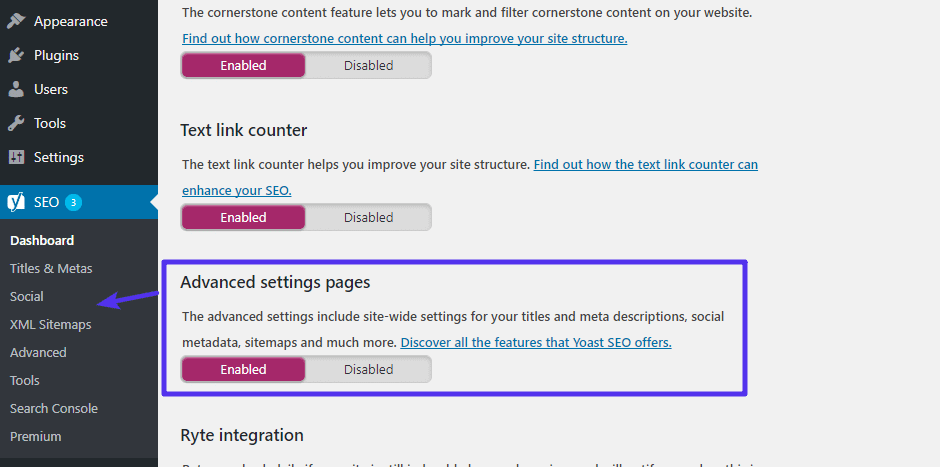
How To Turn On Advanced Settings Pages
By going to the Features tab in plugin dashboard access the Yoast WordPress SEO advanced areas and also enable your advanced settings pages.
Thereafter, you will be able to see an entire stack of new options in your WordPress dashboard sidebar:
Titles & Metas Options
However, you should aware that the Titles and Metas area is one of the best tools for automating your On-Page SEO.
Apart from this, with WordPress SEO plugin you can also set templates for SEO titles and meta description for all pages, posts, custom post types, custom taxonomies, taxonomies, archives pages, etc.
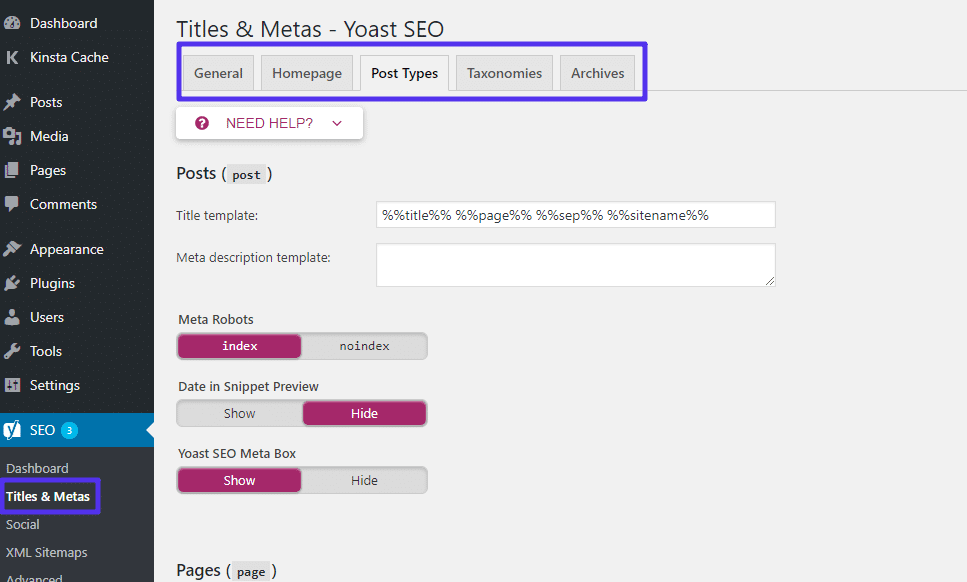
The best thing is you can use the various range of variables to dynamically insert the information that is contained in custom fields. Not only this but, you can also get an entire list of these variables. Click the Need Help? Button and go to the Template explanation tab to get these variables. You can see given-below screenshot:
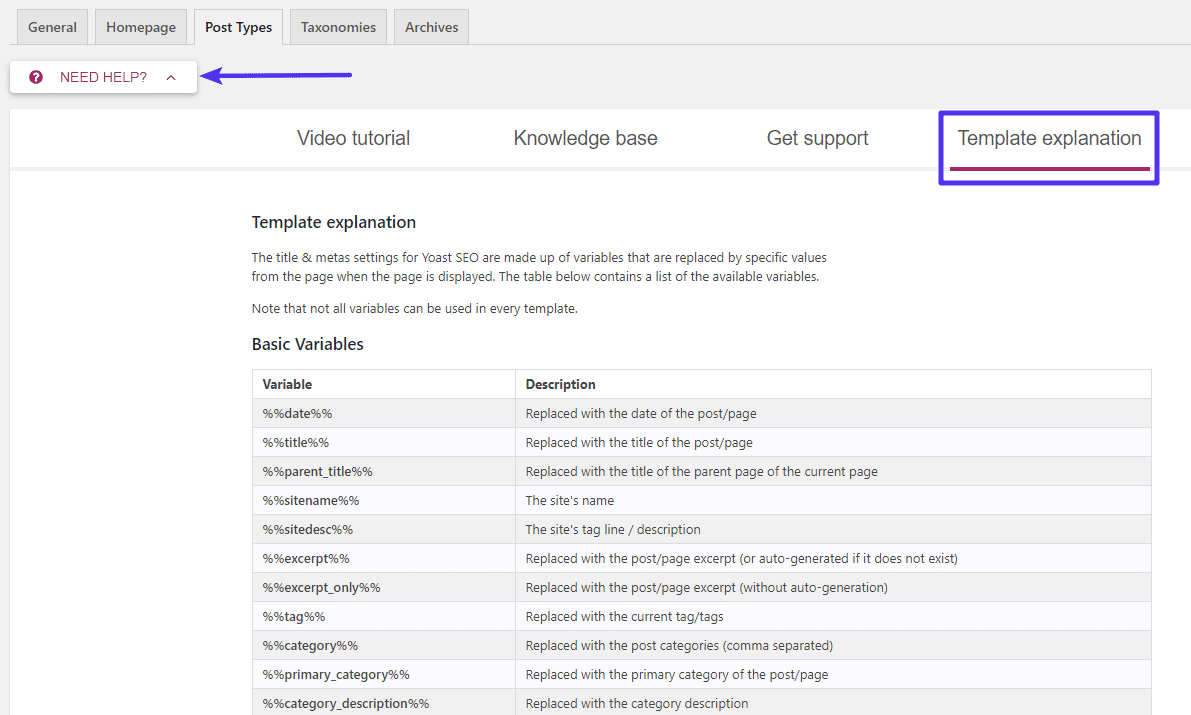
Scroll down and go to the advanced variables phase, here you can get some really neat time-saving hacks. For example, suppose you have a coupon website and you want to show your post’s title looks like as shown image:

You can keep your Title up to date instead of editing manually every month by using such variables %%currentmonth%% and %%currentyear%%. By doing this, Yoast SEO will automatically do it for you.
There are a lot of things are included in this area, which is as shown below:
- You can Control noindex tags for particular types of post. You should know that Google does not show the type of content in the search result that you make noindex, so use these tags very carefully. If you are aware of that, change only the default settings.
- You can select whether or not you want to show the published date of posts in search results. You should turn off this in case you publish evergreen content. But in case you publish news or other types of content, you can turn on this.
- Also, choose whether or not you want to show Yoast SEO meta box for specific types of content.
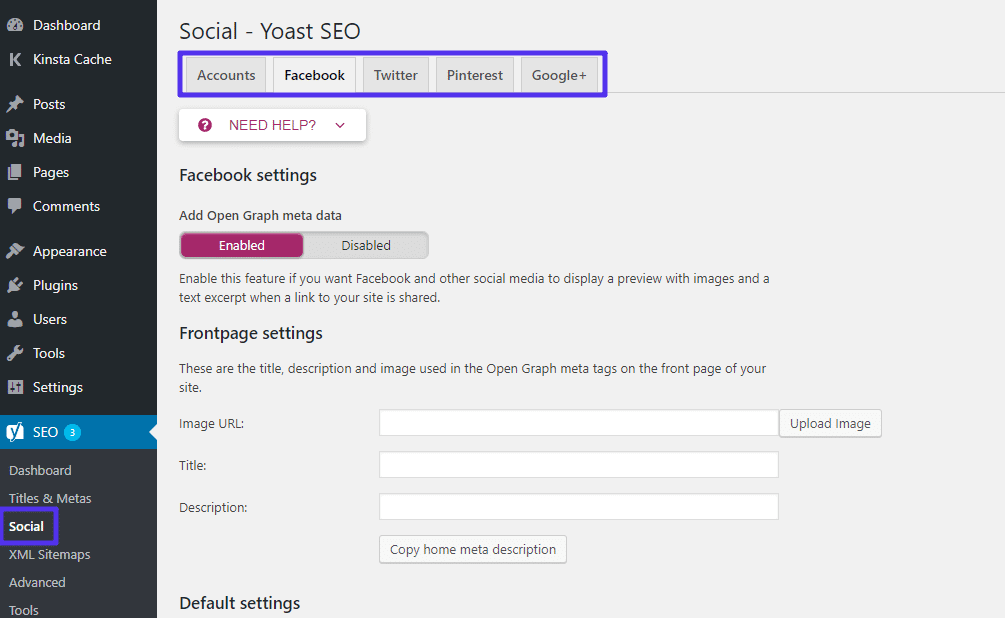
Social Options
In social options, you can know more advanced settings like how your site connect with different social networks. But most of the users leave these as the defaults.
XML Sitemaps Options
With Yoast WordPress SEO plugin, you can easily generate an XML sitemap and submit it to search engines.
In this sitemap area, you can select to enable or disable this feature. And can Import/Export manually some content from your sitemap.
However, in post types and taxonomies tabs, you can select whether or not you want to include entire types of content:
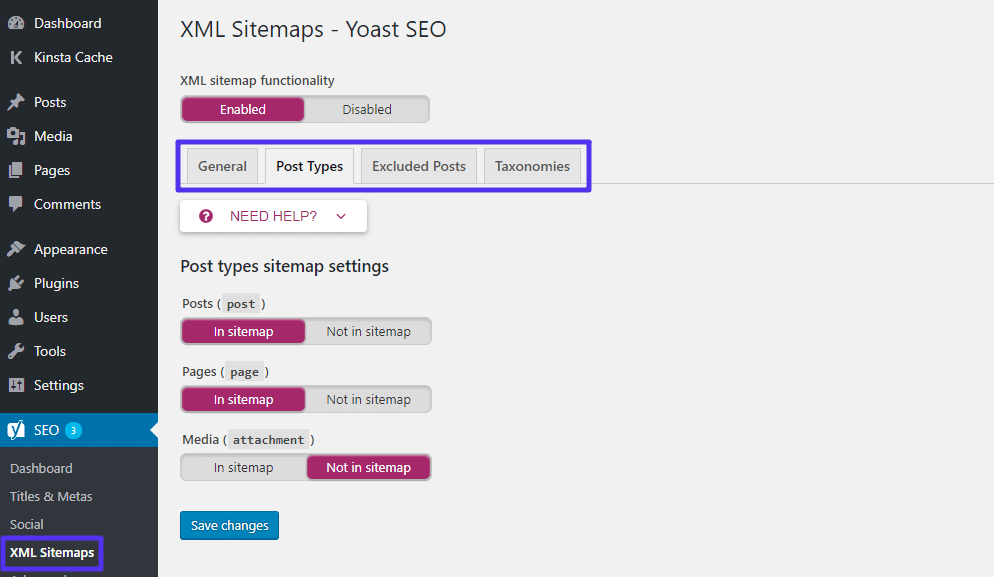
And in the next – ‘excluded posts tabs’ you can export particular pieces of content manually by using their post IDs.
Advanced Options
Here, there are various features included such as Breadcrumbs, Permalinks, and RSS.
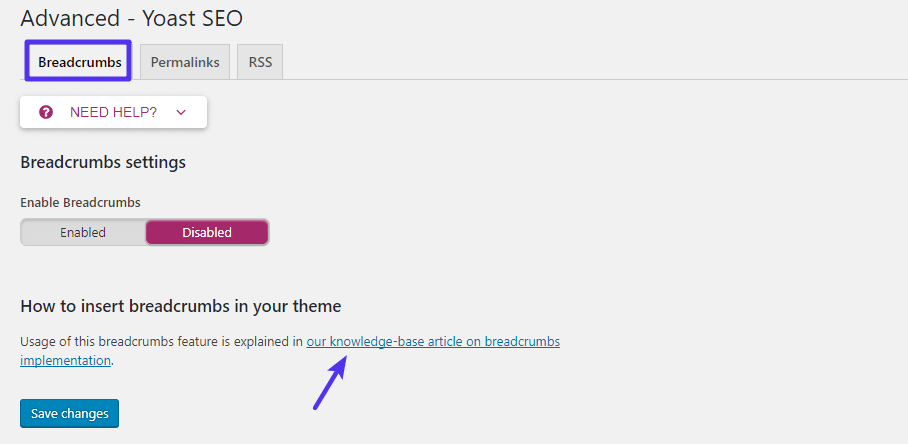
Breadcrumbs Tab
We can say that the Breadcrumbs are the navigational feature that something looks like as shown below image:
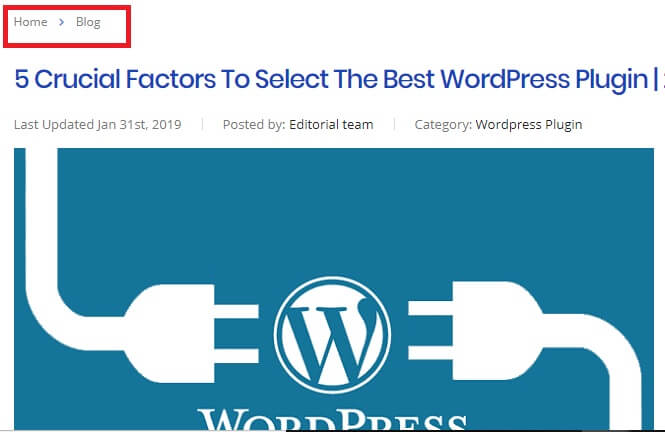
Generally, they help users to navigate your site. Here, with the help of Yoast login, you can enable them. But, if you want to get this feature working, you have to add a small code snippet to your theme:
Permalinks Tab
Here, you can clean up permalinks of your sites with the help of this ‘permalink tabs’. The best feature is the option that works to remove the category slug from your URLs:
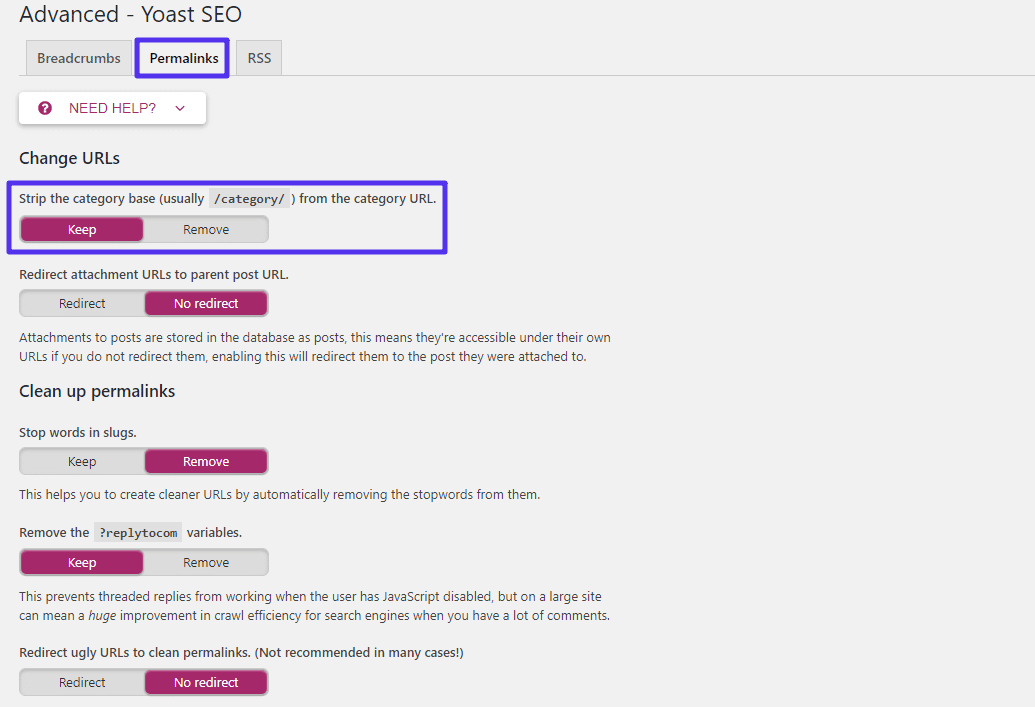
But there are also some other things that are most beneficial for you. Like:
- Yoast seo plugin automatically removes stop words from automatically generated permalinks.
- And set up some types of redirects.
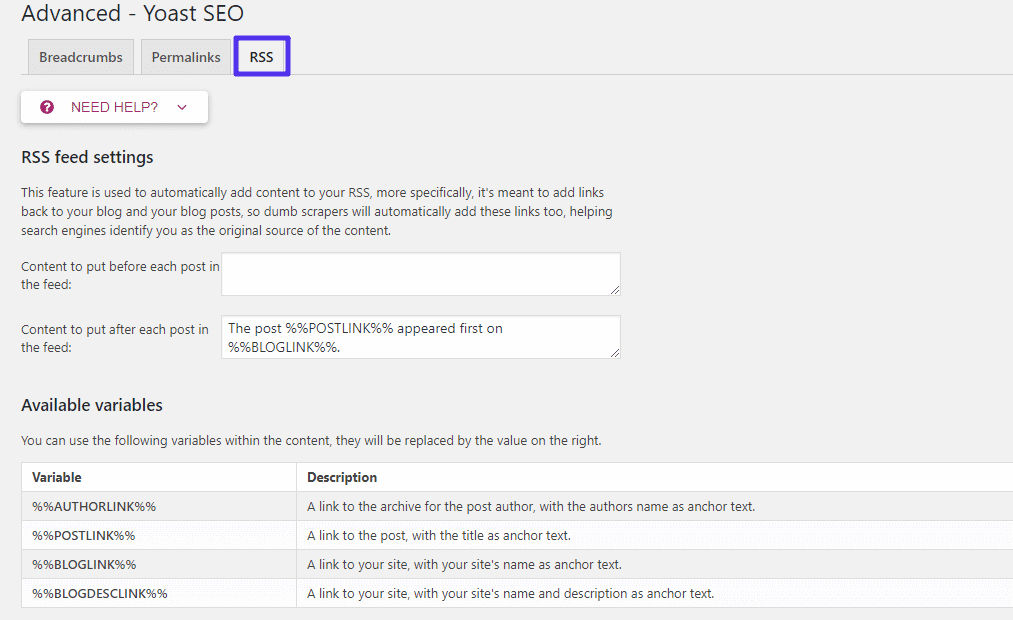
RSS Tab
Lastly, by using the RSS tab you can add more content before or after you post content in your RSS feed. Apart from this, you can also use variables to insert information fastly, like a link to your blog to ensure proper citation.
Tools Options
Here, by using tools options, you can access different types of editors and option to import/export your Yoast seo plugin settings.
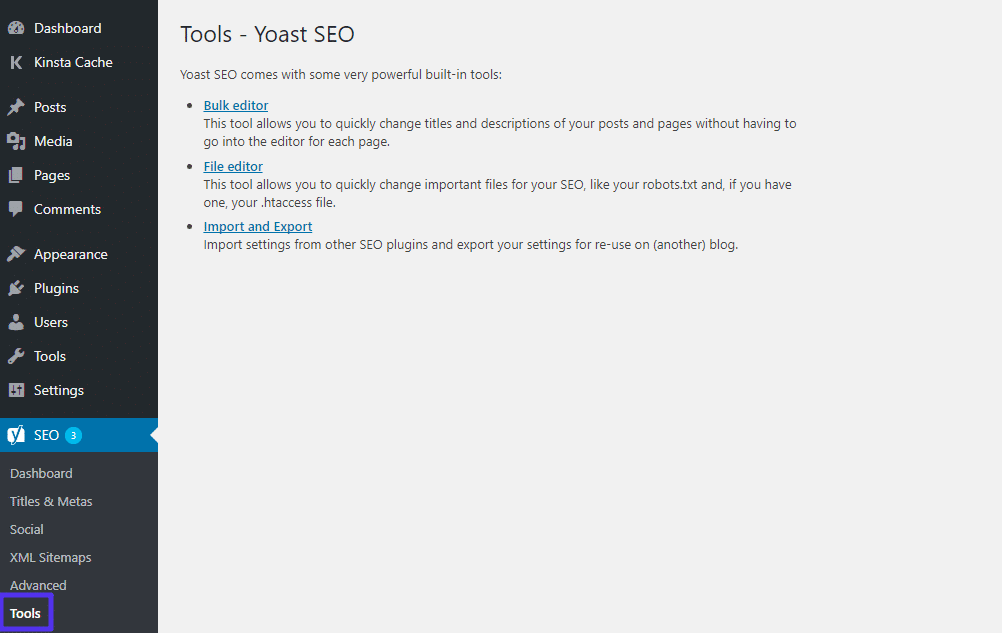
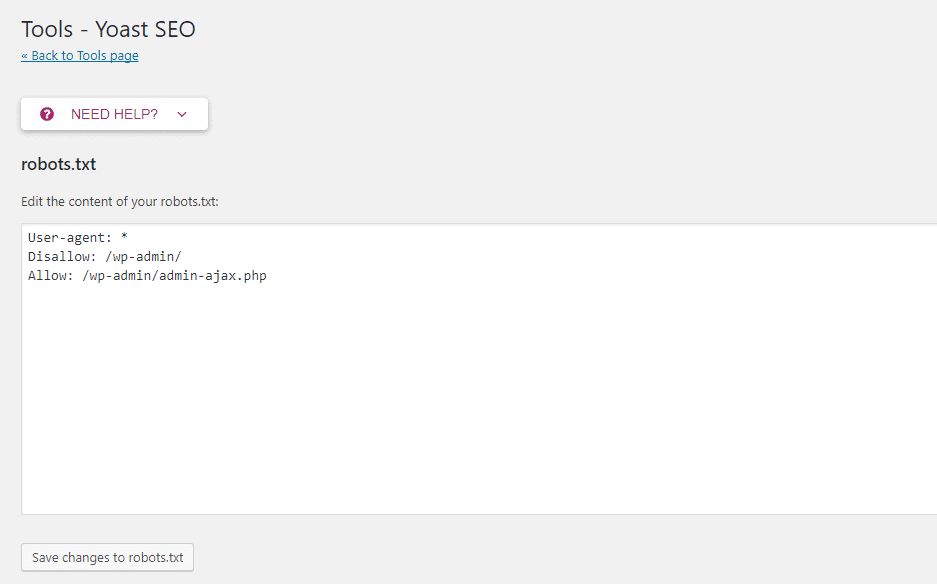
The best is you can edit here the robot.txt file of WordPress site from your WordPress dashboard. You don’t need to SFTP (Secure File Transfer Protocol) into your website.
After all, create your robot.txt file (if you don’t have already) via Yoast WordPress plugin by clicking on file editor option. If you have the robot.txt file already, you can edit it via Yoast dashboard.
Wrapping up all things, we want to explain you entire information over how to use Yoast WordPress in your daily site life.
Steps To Install The Yoast SEO Plugin
However, the very first thing that you have to do is just install the Yoast SEO plugin and after that, you need to activate it. Basically to help you out this easy step by step guide will give you more details on how to install a WordPress plugin.
After successful activation of your Yost SEO plugin, then you will be able to see a new and fresh menu item into your WordPress admin bar named as SEO with the Yoast SEO logo on it.
This means you have completely installed and activated the plugin. Now all you have to do is that just take a look at it. The next thing you need to know is how to properly set up this Yoast SEO plugin.
Setting Up The Yoast SEO Plugin
Well before we go further and discuss the process, the one thing that you must remember is that the settings which we select are the same that we recommend you. Besides that, many other specialists may have their own choices and option.
Therefore advanced users may overlook anything that they do not prefer. However, if you are also a beginner or new to this installation process. But still, you want to install and use the Yoast’s SEO plugin of WordPress as all others do. Therefore you must follow all the given steps along with the care.
Transferring The Data
Well, it may happen that most of the people apparently have some other kind of WordPress plugins such as All in One SEO Pack. Also, they can have a theme framework such as Genesis dealing with the SEO data. Thus if you want to successfully use this plugin.
Then you have to make sure that all of your previous data has been transported to this plugin before you deactivate the other one. Although we recommend you use the SEO Data Transporter of the StudioPress to achieve this task. Therefore if you are setting this up on a new blog, then should skip this step.
General Settings Option
Well, to set up some of the recommended general settings you should click on the SEO icon. Then it will take you to the settings page for the plugin. Now you have to switch to the General tab and then you will notify a button to open the configuration wizard. So if you like then you can ignore this wizard because we will guide you step by step through each option.
Features Page Option
However, the Yoast SEO plugin comes with a variety of great features. This page allows you to easily turn all those features on and off. But you must aware that, all these options on this page are turned on by default. Hence we will discuss a few of them later in this article.
So for now, let us take a fast look at each one of them and quickly know what it does actually. All of these features are as follows:
- Admin menu bar: This option will show you the Yoast SEO menu in the toolbar of the WordPress admin page.
- Cornerstone content: This feature allows you to mark and filter
- Ryte integration: Ryte is known as a third-party service, this service will check your website weekly. Also, it will notify Yoast SEO if your website is deindexed.
- Security: Basically, it hides advanced SEO settings from authors to improve security. Therefore now there are no advanced settings for authors.
- cornerstone content. These are your most important pillar articles.
- Text link counter: This feature shows the number of internal text links to and from an article.
- XML sitemaps: Creates XML sitemaps for your website.
- SEO analysis: It will show you the analysis and SEO score for the content of your website.
- Readability analysis: It will show you the readability score and analysis for the content of your site.
Google Webmaster Tools
This popular search engine enables the owners of the website to add their websites using the webmaster’s tools area. You can also see the complete guide about Google Search Console to discover more about these tools. Yoast SEO makes it easier to verify your website with all top search engines.
In order to do that you need to sign up for the webmaster tools program for each search engine. So after that, you will be asked to add a meta tag to verify your ownership of the website. Just add the meta code which you will get from the search engines in the respective fields.
Search Appearance Option
Well, the option of the search appearance is available within the Yoast SEO plugin settings. Basically, this option will control how your website will appear in the search results. This section has included several options for your homepage, archives, single articles, and taxonomies.
However, here we will guide you through each and every one of them. So now let us begin with the more general settings first:
1. General Settings
Here you can pick the symbol you need to use as a separator between titles. The default option is a dash, you can use it if you are unsure which symbol to choose. On this page, you can also determine the SEO title and meta description for the homepage of your website.
After that, you can discover the schema options and knowledge graph for your website. You can prefer whether your website represents an organization or an individual. Also, you can upload an avatar recognized as a profile picture for the individual or a website logo for a business.
2. Types of Content
You can determine an SEO title and the description for each page or post that you write for your website. The Yoast SEO plugin also enables you to set up an automatic template to use for them, in case you forget to add them manually. These options will enable Yoast SEO to use default settings to fill in those options automatically.
In addition, you will be capable to set date snippet, search appearance. Also, you will decide either to show or not display the SEO meta box for each content type. The default options would work for all websites. After that, you can set an SEO title template and a default meta description.
However, we recommend you to change only the SEO title. After that keep the meta description field blank. This can enable the Yoast SEO plugin to produce a description from the first some lines of the article.
3. Media
WordPress generates a new page by default for each image or media that you assign to your pages and posts. This page only presents the media attachment. Thus those attachment pages don’t have meaningful text to provide a context to search engines.
All these pages are acknowledged as low-quality content by search engines and produce a negative SEO impact. Here Yoast SEO redirecting users to the attachment file instead of the attachment page and helps you fix it. This option is by default set to ‘Yes’ and you don’t need to change it.
4. Taxonomies
You can configure meta and titles for tags, categories, post format archives, and custom taxonomies, on the taxonomies tab. Default template variables must work for many websites. Also, you must remember that the Yoast SEO plugin chooses the descriptions from your tags and categories.
5. Archives
Archives tab enables you to manage search appearance options for different archive pages on your website. This involves the date, author, 404 pages, and search. The default alternatives will work for many websites. However, if you manage a single author blog.
Then you require to disable the author archive pages from search engines. The author archive pages are very similar to your blog pages or date archive on a single author blog. This produces duplicate content which affects your SEO rankings.
6. Breadcrumbs
The Breadcrumbs are excellent for internal linking. Because it describes a clear path or way to the page you are on. These breadcrumbs also seem in search results that giving your website more advantage in the search. But ensure that you have click on ‘Enabled’, this will expose more breadcrumb settings.
The default settings must work for many websites, but if you require to change something then go forward. When you are done with the click on the “save changes: button. If you need more strong breadcrumb features, then take a look at the Breadcrumb NavXT plugin.
7. RSS
Well, to copy content from your website the RSS Feeds are frequently used by content scrapers. Yoast SEO enables you to add a backlink to your own website for every post in the RSS feed. So you will get backlinks with this approach from their website, and Google will understand that you are the original source.
Although there are some options to add the author link, blog link, Post link, and blog description. So be creative because this can also be applied to add advertisements to the RSS feed.
Search Console Option
Search Console segment in the Yoast SEO plugin empowers you to connect the WordPress website to Google Search Console. That is formerly known as the webmaster tool. Also, you can connect WordPress to the Search Console and enables Yoast SEO to fetch and show the search console data. Just go to the SEO » Search Console page and then click on the button named ‘Get Google Authorization Code’.
This will redirect you to the Google Search Console page, where you will be requested to give permission. After that, you require to copy and paste that Authorization Code within the plugin settings. Google Search Console gives you a lot of useful information about the search rankings.
Social Media Option
Yoast SEO is loaded with many useful features to give you complete optimization. Some feature of this plugin is that it integrates your website with Twitter, Facebook, and Google+ social platforms. Just click on the social link within the SEO menu and it will take you to set up these platforms. See below how to configure each of them.
Accounts: The first tab within the social settings is for all of your social accounts. This enables Yoast SEO to tell Google for your social profiles. You require to just add the URLs and usernames of Twitter for the main social profiles of your website.
Facebook: You have to be sure that the open graph metadata option is allowed under the Facebook tab. It permits Yoast SEO to add Facebook open graph metadata in your website’s header section. This will support Facebook to choose the right thumbnail and page information.
When your website post is shared on Facebook. Next, you need to provide a Facebook App ID if you have one. Below that, you will find the option to provide a thumbnail for your homepage with an SEO title and description.
This image and description will be used when someone shares the homepage of your website on Facebook. Also, you can give a default thumbnail image URL. This image will be applied for all articles that don’t have a thumbnail or any other image.
Twitter: As for Twitter, you can add Twitter cards to your site’s head section. You can also choose the card type to use. We recommend using a summary with a large image.
Pinterest: Pinterest uses Open Graph metadata just the same as Facebook. Ensure that you have checked the open graph meta data box under Facebook settings. After that, you just require to insert the site verification code given by Pinterest. Just visit your Pinterest account settings to add and verify your website. You will be given a meta tag that you require to enter here.
Tools Option
Yoast SEO comes with amazing built-in tools that enable you to perform a few advanced tasks. Most of the beginners may not want to use these tools. However, we will explain to you each tool and what it does.
Import and Export: If you before used another WordPress SEO theme or a plugin with built-in SEO functions. Then you can use this tool to import SEO data. You can also use it to import and export the Yoast SEO plugin’s settings and use them on a separate WordPress site.
File editor: As your WordPress website develops, you may usually come across tutorials requiring you to add a few codes to your website’s .htaccess file or robots.txt file. Both of these are configuration files that also have a large impact on your website’s SEO. Yoast SEO enables you to edit both of these files directly from the admin area of WordPress very easily.
Bulk editor: The bulk editor tool within Yoast SEO enables you to quickly add SEO title and description for all your pages and blog posts. You will see a blank field under the Titles tab to add your new SEO title for that blog post. After that just click on the Save links to save your changes.
To add descriptions, you will require to switch to the descriptions tab. Once again, you will be capable to add a description for every blog post or page and save it.
How To Properly Use Yoast WordPress SEO Plugin In Your Daily Site Life?
However, most of the things we have covered up above. But now we will give you a bit overview on the things that you use on regular basis.
In this plugin, set all options once and forget them but one thing is left that you use on regular basis i.e Yoast SEO meta box.
For each & every post you need to:
- Place a focus keyphrase: No need to get each & every single suggestion from the Yoast plugin, but usually, you should try to get a green light.
- Check SEO Title & Meta description: Despite to set up a good template, you’ll still want to edit these manually for most of the posts to make them optimized, you can do it easily.
Some other things that you have to configure for a post:
- Readability
- Social settings, in case you think a particular post can perform best on social media platforms, configure your social settings properly.
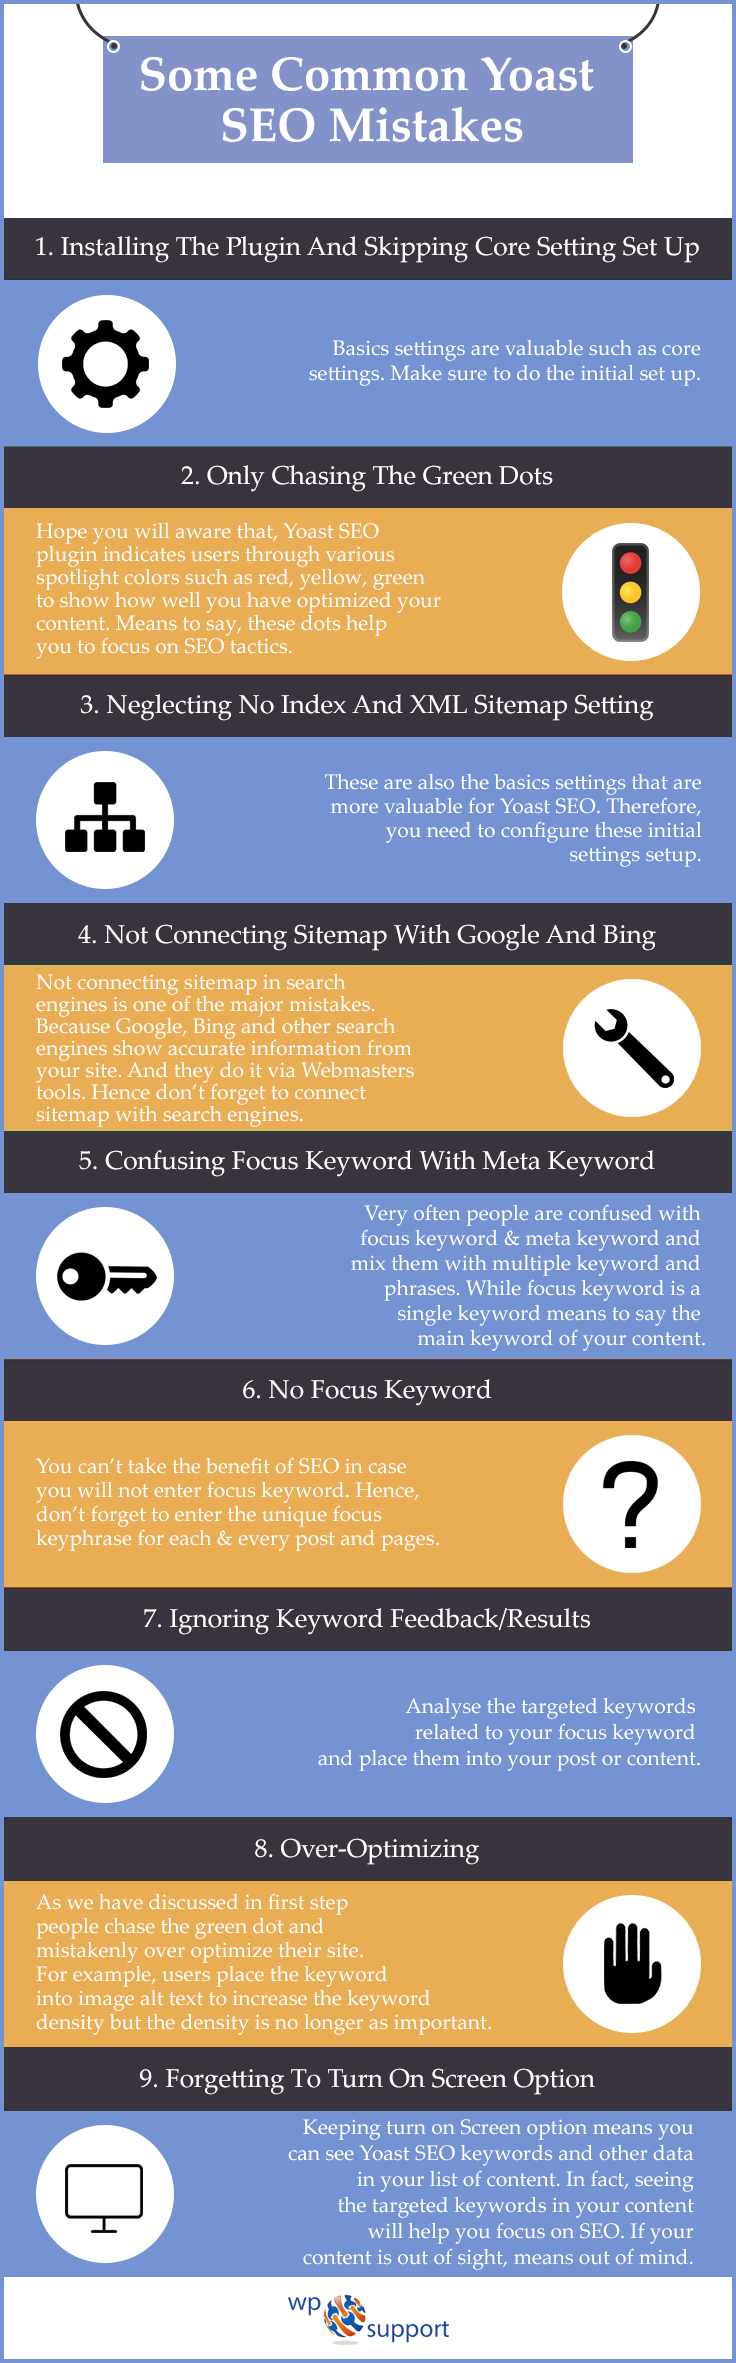
Some common Yoast SEO mistakes
As you know that, Yoast SEO is a well-built and fully-featured plugin, but there are a lot of users are not using it properly.
1. Installing the plugin and skipping core setting set up: Basics settings are valuable such as core settings. Make sure to do the initial set up.
2. Only chasing the green dots: Hope you will aware that, Yoast SEO plugin indicates users through various spotlight colors such as red, yellow, green to show how well you have optimized your content. Means to say, these dots help you to focus on SEO tactics.
3. Neglecting no index and XML sitemap setting: These are also the basics settings that are more valuable for Yoast SEO. Therefore, you need to configure these initial settings setup.
4. Not connecting sitemap with Google and Bing: Not connecting sitemap in search engines is one of the major mistakes. Because Google, Bing and other search engines show accurate information from your site. And they do it via Webmasters tools. Hence, don’t forget to connect sitemap with search engines.
5. Confusing focus keyword with meta keyword: As off, people are confused with focus & meta keyword and mix them with multiple keywords and phrases. While focus keyword is a single keyword means to say the main keyword of your content. It can be of two types: LSI: Least Symmetric Index means long-tail keyword and the second one is a short-tail keyword.
6. No focus keyword: You can’t take the benefit of SEO in case you will not enter the focus keyword. Hence, don’t forget to enter the unique focus keyphrase for each & every post and pages.
7. Ignoring keyword feedback/results: Analyse the targeted keywords related to your focus keyword and place them into your post or content.
8. Over-Optimizing: As we have discussed in first step people chase the green dot and mistakenly over optimize their site. For example, users place the keyword into image alt text to increase the keyword density but the density is no longer as important.
9. Forgetting to turn on Screen option: Keeping turn on Screen Option means you can see Yoast SEO keywords and other data in your list of content. In fact, seeing the targeted keywords in your content will help you focus on SEO. If your content is out of sight, means out of mind.
Some other Yoast SEO Plugin versions
There are also some other premium Yoast SEO versions that focus on various cases, which are as follows:
- Video SEO: WordPress SEO allow you to optimize videos for search engines in case your site uses loads of videos.
- Local SEO: You can get all the details of local business from Google via this plugin.
- WooCommerce SEO: With the help of this plugin you can set up your WooCommerce store and get all details such as reviews, price, availability, and much more to search engines.
- WooCommerce Local SEO: In WooCommerce Local SEO, merge both the WooCommerce SEO and Local SEO features to succor local stores which have an online web presence.
- News SEO: As the name suggests, if you are running a major news outlet which has numerous content, so News SEO is for you. It’s is not for blogs or press release.
That’s All!
Conclusion
By generating interesting, easy, and engaging content of high quality, using attractive titles, super categorization and tag use, Meta descriptions and other good content development habits, you will find that your blog posts will organically reach more and more people and your popularity on the cyberspace will increase.
Hope this beginner guide for Yoast WordPress SEO & structure is helpful for you. In case of any related problem, contact to our WordPress help number now to get instant help. Dial +1-888-738-0846 (Toll-Free).