So to hide unnecessary items from WordPress Admin bar, where the Admin bar is easily accessible toolbar with a few shortcuts to some central WordPress.com dashboard pages. When you have different options to click you become experimental towards it. The same can happen to your WordPress website too.
Each and every menu displayed in WordPress represents a feature which used to customize WordPress. Customizing WordPress is the best process to impress your users – These are the files which work together to construct the design in addition to functionality of WordPress site.
Each & every WordPress theme remains different and provides different designs and layout to the site owner to change the look of their WordPress site. If people are experimental toward this your site might be stuck in some troubles. This usually happens when you add other authors and editors to your website.
If you run a multi-author site then you must have allowed the user to post. At this stage, you need to clean up your WordPress admin area and hide unnecessary items from your WPAdmin bar. Here, in this post, we will explain you to Customize WordPress admin toolbar. Before we go far in the topic let’s understand what WordPress menu does.
Now, you can proceed to Customize WordPress admin toolbar by hiding the unnecessary item from WordPress admin.
Hide Unnecessary Items From WordPress Admin Through Adminimize
There are many items in your WordPress admin area which you don’t want to utilize by others. such as dashboard widget, admin bar, post edit area etc. And to hide these unnecessary items in WordPress the first name comes in mind is Adminimize.
Install Adminimize plugin

Adminimize is a WordPress plugin used to clean up WordPress menu. As plugins adds new functionality to your WordPress site or extends existing functionality on your site. The plugin modifies the administration backend and allows the user to assign access to a certain area of action. The plugin will allow you to activate and deactivate every area of menu and submenu.
Furthermore, to start with plugin first you need to install and activate the WordPress plugin. For information about plugin installation, read our blog How to Install a Plugin in WordPress?
After activation, go to the Settings > Adminimize to configure the plugin settings.
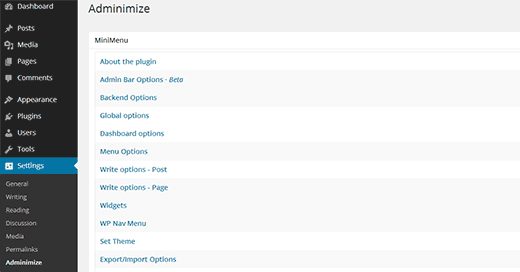
The settings page has a mini menu. It separates the settings page into the several sections for different WordPress admin screen. the default screen with widgets such as activity, quick draft, WordPress events, and news, at a glance. This screen will give you a quick overview of all the details for your WordPress website.
If you want to go to each option then click on each link in the mini menu. In each section, you will see many Unnecessary Items that you can change and deactivate. Also, you will notice that there is each option has checkboxes for all WordPress user’s roles.
When you have checked to deactivate some items then you have to click on the “Update Options >” button which is below any section to save your changes.
Although, we want to tell you that your changes will not be visible on the plugin’s Settings page. If you want to see your changes then you have to open any other admin page in a new browser tab.
Here, we will show you every item in the mini menu and also, how to change their settings.
Backend Options
In the Adminimize plugin settings screen, all the sections will not have checkboxes. The backend section has different look. This section permits you to set global options for all users in the admin area.
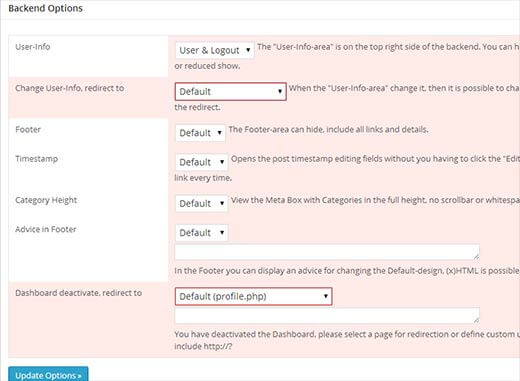
In this, the first menu is to configure the user info menu. This menu view on the top right corner of the admin screen with a user avatar. You can select to hide it, display user and log out, display the logout link only.
The next option is to select where to redirect users when they click on the user info link. If you want to change this, you have to change the user info menu to anything other which default or hide.
You have to click on the update option which is below to store your settings. Now, you can change the redirection option and set to the front page of your website.
Next option is the footer that permits you to hide the footer from all the admin. Now, the next option is the timestamp. When you are working on a post then the timestamp option is hidden behind an edit link which is next to the published information.
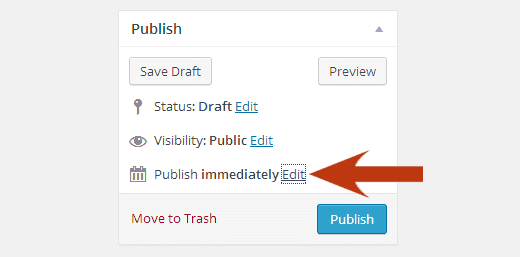
If you want to schedule a post, you have to click on the edit link to display the timestamp. In the backend options section, you can choose to activate which is next to the timestamp option to make visible.
WordPress hides some categories in the categories meta box on the post edit screen. You can change this activity by selecting activate next to the Category Height option. If you do this then the meta category meta box will adjust the height to show all the categories.
The advice in the footer option permits you to keep your own text in the footer area of all WordPress admin pages and this can be used for adding shortcuts, branding, etc;
The last option is to set a redirection for the dashboard. If you want to use this you require deactivating the dashboard.
Global Options
This option permits you to activate or deactivate settings for the specific user roles. In this, the first option is to display or hide the admin bar. The admin bar section permits you to modify the menus in the admin bar, this checkbox will switch off the admin bar for the selected user roles.
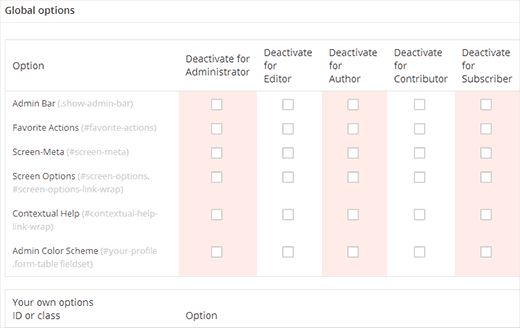
Now, the Favorites section is not available in the WordPress and the next some options are screen meta, screen options, and contextual help and this will deactivate the help and screen options section from WordPress admin page.
On your WordPress website, users can go to their profiles and change the admin color scheme. If you want to deactivate this feature then you can deactivate the admin color scheme for selected user roles. Where in admin color scheme you can use colors across different parts according to your liking. Also, you can use it to enhances the admin area and add additional features.
Now, remove WordPress dashboard widgets for users other than admin.
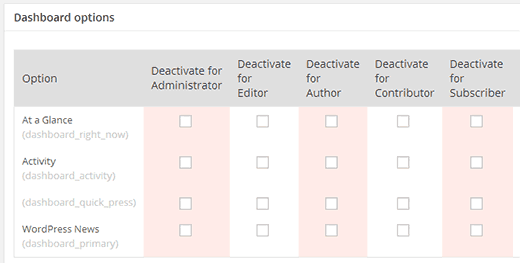
Hiding WordPress Dashboard Widgets
To do this, you have to go to the dashboard. This will permit Adminimize to load your dashboard widgets. Now, you have to go to Settings > Adminimize and click Dashboard Options link from the mini menu or go to the Dashboard options section. Now, you can hide an activity widget, QuickPress widget, WordPress News widget.
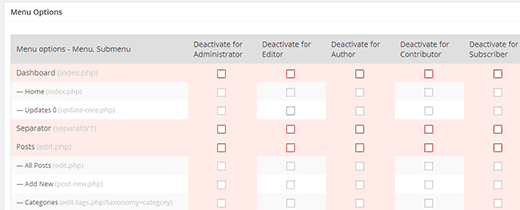
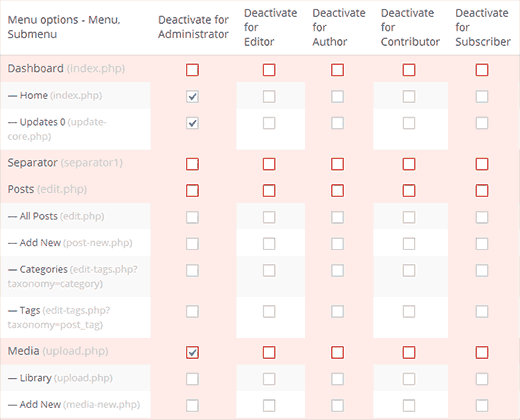
Menu Options
This option permits you to display or hide from your WordPress menu bar.
Adminimize will display you an option for every item and all its sub-menu items. Also, it will display your menus added by your WordPress plugins and themes. You can check menus and you want to deactivate fir different user roles on your WordPress website.
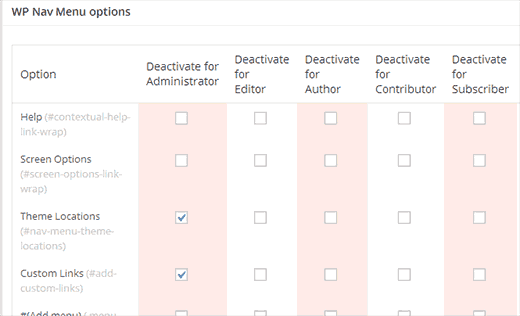
WP Nav Menu Options
This section permits you to control Appearance > Menus screen. You can display and hide categories, pages, posts, or custom link section from the menu screen.
Write Options – Post, Page, and Post Types
Also, you can change the meta boxes and write panels in the WordPress posts and pages edit area. To do this, just click on the Write Options -Post or Write Options -Page from the mini menu in Adminimize settings. You can hide almost all the Unnecessary Items which appear on the write screen.
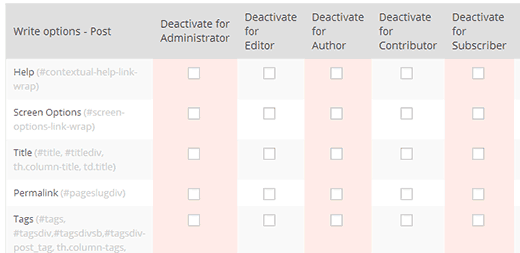
The first some options permit you to display or hide different meta boxes and sections from your post edit screen. Also, it permits you to hide items from the Quick Edit area.
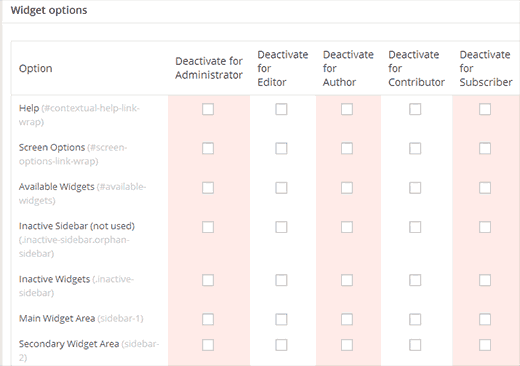
Widget Options
The next option is the Widget options. This section permits you to display or hide items from the widget screen and you can display and hide widget-ready areas and sidebars.
Also, you can hide the inactive widget section along with hiding individual widgets from the list of available widgets.
Set Theme
This option permits you to set a WordPress admin area color scheme for your users. To do this, click on the Load User Data and after that, the plugin will load all users.
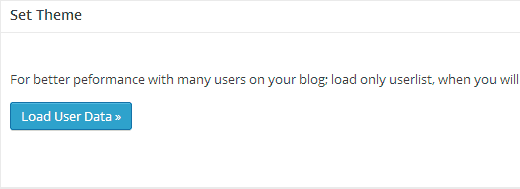
When the plugin loaded all users, then choose a user and select a theme from the theme. Although, you can choose the theme by clicking on the default theme drop-down menu.

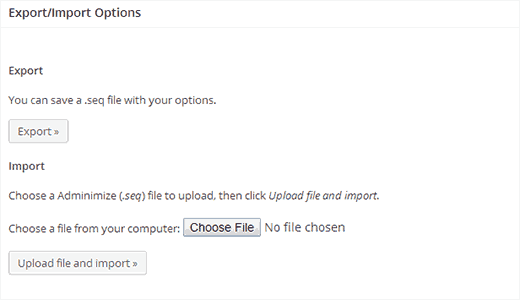
Import/Export Adminimize Settings
The Adminimize plugin permits you to import and export your plugin settings. Also, you can apply the same setting on multiple websites by using this feature.
To export, click on the export button and download the .seq file which contains the plugin settings.
To import, click on the Choose File button which is under the import, choose the .seq file which you want to import and click on the Upload file and import button.
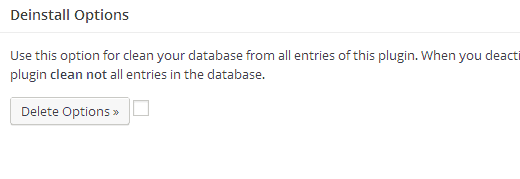
Deinstall Options
If you want to deactivate and uninstall the plugin, this option permits you to safely disable all plugin settings. If you deleting the plugin the not sure that all the options stored in your database will delete. To clean up all, check the box next to the Delete button and click on the Delete options.
Admin Bar Options
Here, the first option in the mini menu is the Admin Bar options. The Admin bar is the WordPress toolbar which you will see on the top of each screen when you are log on your WordPress website.
In the admin bar, all the items can be turned off or on for each user role.
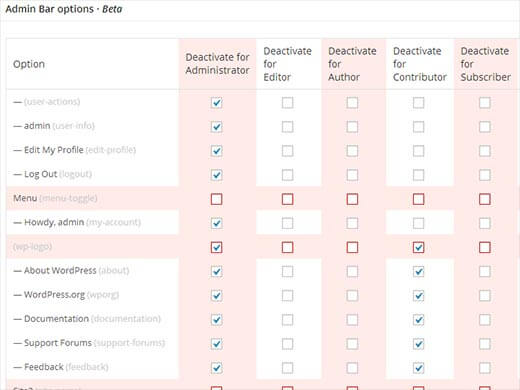
In this, the first option permits you to hide the user menu and also its subitems view on the top right corner of the admin bar. After that, every item highlighted with a pink color. Also, deactivating the main menu will hide all its sub-menus.
The admin bar displays you the website name with the drop-down menu which contains the link to visit your website’s front-end. If you are checking the website name then also, it will hide the link to visit the website’s front-end.
In the other options, you will view checkboxes to hide comments icon and +new icon. Also, you can hide the sub-items. For example, if you want to put the new menu in the admin bar and also you want to hide pages from it, then check the pages and deactivate it for the selected user roles.
There are some more plugins that specifically used to hide WordPress admin bar.
- Hide Admin Bar
- Admin Bar Disabler
- Remove Admin Bar
- Auto Hide Admin Bar
Similarly, you can remove WordPress admin bar without using any plugin. This method is best for the person who is good at coding. Let’s start!
Remove the Admin Toolbar with a code
To start first you need to access the function.php file in cPanel or by FTP client. As FTP stands for File Transfer Protocol. It is used to transfer files from one local computer to a remote website, such as a WordPress blog.it can be found in your theme folder
Paste the below-given code into the functions.php file,
| add_filter(‘show_admin_bar’, ‘__return_false’); |
After you reload your WordPress website, you should see the changes take instant effect. Now you won’t be able to see the WordPress toolbar. As the toolbar has links to various administrative functions and is displayed at the top of each Administration Screen. Many Toolbar items expand (flyout) when they are hovered over to display more information.
Another way to hide WordPress admin bar is by turning it off in settings or profile pages.
Turn off the Admin Toolbar in Settings / Profile Page
The simplest method to turn off the toolbar through the Settings Page. Log in to your dashboard site and go to your profile page (dashboard > users > select your profile). Just un-tick the box labeled Show Toolbar when viewing a site in the Toolbar section.
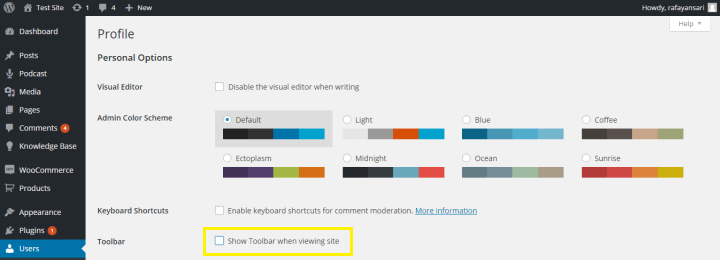
Once you’re done click the Update Profile button. Now you’ve successfully disabled the toolbar off of the front-end of your site however it will still be visible from the back-end of your site.
Removing or hiding the toolbar from your site’s backend could lead to various unwanted problems. Logging out from your admin panel wouldn’t be as simpler as hovering over your username and clicking Log Out.
Conclusion
That’s all. Now you can manage WordPress admin toolbar and hide unnecessary items using any of the methods. We hope you like the article. If you liked this post & share it with your peers.
If you have any problem, please tell us in the comment section. We are happy to help you.
You can contact our WordPress support team Dial +1-888-738-0846 (Toll-Free). Our WordPress customer service will always help you. We will happy to help you and solve your problem related to WordPress.
That’s all, thanks!
Read more blogs: