Do you want to create a client Dashboard in WordPress? A custom dashboard in WordPress can support your clients with resources and shortcuts they required to get started.
In this article, we will demonstrate you how to create a client dashboard in WordPress.
Reasons for Creating a Client Dashboard in WordPress?
By the creation of a custom dashboard for clients, you can give them with an angular WordPress interface and improved service.
It will enhance client satisfaction which leads to more repeat work. Your clients will require minimum support which will also save you time.
1. Hide Unnecessary Admin Menus
While creating a website for your clients, you may use various WordPress plugins, custom post types and some other tools. Most of these tools will add their own menu items in the WordPress admin bar, create custom widgets in the admin dashboard, and add links to the toolbar.
The final result looks a bit confused. For a client who has never used WordPress these further items make the dashboard look more difficult than it needs to. Let’s start establishing a client dashboard by cleaning up the confusion.
- Firstly you need to install and activate the Adminimize plugin.
- After the activation, just visit Settings » Adminimize page to configure the plugin.
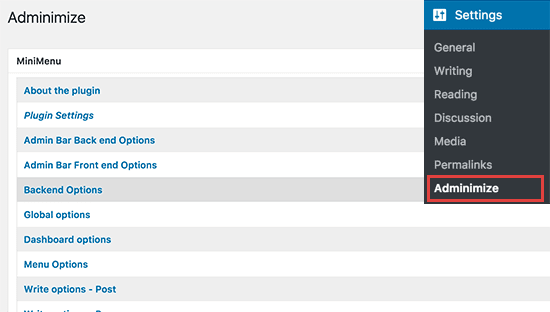
- You will see various admin sections listed on the settings page. Clicking on a section will enlarge it, and you will see the options for that precise section.
- You can show or hide any item listed under a section for various user roles. Thoroughly review each item before hiding it as this may influence your client’s capacity to use their website.
2. White Label WordPress Dashboard
The Adminimize plugin does not have options to hide the WordPress branding and white labeling the admin area.
White labeling includes substitution of the WordPress logo with a custom logo, show or hide items from menus, and more.
- First of all, install and activate the White Label CMS plugin. After the activation, go to Settings » White Label CMS page to configure plugin settings.
- The settings page is divided into various sections. You can click on a section to enlarge and view its settings.
- Many of the options in the plugin are also present in Adminimize. If you have before hidden those options, then you can skip them.
3. Change The WordPress Dashboard Appearance
WordPress comes with a few of admin color schemes that users can change from their profiles. You can fix a color scheme as default for new users. You can also create a custom color scheme with your own.
4. Add Helpful Resources to Client Dashboard
When distributing projects to your clients, you will see that many of them have same questions. Adding a help or resource section in WordPress client dashboard can benefit you answer those questions and save time used on providing support.
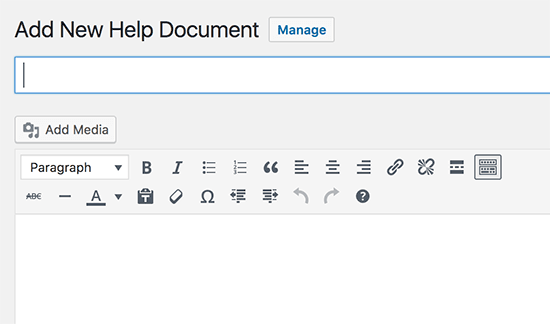
- The simplest way to add a help section is by installing and activating the WP Help plugin.
- After the activation, the plugin adds a new ‘Publishing Help’ menu item in your WordPress admin bar. By Clicking on it will take you to the settings page.
- This area will be empty because you haven’t created any help resources yet. Go forward and click on the ‘Add New’ button to create one.
- You can create your help document like you would create a WordPress post or page on the next page.
WP Help uses custom post type for documents. They are hierarchical like pages and you can create parent or child documents to regulate them.
5. Creating Custom Dashboard Widgets
When the user logs into the WordPress admin area Dashboard widgets is the foremost things user see. This is the best place to mark your clients in the suitable direction by adding your own custom dashboard widgets.
Here is a very easy dashboard widget code that you can use as a origin point. Just add the below given code into your theme’s functions.php file or in a site-specific plugin.
| add_action(‘wp_dashboard_setup’, ‘my_custom_dashboard_widgets’);
function my_custom_dashboard_widgets() { global $wp_meta_boxes; wp_add_dashboard_widget(‘custom_help_widget’, ‘Theme Support’, ‘custom_dashboard_help’); } function custom_dashboard_help() { // Content you want to show inside the widget echo ‘<p>Welcome to Custom Blog Theme! Need help? Contact the developer <a href=”mailto:[email protected]”>here</a>. For WordPress Tutorials visit: <a href=”http://www.wpbeginner.com” target=”_blank”>WPBeginner</a></p>’; } |
Transform the content part with your own message. You can select plain HTML for formatting and styling.
We hope that the steps helped you to Create a Client Dashboard in WordPress. You can also take help from our WordPress technical support team. To get instant support service, Dial: +1-888-738-0846.