In this blog, we will show you how to add Inline Content Ads to WordPress Website. Most of the Beginner bloggers and online marketers make the mistake of placing ads in headers and sidebars. However, these locations can yield some good results. As, sidebar is a theme feature, which is basically a vertical column provided by a theme for displaying information other than the main content of the web page.
Here, theme is a group of stylesheets and templates that are used to describe the appearance and display of a WordPress site. A WordPress theme changes the layout & design of your site. Templates are those files which control how your WordPress site will be displayed on the Web.
Advertising platforms commonly suggested learning how to add inline content ads to WordPress. An inline advertisement is displayed in your page content or post. Maybe right below the first or second paragraph or spread throughout a blog post to enhance conversions.
Inline ads can be seen as distracting to users so that’s why it’s necessary to use them gently. Somewhere toward the top and bottom of your post or page to make sure that you’re getting enough clicks. As, the articles posted by the admin of a WordPress site are called posts and pages are like posts. Pages can be managed in a hierarchical structure in WordPress.
Adding inline content ads to WordPress?
This sounds like a difficult task since going to Google AdSense and copying the code manually into every individual post is going to take forever. You might be able to get away with this for a newer smaller blog but ultimately you require a way to place an ad inside every post in a particular location without having to copy and paste the code manually.
Fortunately, several plugins let this functionality most of which cut out the majority of coding that you would have to complete otherwise. There’s still a bit of code copying, from places like AdSense but it’s not more than a five-minute task.
So for this blog, we’re going to make the demonstration using the Google AdSense network. This is mainly because it’s one of the most popular ways to get dynamic ads on your Website and it’s known for delivering appropriate ads.
So we are going to illustrate briefly some of the Steps:-
- Create an AdSense Account
- Install and Activate the Ad Inserter Plugin
- Setting an Advertisement to display below the First Paragraph on Every Blog Post
- Copy AdSense Code into the Head Area of Your Website
- Test the Code on the Frontend of Your Site
1. Create an AdSense Account

First of all, go to the AdSense site. Create an account or login with one of your previously created Google accounts. The process results in getting your account activated and verified. While also creating individual ad units or going to the Auto Ads section for the most effective method.
After creating your automatic advertisements it provides the code required for dynamic ads based on what your users have searched for in the past.
2. Install and Activate the Plugin (Ad Inserter)
One of the most feature filled and simple to use WordPress Plugin is called Ad Inserter. Install the Ad Inserter plugin and activate it. If you are facing any sort of difficult while installing it then move ahead to our article on how to install a Plugin in WordPress. Many of the default settings are fine right out of the box but you will have to go in and determine how and where you would like the ads to display.
3. Setting an Advertisement to display below the First Paragraph on Every Blog Post
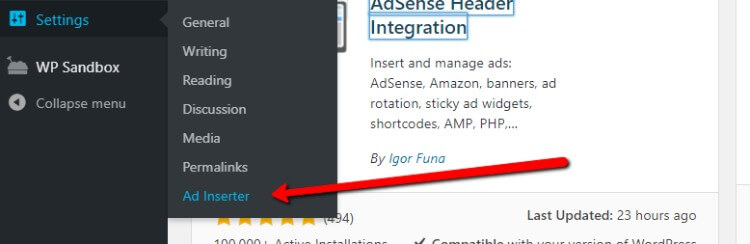
For finding the Ad Inserter plugin settings go to the WordPress dashboard menu and click on Settings > Ad Inserter.
This module looks a bit confusing at first but it’s literally simple once you get the hang of it. You will also learn that it’s by far the best plugin in terms of flexibility or your ad placements.
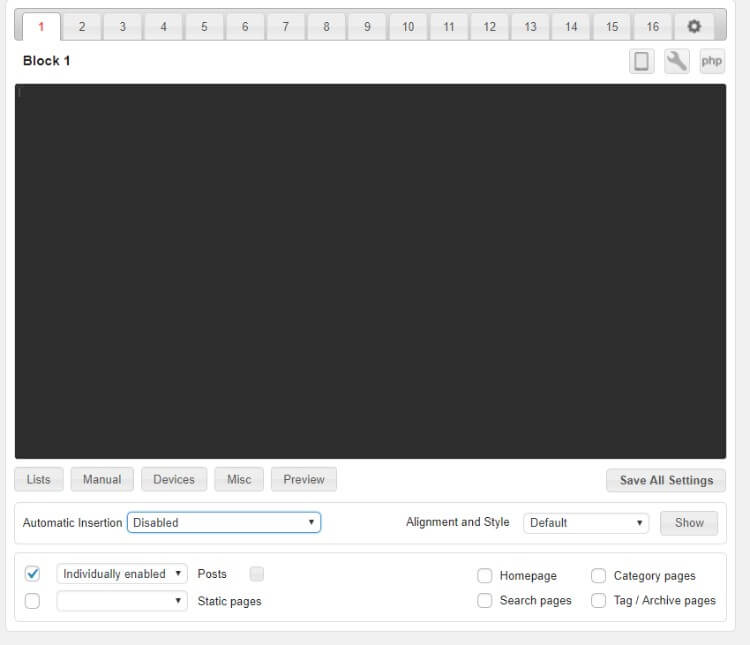
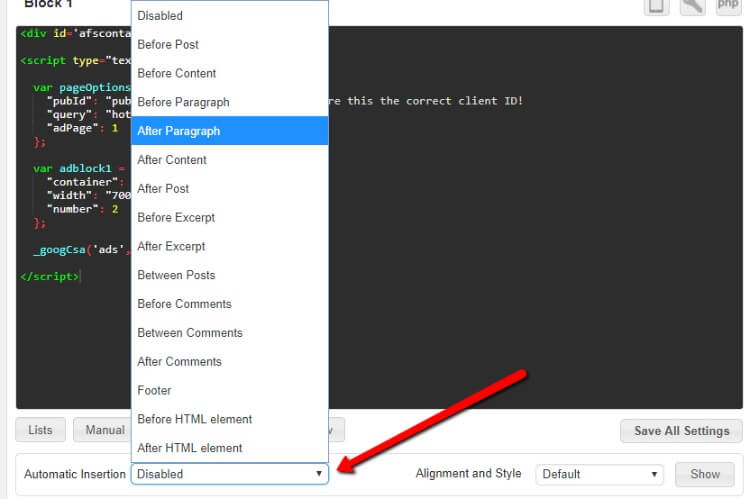
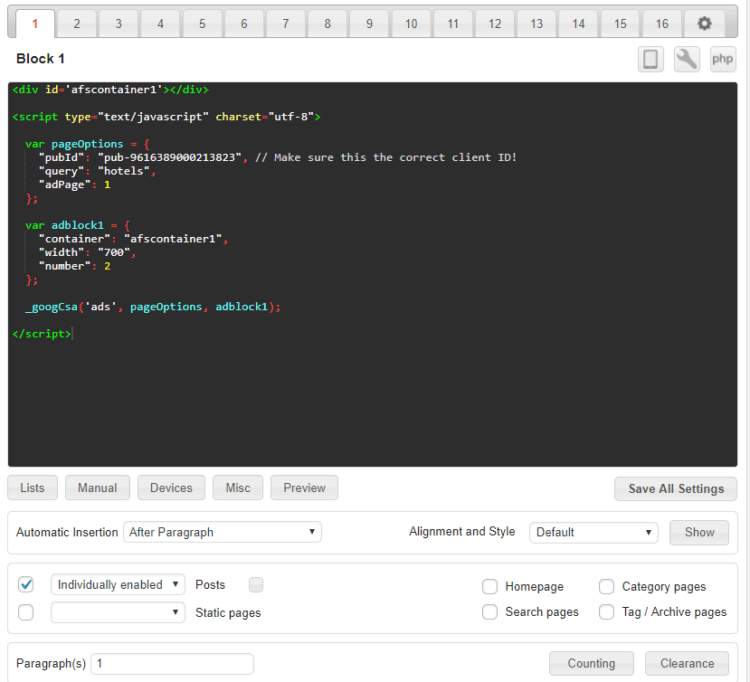
The numbers at the top of the module represent various blocks you can create to add inline content ads to WordPress. However, if I had one ad showing up after the first paragraph of a post and another ad showing up right before the last paragraph those would be two separate ad blocks. We’ll only make one for this example.
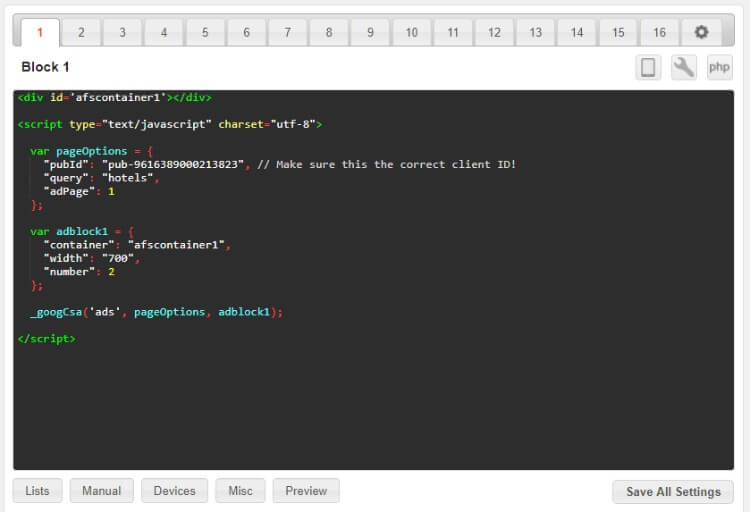
Just take the Auto Ad code or the Ad Unit code from your Google AdSense page and copy it to your clipboard. This would generally be the code that you manually paste into the body of your page but with the Ad Inserter plugin. You only require to do it once – in Ad Block 1 or whichever you would like to use.
Overview:
The Automatic Insertion area is set to disable by default, but you want to adjust that to place the advertisement after a certain paragraph, between comments or wherever you find it applicable. We’re selecting the After Paragraph option.
Once you select the After Paragraph field you have the option to type in how many paragraphs. So, if I’d like this specific advertisement to show after the first paragraph, I’d type in the number 1.
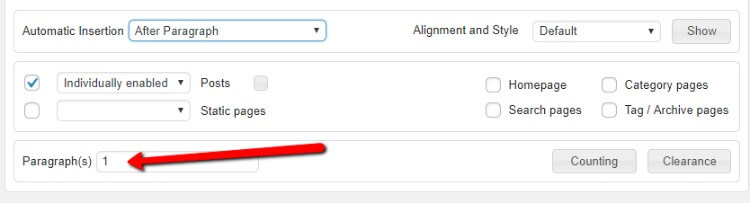
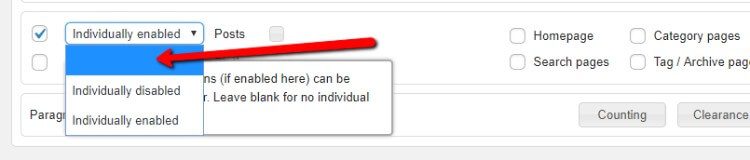
If you’d like to individually enable or disable ads on each post you have that feature in the dropdown below. But most people will want the ads to automatically show on every single post, In that case, choose the blank option for removing any post exceptions.
You can get actually specific with the placement when you add inline content ads to WordPress with this plugin. There are tools for the style, alignment and post exceptions. Feel free to play around with this to meet your own requirements.
Here are my final settings for revealing a Google AdSense advertisement below every first paragraph in my WordPress posts
Just ensure you click on the Save All Settings button before moving away from the page.
4. Copy AdSense Code into the Head Area of Your Website
You have to copy Adsense Code into the Head Areas of your site. There’s also a piece of AdSense code that has to be placed in the <Head> area of your website and this area is found in the header.php file. Just search for the <head> tag and place the code in right below that. Even if you already have some other bits of code below the tag this pushes everything else down and shouldn’t affect the functionality of your site.
5. Test the Code on the Frontend of Your Site
I would assume you already have some blog posts published on your website but if not go ahead and make a test post. After that ensure that there are enough paragraphs in the article for the advertisement to be displayed. We require two paragraphs since the plugin recognizes that first click of the Enter key as the end of the first paragraph.
As, plugin is defined as a type of software that contains a group of functions that can be added to a WordPress website. They are used to provide additional functionality to your application.
The backend of your post won’t display any of the ads we implemented as you can see. But you can then click on the Preview or Publish button to see how they show up on the frontend. The frontend display requires a small formatting to make them more visible and attractive but that can all be done through the Ad Inserter Settings page.
There’s also a module in every post that gives you some manual power over inline ads. Therefore if you have added some exceptions to the Ad Inserter plugin you might have a checkbox for removing or include an ad in this particular post.
That’s all on our behalf and we hope that this article helped you for adding Inline Content Ads to WordPress Website.
If you’re looking for someone who can help you with WordPress Website design then you can dial our Toll-Free number +1-888-738-0846 now. We will be pleased to help you.