
Are you facing problem to Add Instant Search in WordPress with Algolia? If yes, then keep reading this guide and solve your own problem.
The default WordPress search feature is very limited. Hence, a lot of pro bloggers change it with third-party tools and plugins. As, plugin is defined as a type of software that contains a group of functions that can be added to a WordPress website. They are used to provide additional functionality to your application.
Here, in this today’s post, we are going to show you how to add instant search in WordPress with algolia.
Why Add an Instant Search Feature in WordPress?
Default WordPress search is plain and often not relevant. Because of this a lot of WordPress users change it with third-party search tools such as Google Search, or WordPress plugin like SearchWP.
However, a search feature on your site can greatly improve the user experience. This helps users find content, that increases your pageview and the users spend time on your website.
Instant Search feature helps users to find as well as they start typing. It helps users get their desired content very fast. Think of it as MacOS’s spotlight feature your WordPress website.
What is Algolia?
Algolia is a cloud-based search platform allows you to create a beautiful search experience for your sites and apps. Once activated, it will index all the content on your site and will replace the default WordPress search with the more powerful cloud-based search.
Although, it always comes with a built-in instant search feature. Means your users can receive the content faster without seeing any search results page.
However, Algolia provides a free plan with 100,000 queries and 10,000 records per month. Their premium plans start from $49 per month and come with a free 14 days trial.
Let’s take a look at how to add instant search in WordPress with algolia.
Read Also: Adding Post Type Archive in WordPress Navigation Menus
Adding Instant Search in WordPress with Algolia
- The first thing you have to visit Algolia website and then sign up for an account.

- After that, you have to install the Search by Algolia plugin and then activate it. For more details, read our step by step guide on how to install a WordPress plugin.
- After activation, the plugin will add a new menu item labeled Algolia on your WordPress menu. By clicking on it will take you to the settings page of the plugin.

- You will be asked to provide the API key and application ID. You can get this information from your algolia account dashboard.
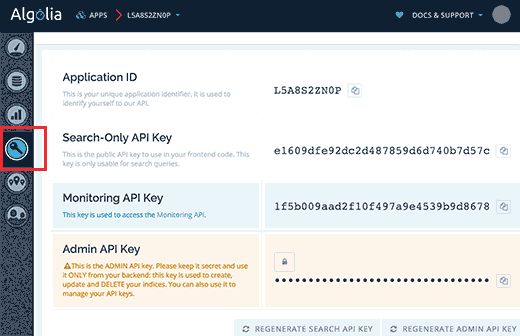
- Copy and paste the required key into the plugin’s settings page. And after that click the Save Changes button to save your settings.
- After this, you will be asked to index your content. Indexing permits Algolia to crawl and make an index of your content. So that it can be searched quickly without slowing your website.
- You can start indexing by visiting the Algolia>>Indexing page and choose the content types that you want to index. Also, don’t forget to click the Save Changes button.
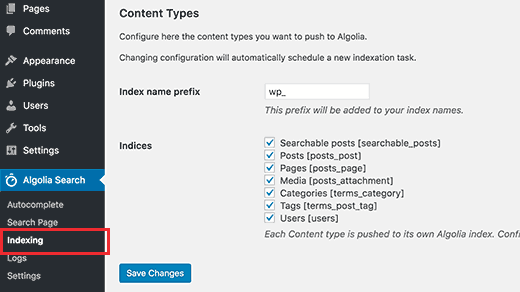
- Now, Algolia will start indexing your content. It can take a while that depends on your site how much content you have.
- After this, you require enabling the autocomplete feature. Go to Algolia>>autocomplete and check the box that is next to the ‘Enable Autocomplete’ option.
- Next, you have to scroll down and choose the content types to include in your autocomplete results.
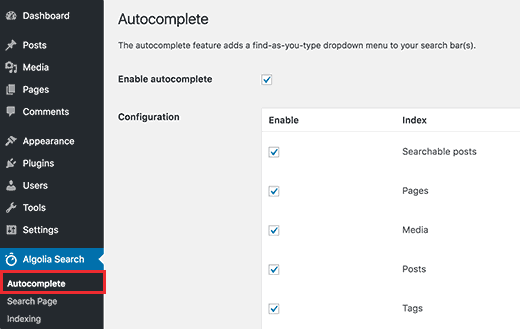
- Remember that don’t forget to press the save changes button to store your setting.
- Finally, you require changing the default WordPress search with Algolia instant Search.
- You can do this by going to the Algolia>>Search page and choose the ‘Use Algolia in Backend‘ option.
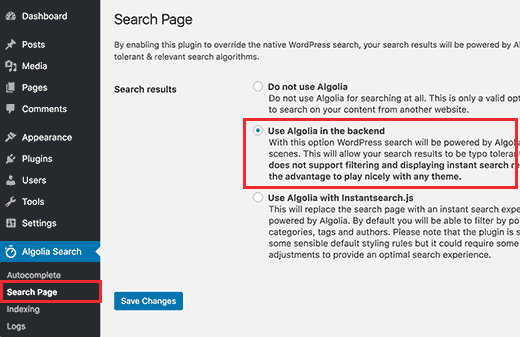
- By selecting Algolia in the backend, your WordPress search has been replaced with Algolia Search.
- Now, press the save changes button to save your settings.
Adding Instant Search Box in WordPress
- Now that you have successfully setup Algolia, then go ahead and add an instant search box to your WordPress site.
- Algolia replaces automatically the default WordPress search form with an Algolia supported search.
- If you have already added search forms to your site, it will automatically start showing results using algolia.
- In case you have not added a search form, then visit the Appearance>>Widgets page. Drag and drop the search widget on your sidebar.
- As, sidebar is a theme feature, which is basically a vertical column provided by a theme for displaying information other than the main content of the web page.
- Also, theme is a group of stylesheets and templates that are used to describe the appearance and display of a WordPress site. A WordPress theme changes the layout & design of your site.
- Templates are those files which control how your WordPress site will be displayed on the Web. These files draw information from your WordPress MySQL database and generate the HTML code which is then sent to the web browser.
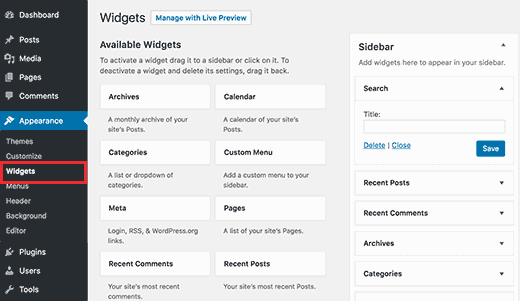
- Keep in mind that, press the save button to save your widget settings.
That’s all!
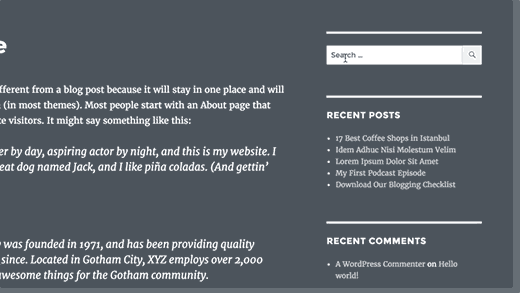
Now you can visit your website to see the instant search in action. Start by typing in the search box. And algolia will start showing results while you typing.
CONCLUSION
Here, we have discussed how to add instant search in WordPress with algolia?
We hope this post helped you to add instant search in WordPress. If you have any problem with adding instant search, let me know in the comment section below.
If you liked this article, please share it with your friends.
You can contact to our WordPress Support team if you need any help related to WordPress, dial +1-888-738-0846 (Toll-Free). We will be pleased to help and support you in case of any issues related to WordPress.