Speed is now a landing page factor for Google Search and Ads. Leverage browser caching is a technology that not only results in significantly faster load times but also decreases the load on your server.
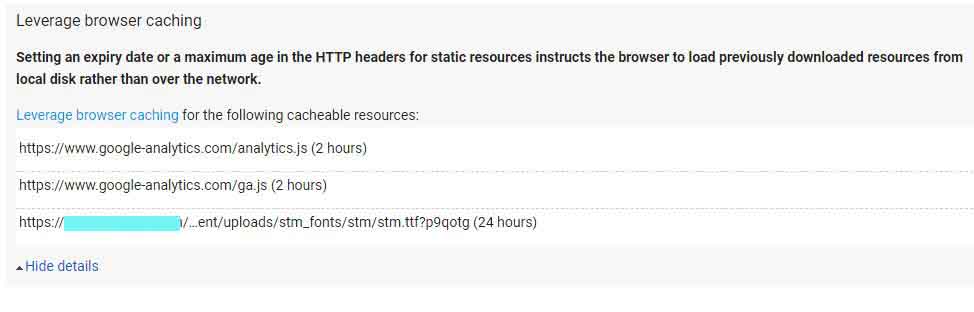
While using speed test tool such GTmetrix, Google PageSpeedInsights etc, it often shows an error “Setting an expiry date or a maximum age in the HTTP headers for static resources instructs the browser to load previously downloaded resources from local disk rather than over the network” or any other error showing to fix leverage browser caching for the following cacheable resources.
Let’s see! How can we resolve this error?
When it comes to speed optimization in WordPress, Leverage Browser Caching plays an important role. In this fast digital world, no one wants to wait for long while opening a web page.
However, Leverage browser caching guarantees a high ratio of success. Leverage browser caching in WordPress makes your work easier by making your site load faster. Want to know how to implement it with or without plugins? Keep reading this blog.
Plugin is defined as a type of software that contains a group of functions that can be added to a WordPress website. They are used to provide additional functionality to your application.
Also, you can test your WordPress website loading time on various online tools like Google PageSpeed Insights, Pingdom, GTmetrix, etc. They provide accurate results and help you to understand whether your website needs improvement or not. It will definitely help you to increase your website loading speed in any web browser.
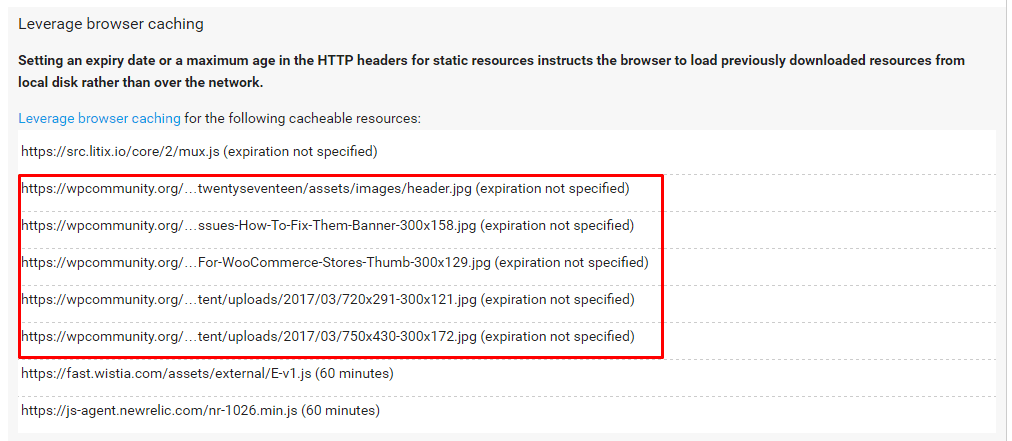
During the testing of the site’s execution, you may have got a warning like below.
Today, we will provide you with the step by step guide on how you can resolve this issue. Firstly you must know about leverage browser caching.
What is a Leverage Browser Caching and How does it work?
Leverage browser caching means storing static files of a website in visitor’s browser. In certain caching times and retrieving them from the browser quickly. It is used to speed up each page of a website.
Consequently, when someone comes to your website, so the browser sends the request to load assets such as CSS, HTML, Image, scripts, etc. from the browser. The web host then responds to the browser’s request.
Here, CSS stands for Cascading Style Sheet. These are the documents which contain the styling rules that can be applied to HTML or XML, (along with some structural formats).
Based on the size of the asset requested and server process time, It may take some time to respond. This is the result of increased load on the server and slows down the website.
Here, the browser cache works best, it stores static content on the local machine of users, When the user visited a website the first time. Browser cache files are the files stick in the browser’s data. This file stores a user’s interaction with a particular website. While you are accessing your WordPress admin the browser loads the last interaction of your site.
Thus, if the website is not properly configured with browser cache and you are testing the speed of site using any online speed testing tools. It will show a warning message to leverage browser caching.
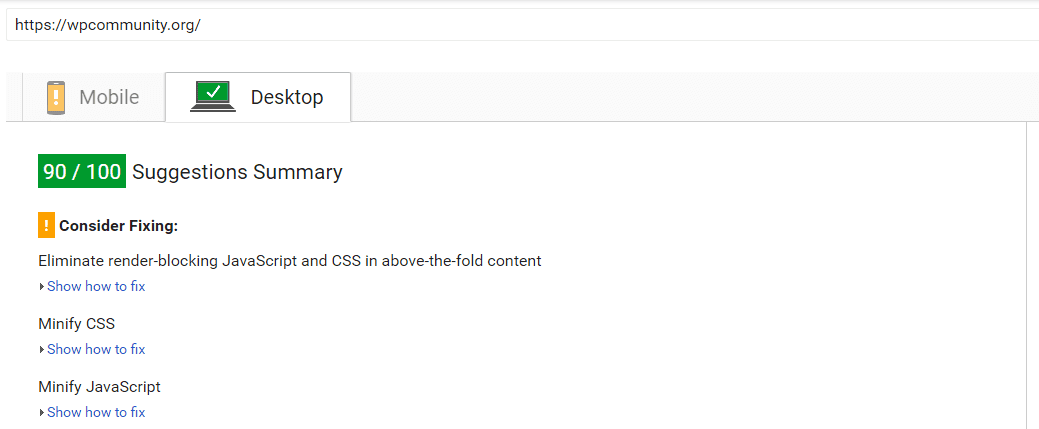
Let’s take a look at an example. We tested our site using “Think with Google” and here is the result.
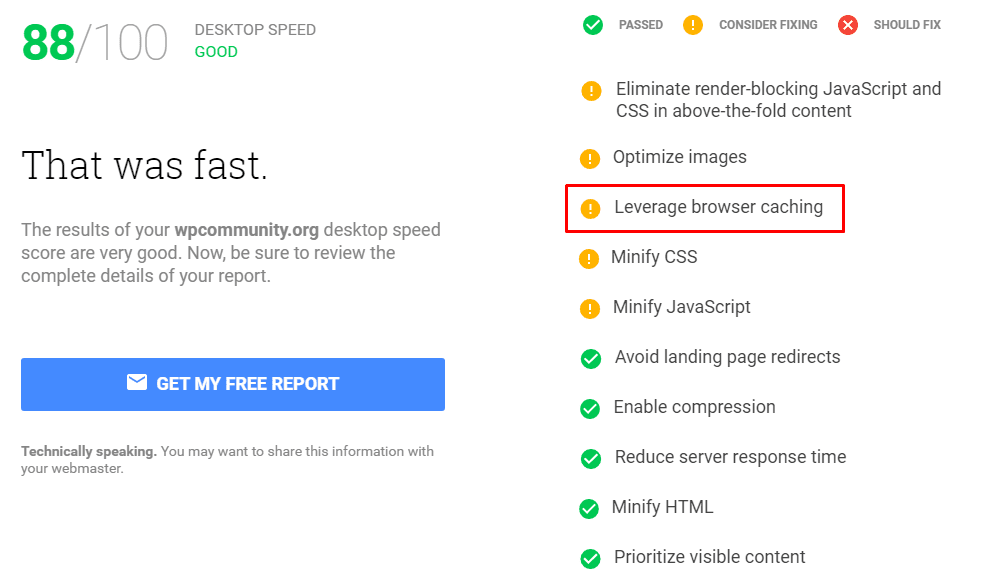
Let’s also test it with Google PageSpeed Insights.
Ok, you can see that the overall performance of this website is quite good. But, there is room to improve it. It is showing that the internal URL can be cached.
Now time arrives to know:
How to Fix Leverage Browser Caching in WordPress
To fix the “Leverage Browser Caching” warning, you have to follow the following two-step:
- Change request headers to use cache
- Optimize caching policy
1. Change Request Headers to Use Cache
Although, one way to improve the speed and reaction of your website is to change the request header to use the cache. As you can see, we are going to add some lines of code to our .htaccess file. As, The .htaccess (hypertext Access file) is the configuration file of a website.
This configuring file used to run Apache is a software which receives your request for accessing a web page software. Any alteration in this file can cause an error. Web server is a software which receives your request for accessing a web page.
Note: .htaccess is a website’s control panel. If not properly configured, then it can break the whole site when you are on it!
Thus, to leverage browser caching in WordPress:
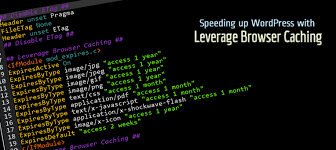
Access your WordPress installation’s main directory, after that search the .htaccess file and open it with any code editor. And simply paste the coding lines on the top of the WordPress .htaccess file shown below.
| <IfModule mod_expires.c> ExpiresActive On ExpiresByType image/jpg “access 1 year” ExpiresByType image/jpeg “access 1 year” ExpiresByType image/gif “access 1 year” ExpiresByType image/png “access 1 year” ExpiresByType text/CSS “access 1 month” ExpiresByType text/html “access 1 month” ExpiresByType application/pdf “access 1 month” ExpiresByType text/X-javascript “access 1 month” ExpiresByType text/X-shockWave-flash “access 1 month” ExpiresByType image/X-icon “access 1 year” ExpiresDefault “access 1 month” </IfModule> ##EXPIRES CACHING## |
Furthermore, By using the above code you can edit caching timing for different files.
2. Optimize Caching Policy
This is the second step to speed up response time on your website is to optimize Caching Policy. The above code shows file types and their expiries. It’s fully up to you how much time you want to store specific static content in the user’s browser cache.
However, if your static content like images is long-term. We would suggest you set them for a year. It is suggested that you set the expiry date for one month.
Cache-Controls
It is the other alternative method that can help you out with cache-controls for setting the caching expiry. If both above methods fail to work for your server, you can use this or you can hire a WordPress developer.
You have to copy and paste the below coding lines on the top of your .htaccess file.
| # 1 Month for most static assets <filesMatch “.(CSS| jpg|jpeg|png|gif|js|ico)$”> Header Set Cache-Control “max-age=592000,public” </filesMatch> |
However, like the previous step, the above code describes the expiry and caching policy of various file types.
After setting the .htaccess file properly. We are going to check it now. So, let’s test!
And leverage browser cache warnings have been fixed.
Still, Seeing the Leverage Browser Cache Warning?
Thus, after setting everything properly, you are suggesting Google leverage the browser cache, like the image below.
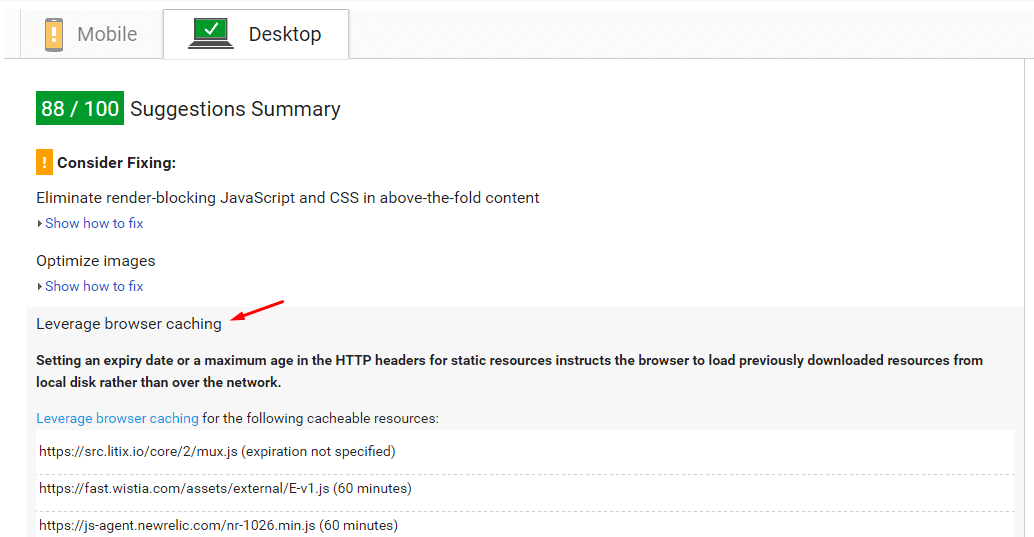
As you can see, the above files are third-party integration, they are not present on our servers. Apart from deleting them, we can not do anything with them. All third party integrations may cause this warning in speed testing tools.
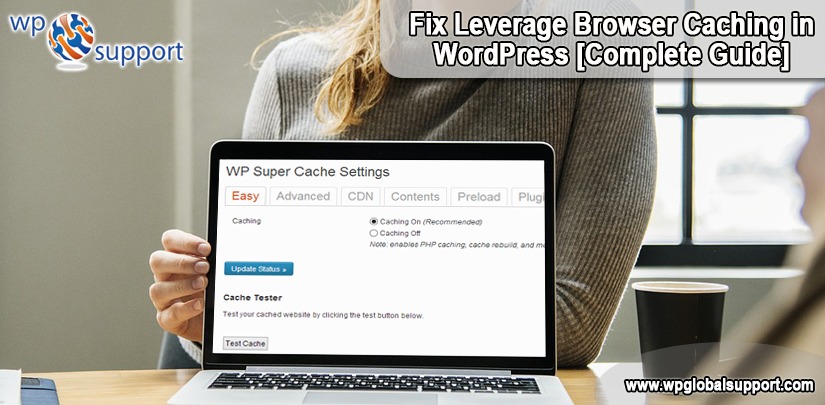
Leverage Browser Caching with W3 Total Cache WordPress Plugin
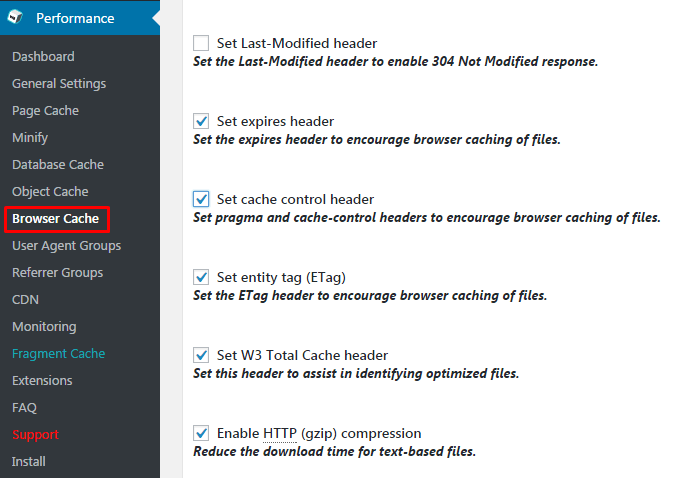
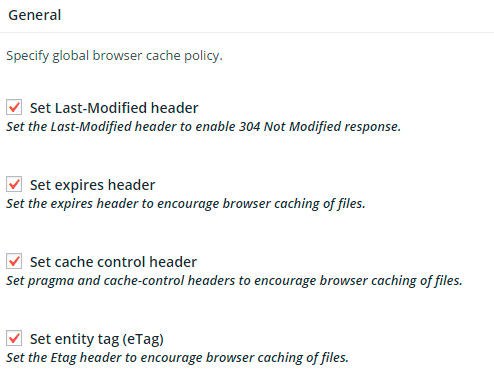
The above method is the manual way to remove leverage browser cache warning. However, If you are using a W3 Total Cache caching plugin, you have to enable Browser cache by navigating to Performance-> General settings.

After that, navigate to the Browser Cache and mark below the five check boxes.
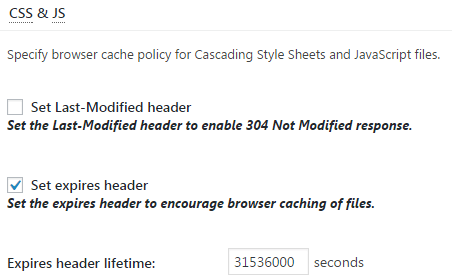
Scroll down a bit to set the expiry time for CSS files and JSS files. Here, the default value is 31536000, which is equal to 365 days. You can change it to your required time limit.
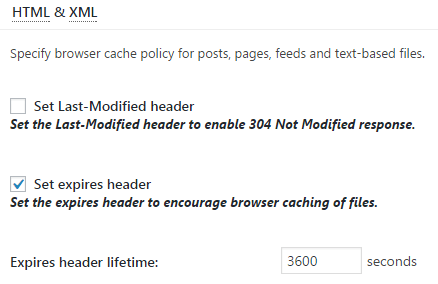
Afterward, scroll down a little bit to set an end time for HTML and XML.
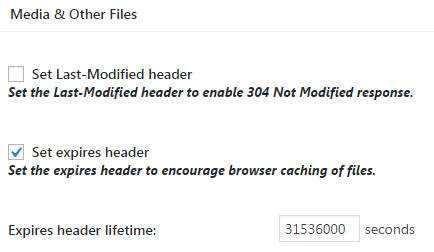
To change the default value for media and other files, scroll down a bit and set the expiry. Moreover, The default value is 31536000, which is equal to 365 days.
Now, we are going to explain some Leverage Browser Caching WordPress plugins:
Top WordPress Plugin for Leverage Browser Caching
Here are the three most popular and well-founded WordPress plugins to Leverage Browser Caching. Also, it is recommended rather than using a WP Plugins use code in .htaccess file.
- WP Fastest Cache – WordPress plugin
- Browser Caching with .htaccess – WordPress plugin
- W3 Total Cache – WordPress plugin
- Leverage Browser Caching – WordPress plugin
1: WP Fastest Cache – WordPress plugin
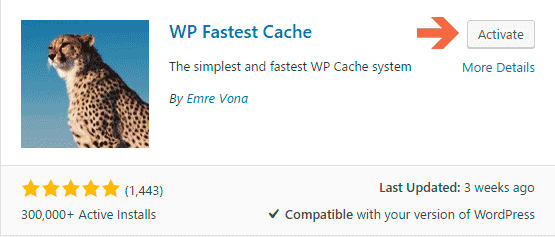
It is one of the most popular Leverage Browser Caching WordPress Plugin. This WordPress plugin is available on the WordPress repository for free.

- Firstly download WP Fastest Cache WordPress Plugin.
- Then, go to the WP Fastest Cache plugin settings and click on the Browser Caching check box.
- Next, click on the submit button.
- Now, you will see the message options have been saved.
Now, the plugin has successfully enabled this plugin.
Features
- Enabling Gzip Compression and minifying CSS and HTML.
- Also, it can generate static HTML files of a dynamic WordPress site.
2: Browser Caching with .htaccess – WordPress plugin
Browser Caching with .htaccess is another plugin. It is especially relevant for the beginners. This is a Five Star Rating plugin. And it is available for free on WordPress Repository. It is the most lightest Leverage Browser Caching WordPress Plugin.
- First of all, Install and Activate the plugin.
- Next, go to Tools and select Browser Caching for plugin setting page,
- Then click on the Activate Browser Caching button.
- Finally, a message of successful browser caching will appear.
3: W3 Total Cache – WordPress plugin
Besides, you can also use W3 Total Cache Plugin to Leverage Browser Caching in WordPress.
- Go to the General Settings of W3 Total Cache Plugin and Enable the Browser Cache.
- After that, save all the settings.
- Then, navigate to the Browser Cache Settings Tab which is available on top of the page.
- Next, specify the Cache Header in General Settings on the page, set the Expires Headers and Set entity tag (eTag).
- Now, check all the boxes.
- And then save all the settings.
4. Leverage Browser Caching – WordPress plugin
With a rating of 4 stars, Leverage Browser Caching plugin has 20,000 active installations. The plugin combinedly works for Browser caching issues and improves the page speed score in website testing score.
Benefits of Leverage Browser Caching
- The most important benefit is it speedups a website because static files served from the browser.
- It saves the data and bandwidth of website server and reduces the load on the web server.
- It decreases HTTP requests.
As, web server is a software which receives your request for accessing a web page. It runs only a couple of security checks on your HTTP request and takes you to the web page.
CONCLUSION
Leverage Browser Caching helps in improving and maintaining the web performance testing score. These settings are only for building basic guidelines and understanding among WordPress users. Other than this, there are a number of techniques that can help individuals to achieve a faster website within no time.
We hope this blog helped you! Still, if you have any problem related to this, don’t forget to use the comment box provided below!
Talk to our WordPress Technical Support Team and you will get the best solution for all your queries by our WordPress Experts, dial +1-888-738-0846 (Toll-Free).
Read More: