WooCommerce is a widely used e-Commerce solution. It is versatile & easy to handle. Custom WooCommerce theme lets you create an e-commerce business (store), manage inventory, accept payments, and much more. It comes with almost all the functionalities that you require to open an online store.
However, it nearly powers about 30% of all the online businesses on the internet with over 32 million downloads. This plugin is one of the most comfortable to customize an e-commerce platform. WooCommerce is an e-commerce platform. It permits you to exercise some growth and expansion in terms of how you arrange your store, product, and customers.
WooCommerce themes are responsible for the portrayal of your website. It’s a bunch of files that combine and produce a graphical interface that designs a website. The interesting part is that you are allowed to create a WooCommerce Custom theme using different methods. Let’s have a look at the method used to customize the themes. Where there is a group of stylesheets and templates that are used to describe the appearance and display of a site.
In this article, we’ll guide you through the process of creating an amazing custom WooCommerce theme in WordPress.
Method of Creating Custom WooCommerce Theme
Our WordPress experts are aware of so many methods to create custom WordPress themes. As there are a lot of themes available in the WordPress.org theme directory. Each & every theme comes with various features, designs, and layouts. The user can choose one that suits their requirements. But for the user’s sake, we will discuss a few basic methods.
- Using WooCommerce Content
- Using WooCommerce Hooks
- Using Template Toaster
The first method is the WooCommerce Content Method you will find the WooCommerce template file from the WooCommerce plugin files. Where Plugins add new functionality to your WordPress site or extend existing functionality on your site.
You can use these templates if you are customizing a particular WooCommerce page in WordPress.
1. WooCommerce Content Method
In this WooCommerce Content method, you are creating a custom WooCommerce theme using a new WooCommerce PHP page in your theme file.
Note: This method uses all the WooCommerce default taxonomy and post type.
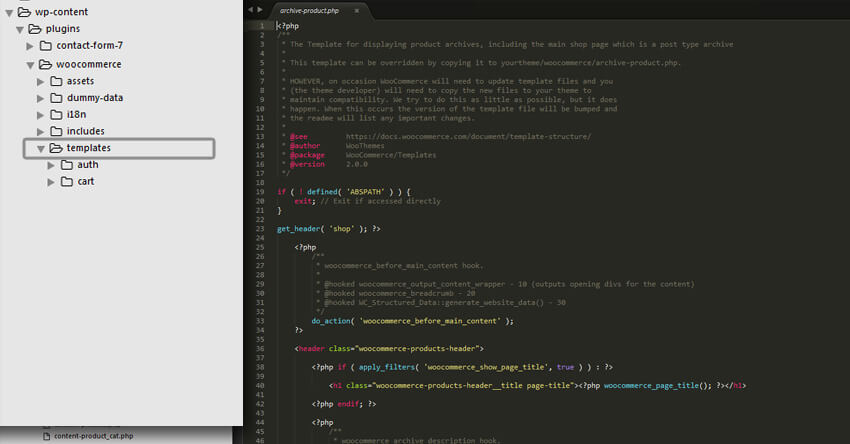
The WooCommerce plugin has the template files. All the necessary pages and their page structure are under the templates file. Also, you have to do is to copy the template and paste it into your WooCommerce theme file to bring about great advantages in digital marketing for yourself.
As Digital marketing is the component of marketing that utilizes the internet and online-based digital technologies such as desktop computers, mobile phones, and other digital media and platforms to promote products and services.
Create a New Custom WooCommerce Theme File
To create a new Custom WooCommerce theme file follow these steps:-
- Firstly, Log into your cPanel, and head to the directory where the theme files and WordPress are located.
- Search for the page.php file and duplicate the file.
- Rename the file as WooCommerce.php file and save it.
- The file path should be like this now;
c-Panel is also known as a control panel which is basically a web hosting panel based on a Linux system and provided by many hosting providers. It provides a website with all the automation tools to simplify the process of hosting a website. It also provides a graphical user interface to the website.
wp-content/theme/NAME OF YOUR THEME/woocommerce.php.
Adding Template to Custom WooCommerce Theme File
After creating the new custom WooCommerce theme file. We have to place the required file template in the custom file. You can find the template at the location given below;
wp-content/plugins/WooCommerce/templates
Like this, if you have to change the cart page. Copy the cart page template and paste it into the new WooCommerce theme file created in the theme file.
Although, the cart page in the theme will be called first before the default cart template. The custom WooCommerce theme will have the default looks of WooCommerce. Thus, to change the look of this theme you have to create your own custom WooCommerce CSS file.
Where CSS stands for Cascading Style Sheet. These are the documents that contain the styling rules that can be applied to HTML or XML, (along with some structural formats).
Note: Since you are making changes to the core file. Each time when you are updating your theme. You have to do the changes manually again.
After that, you feel all the customized functions are working well. You have to declare WooCommerce support to hide the message.
If your theme does not declare WooCommerce support. So, paste the following code into your functions.php file.
| add_action( ‘after_setup_theme’, ‘woocommerce_support’ );
function woocommerce_support() { add_theme_support( ‘woocommerce’ ); } |
The second method is the developer-based method. It is the most preferred method. WooCommerce Hooks are like calling and inheriting your custom WooCommerce functions without annoying the core file.
2. WooCommerce Hooks Method
The hooks method is more preferred and easy-to-maintain WooCommerce customization method. Creating a custom WooCommerce theme by the content method has some limitations. Also, don’t try to use the content method for WooCommerce customization.
This method is the last option because you have to look out for compatibility issues regularly before WooCommerce and theme updates.
Now come to the point:
However, by using the Hooks method, you are calling the fundamental characteristics of a WooCommerce page into your custom WooCommerce theme. This technique bets suited for integrating custom WooCommerce to a non-WooCommerce compatible WordPress theme.
The hooks method involves the following steps:
Unhook WooCommerce Wrapper
The WooCommerce function file contains the default wrappers:
Here, you wish to remove or replace these default opening wrappers to hook in your custom function among them all.
| “remove_action( ‘woocommerce_before_main_content’, ‘woocommerce_output_content_wrapper’, 10);
remove_action( ‘woocommerce_after_main_content’, ‘woocommerce_output_content_wrapper_end’, 10);” |
Hook Your Custom WooCommerce File
Place your own wrappers to hook these function files into your custom WooCommerce theme.
| “add_action(‘woocommerce_before_main_content’, ‘my_theme_wrapper_start’, 10);
add_action(‘woocommerce_after_main_content’, ‘my_theme_wrapper_end’, 10); function my_theme_wrapper_start() { echo ‘<section id=”main”>’; } function my_theme_wrapper_end() { echo ‘</section>’; }” |
Also, this process is more or less like throwing a lasso and hooking the functions you need.
Example- To show the Upsell product per page/per line, is that the number of products shown in the recommended products segment.
| “remove_action( ‘woocommerce_after_single_product_summary’, ‘woocommerce_upsell_display’, 15 );
add_action( ‘woocommerce_after_single_product_summary’, ‘woocommerce_output_upsells’, 15 ); if ( ! function_exists( ‘woocommerce_output_upsells’ ) ) { function woocommerce_output_upsells() { woocommerce_upsell_display( 3,3 ); // Display 3 products in rows of 3 } }” |
However, we have mentioned only three products to be displayed in a row of the upsell section in this code. If your custom functions are working well with your custom WooCommerce theme. Declare the WooCommerce support by placing the below-given code in the functions.php file.
A function.php file is also known as a theme function file. It is used by the WordPress theme to define classes, actions, functions, and filters that are to be used by our templates. function.php file is automatically loaded in the admin bar and front-end pages of a WordPress site.
| add_action( ‘after_setup_theme’, ‘woocommerce_support’ );
function woocommerce_support() { add_theme_support( ‘woocommerce’ ); } |
3. Using TemplateToaster
Well, you can also create a WooCommerce theme with the help of TemplateToaster. Basically, it is just like a simple yet effective method to develop any type of custom WooCommerce theme for your own or any eCommerce website.
But to enjoy this piece of cake and create your own custom theme. First of all, you have to either download the WooCommerce Theme Builder plugin, or the eCommerce website builder plugin on your local machine.
After that, you should install TemplateToaster by the required steps. And then follow the given below steps to create WooCommerce Theme using the TemplateToaster.
Select The CMS First
Well, after you successfully install the TemplateToaster on your machine. Then you will be able to see some of the options on the screen to choose from. These all are different types of CMS, but first, you must choose the WooCommerce option there among others.
After you select WooCommerce from the list. Therefore another screen will appear there and you will see it showing two options. The first option is named Go with Sample Template, and the second option is named Start from Scratch. However, the choice is only yours, choose whatever you like. But to begin further we are choosing the option Start from Scratch for now.
Choose Color And Fonts
After moving further now you can choose the various types of color and different typography options from the two sections of Color Scheme and Fonts apply to the body respectively. Also, after selecting your desired color and fonts, you have to click on the OK button that appears on the screen to confirm your choice.
Well, after doing so and setting up all the mentioned things in this step, click on the OK button. Now you will be able to launch the main interface or screen of the theme.
Selecting The Layout
Well, now on the main screen that appears, you can see various options in the horizontal menu and some options in the sidebar menu. So now the first thing that you have to do is to select the desired layout for the web page as per your choice. Although there are two options available for you to choose from. However, you are free to choose any one of them.
Now to choose the one you have to click on the Container option from the horizontal menu. Therefore a dropdown will open, now select Layout then select Fluid from another dropdown. See the below direction:
Container ➡ Layout ➡ Fluid
Choose Header Design
Well after choosing any layout, now you can select the header design. Basically, the Header is known as the topmost area in any of the web pages. Here you are able to customize the header section according to your needs. For example, you can also set up the width of the header as you like. Just go to the Header option in the horizontal menu. After that select the Width option and then choose Full Width. You can also choose other options too. Just see below:
Header ➡ Width ➡ Full Width
Adding A Logo
After completing the header design now you are able to add a Logo to your theme. That will appear in the header section. The logo is known as the brand identity or it will be going to be the online identity of your website from now. Therefore you must select your logo very carefully.
For selecting the logo just go to the Header option from the horizontal menu and then select the Logo option, after that choose the Browse option, as shown below:
Header ➡ Logo ➡ Browse
Now you will see various logos to select from, choose anyone among them. Also, you are able to Align the logo which you have to choose to either Left, Right, or Center, according to your requirements. To do so just see the direction below:
Format ➡ Left ➡ Top
Select Header Background
After successfully setting up your logo, now you are able to select the background of your header section. Although you are free to customize the background of your header as you wish. For doing so just go to the header option from the horizontal menu and then select the Background option there, see below direction:
Header ➡ Background
Here to make the background interesting and attractive you can choose either any of the colors or any image that you like as the background of your website’s header. Just use your imagination and creativity to make it unique and beautiful. Besides that, now you are completely ready with your entire header section now.
Create Menu Design
Well, now let us go further on this process to design the other important section, which is known as Menu for the theme. Also, there are various options available to create different types of menus. Such as Simple Menus, Submenus, Hamburger Menus, etc. However, you are able to create a fully-functional elegant Menu for your theme.
Create The Slideshow Design
Well, you can increase the number of visitors to your website. Because having an effective Slideshow in the theme will definitely make it attractive. Also, you can create a slideshow for your website in just a few simple steps. To create a slideshow all you have to do is just check the slideshow option given in the Slideshow option in the horizontal menu as shown below:
In addition, you can easily adjust the height and width of the slideshow as per your requirement. Well, to do so you need to go to the Slideshow option in the horizontal menu, see below:
Slideshow ➡ Width ➡ Full Width.
However, you are also can choose the background of the slideshow that you have created from the given options. Besides, if you like to search for a few more images then you can click on the More Images option in the background. See the below direction:
Slideshow ➡ Background ➡ More Images
After setting up the desired images now you are free to attach a Foreground Image to the slideshow. For adding the foreground image just go to the Slideshow option in the horizontal bar and then select the Images option, after that choose the Browse option and set it accordingly, see below:
Slideshow ➡ Images ➡ Browse
When you set up your foreground image then you can also adjust the Alignment of your foreground image, which is very easy to do. All you have to do just go to the:
Format ➡ Alignment
And then select to align the foreground image from Left Right or Center, you can set it to any side wherever you like. In addition, you can also add Text to your slideshow very easily. To do so just Select Textarea to add any content to your slideshow, as shown below:
Slideshow ➡ Text Areas
Setting Up Content Style
Now it’s time to customize the appearance of your content. However, you can set up the desired Style of your Content very easily with the help of various useful options such as Typography, Padding, Margin, Color, Border, Texture, etc. Therefore you will get the desired style according to your needs.
Choose The Footer Design
The Footer section is also a very important area in any website to showcase some of the important details. Although you are free to design the Footer of it as per your own specifications. besides that, you can also select and customize the border, height, width, margin, shadow, Effects, Texture, etc of the footer. However, you can also set up the required Number of Columns for your footer.
Exporting The Theme
Well, as you have created the theme with all the basic and required fields. Now you must aggry that you have designed the theme so well in no time. Thus it is the right time to Export your theme. However to export it just go to the File option the then select the Export option, as displayed below:
File ➡ Export
Well, after you have clicked on the Export button, a dialog box will appear on the screen. And after you choose the right options just click on the Export button to go ahead with the process.
Uploading The Theme
However, just exporting the theme is not enough in order to use the theme you have to upload the theme that you have created. Although uploading the theme is very easy. All you have to do now is go to the dashboard of WordPress and then select Appearance from the side menu. After that select the Themes option, same as directed below:
WordPress Dashboard ➡ Appearance ➡ Themes
Once select or reach that page just Click on the Add New option given at the top of the WordPress Dashboard page.
After clicking on it again a dialog box will appear in front of your screen that shows an option named Install Now. Then below in that list, you can browse and select the right name of the theme that you have uploaded. Now all you have to do is just Activate the theme.
After activating the theme, now you are done with the processes. Hence you will see the theme displayed on your screen.
Take A Final Look
Finally, just look at the theme and all its design and customization done by you. Although your WooCommerce Theme is created in just a few minutes. After that now you are ready with your WooCommerce theme to use and see how it will look. Because it is a fully functional and also professional WooCommerce theme created in just a few minutes.
Certainly, you are ready and willing to use this newly created custom WooCommerce Theme. However, all the best practices described above are useful to show you how to create a WooCommerce theme in just a few simple steps. And these methods can help you to create your own WooCommerce themes very easily.
Now, just use your created theme and see the response. Also, you should analyze all the appearance and design to improve it or make some more creative themes. Because the choice is only yours and you have to select in which way you like to create your own WooCommerce theme.
Although if you like to do coding, then it is sure that you will be comfortable with HTML, CSS, JavaScript, and many other WordPress functions. Besides that, if you go with the TemplateToaster option using the WooCommerce Theme Builder software and website builder. Then you do not have to worry at all because the hard work will be done automatically for you. You just have to handle the software only.
Conclusion
Wrapping this all in end!
The Pre-build themes have quality and are good to use. But at a certain stage of time, you may find there is nothing unique on your website. At that time, you need to create a theme that gives a unique look and a creative touch to your views. The method discussed above helps you in WooCommerce custom theme development.
By developing a theme you can clear thoughts of your project and forward the same to your viewers. Well, if you need any assistance or help to create your own WooCommerce theme. However, you can read this article again for any missing step while creating your WooCommerce website theme with any of the methods shown above.
Besides, In case you find yourself confuse or stuck in between any step during the procedure or if you are not able to do it and seek help. Then, you should talk to our WordPress Technical Support experts to resolve your all errors related to WordPress, dial +1-888-738-0846(Toll-Free). We will be glad to help you.