
If you are thinking to add a widget to the header of your WordPress site, then some widget will provide features to do this easily. The website header has a feature where with the help of Widgets, where WordPress Widgets allows you to add content and features to your sidebar without writing any code.
You can add some useful features that will offer an area for a particular on your site. Such as you want to see calendars, widgets with ads and category lists. There are a lot of widgets available in the market. Each & every widget has its own distinct features.
This wordpress header widget will provide you with some extra area to display/promote something that you want to show in header area for every visitor to see. It is the first segment of the portion of your site that will be shown first to people and also this area is reserved to display important things.
But, every theme will not provide header widget to customize. In this blog, we will describe you how we can add a widget to header WordPress plugin on your site. For doing this you have to add few code to WordPress theme files and do some styling through Cascading Style Sheet (CSS).
CSS are These are the documents which contain the styling rules that can be applied to HTML or XML. CSS enables the users to create new content, modify existing content including text, images, photos, videos, audio or any other piece of digital content.
This digital content is a web content management system manages the content for a website. Fewer years ago, it is necessary to have good command on HTML tags to manage web content. But Now all CMS has developed such a way that even a non-technical person is able to manage content.
CSS helps the user to generate more traffic to the WordPress site.
Read More: How to Disable Unwanted Or Unused Widgets in WordPress
Why Use Website Header Widget on Your Site?
Usually, most of the sites are using header portion to display logos or other business and site related texts and pictures. But, many sites are also using this header area to host Banners or advertisements. For example, you can write or paste the code from Google uses into the website header of the WordPress widget area.
WordPress header widgets will make very easy to add any content. Actually, you need to drag and drop to a selected area in WordPress theme and paste your code from affiliates and ad revenue sites. Where WordPress theme is a group of stylesheets and templates that are used to describe the appearance and display of a WordPress site.
A WordPress theme changes the layout & design of your site. The WP theme contains this widget can be used anywhere on your site including the website header.
A widget is defined area can be used to display articles, ads, or anything you want in the header or before component. This specific area is ‘Below the fold’ and all important sites to show the main material.
Generally, many WordPress themes add sidebars to the footer area or next to the component. It is not mandatory that all WordPress themes will have a widget-ready area in the header or above of component. So, we continue to read that how to add WordPress Widget to the header of your site.
Step 1: Create a Header Widget Area
First of all, you have to create some custom widget area. where these themes have layout options available in the widget area. As some widgets available which offer options like to customize and to fill the form to look, include, exclude of the data and other information, besides other customize feature and images.
So you have to add the code in functions.php file of your theme. You can get this file in few ways: can use FTP program like FileZilla, where File Transfer Protocol is used to transfer files from one local computer to a remote website, such as a WordPress blog.
It is also used to download files from your WordPress website to your computer or to change files and directories permissions on a remote website. from WordPress editor or you can use the File manager of cPanel.
Well, go to the appearance section in your WordPress and then click on ‘Editor’
Then click on “Function.php” file link to your theme. WordPress will show default theme that you are using in the current. But you modify by selecting an another one from the “Select theme to edit” drop-down field on the above of files list on the right of the screen.
And then add the below code to the file
| function wpb_widgets_init() {
register_sidebar( array( } |
After that, click on “Update File” button. This code will enter a new widget or a sidebar ready space for your theme.
Now, you can go to the Appearance >> Widgets page, here you will find a new widget area are defined “Custom Header Area”.
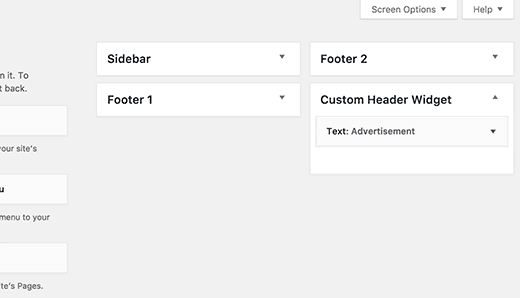
Now, attach a text widget to this currently created widget space and save it.
Step 2: Display your Header Widget Area
In this step, you have to say to your WordPress to display the currently created Website Header area containing its widget. For that, you have to modify the header.php file within your theme and attach the following code where you need to show your custom widget area in Website Header.
Without doing this process your site will neglect the instruction that you have done in above step.
So, click on the “header.php” file within the WordPress editor at the right side of the screen.
Copy the below code and paste it into the area where you want the place widget:
| <?php
if ( is_active_sidebar( ‘custom-header-widget’ ) ) : ?> <?php endif; ?> |
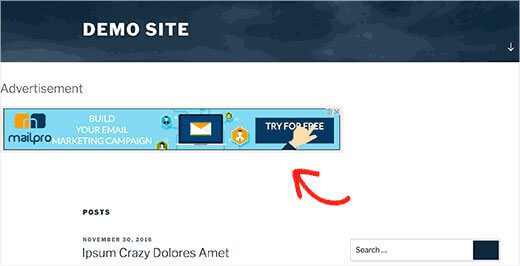
And then, save your changes. Now you can visit your site and see the widget in your Website Header area.
If widget’s view are not seeing in a good manner, then you have to do changes in your CSS to looks better
Step 3: Customize your Header Widget Area using CSS
If you have knowledge of CSS, then you can directly add the coding to modify the header widget area by using WordPress editor or by the customizer. According to your theme, you have required adding CSS to handle that how the widget area and each widget inside it are displayed.
The best and simple way to add this is by using a plugin such as CSS Hero. It will permit you to use an interactive UI to modify the styling of any WordPress theme including the Website Header. In another hand, you may attach custom CSS to your theme by going to Appearance >> Customize page.
You can see Additional CSS tab in the above theme customizer will permit you to attach your custom CSS at the time of you are seeing the view of changes that you have done.
If you are thinking that can you use this area to place a widget to show banner or custom menu widget, then few sample of CSS code will help you to do this.
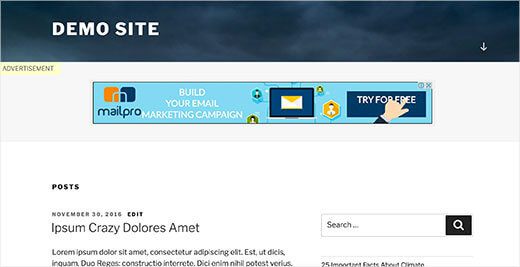
| div#header-widget-area { width: 100%; background-color: #f7f7f7; border-bottom:1px solid #eeeeee; text-align: center; } h2.chw-title { margin-top: 0px; text-align: left; text-transform: uppercase; font-size: small; background-color: #feffce; width: 130px; padding: 5px; } |
In the below image you can see that how our custom Website header widget area is locked as we want.
Wrapping Up
Here, in this blog, we have discussed three steps for “How to Add a WordPress Widget to Your Website Header”?. As this widget can be applied to the entire website including Website Header of your WordPress site. We hope that this blog helped you completely. In addition, keep an eye on the very blog and our website www.wpglobalsupport.com as we will be adding more resources for WordPress in the coming weeks.
If you feeling any sort of difficulty then you can contact to our WordPress Customer Service number +1-888-738-0846(Toll-Free). Our WordPress team will help you instantly to resolve all your issues.