Understanding your users is a vital part of governing the success of your site! Have you ever thought about what your user wants?
For this purpose, Google has built-in lots of tools that succor you to gather & organize the information and use them accordingly. These tools are easy for purposes but may be slightly difficult to use.
Well, we all are aware of Google Analytics, but we don’t overhear towards Google Tag Manager –
Users are often confused by these tools because you can integrate them in various ways. However, if you want to use both the tools together, then, they each need to be set up individually.
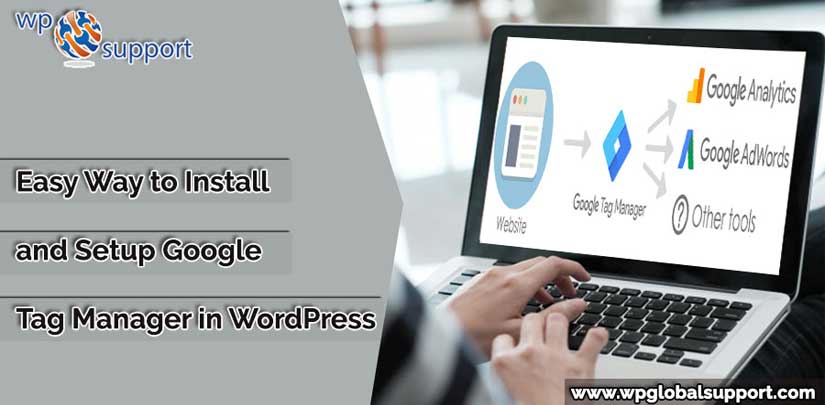
Hence, we will display you how you can install and setup Google Tag Manager on a WordPress site. We will also ensure that the equipment is working properly or not. Further, We will give you some tips to make this all easier a lot.
What Is Google Tag Manager
The Google Analytics has been around you for some time – that helps you to configure, process, collect, website report and mobile app data that resulting in actionable insight.
Thereafter, in 2012 Google has announced its new innovative product known as Google Tag Manager.
Mostly, people believe that the Google Tab Manager is the same thing as Google Analytics or the latest version of it. But, this is not the truth! In reality, Google Tag Manager is entirely an independent tool.
Continuously, It is a solution that helps to manage tags or the javascript’s snippets – which works to send the information to the third-parties over your site or mobile app.
However, these third-party tools are – AdWords conversion tracking, DoubleClick floodlight as well as Google Analytics.
Further, by simplifying the adding procedure of these javascript snippets over your site GTM makes your difficulties easier.
However, you use the interface to determine what needs to fire and on what page rather than updating the code on your site. Thereafter GTM adds the suitable tracking on your site to ensure that it all works in the proper way.
Google Tag Manager consists of three segments. They are as follows:
Tag: A code’s snippet typically JavaScript added to a page.
Triggers: It defines when and where the tags are executed.
Variables: It is used to save or receive the information to be used by tags and triggers.
Key Features
- Check your tags through built-in debugging tools.
- With the help of this tool, you can integrate several services along with your site.
- Add code to any services supported by Google Tag Manager which requires work.
- In accordance with your requirement, you can configure the metrics, your third-party services to track, by using a ‘tag’ system.
Price
Bending towards the Prices! Generally, if we talk about Google products, there are free and paid both tools are available for Google Tag Manager.
With our experience, in most of the cases, the free version services are more than powerful sufficient. If you wish to get some advanced features, then you may judge investing in Google Tag Manager 360 (Its prices depend on whether you intend to use the platform).
Why Should You Use Google Tag Manager?
Now we all know about Google Tag Manager! The next thing comes – Why should you use it?
In short, GTM works by providing an interface for easily managing the snippets, so that you need to modify your code directly.
Consequently, here’s the Google Tag Manager requirement comes – Rather than hard-coding the snippet’s code and requiring hard changes to edit the data tracking, you can easily use GTM to create tags particularly and add them, without any HTML knowledge.
Using Google Tag Manager, the use of analytical and tracking tools is made much easier especially for beginners. Hence, let’s talk about how to integrate it into WordPress.
Setting Up Google Tag Manager
Kindly note, this article is only for self-hosted WordPress.org sites. If you haven’t created a WP site, then please visit our 4 simple steps to Install WordPress to create one.
The very first thing, you will have to create a Google Analytics account for your website if you have not created it yet.
How to make Google Analytics account
You need to go to google.com/analytics.
Note: If you have a Google Account, and you are not signed in, click Sign in. If you do not have a Google Account, then click the Create Account button.
Once you’re signed in to your Google Account, click Access Google Analytics and thereafter click on Sign up.
Fill out your account name, choose the name of the website, the website URL, and an industry category and reporting time zone.
Below the option of data sharing, tick the box by clicking on it, next to the options you want. Click Get Tracking ID.
From the Google Analytics Terms and Services Agreement that opens, click I Accept.
It’s done now. You have successfully created your Google Analytics Account.
Note: You need to stop here while you finding your Tracking Code, instead of adding tracking code directly in WordPress. Because here, we are using a tag manager to do that.
Now that we’re ready to add Google Analytics, the next step is to set up Google Tag Manager.
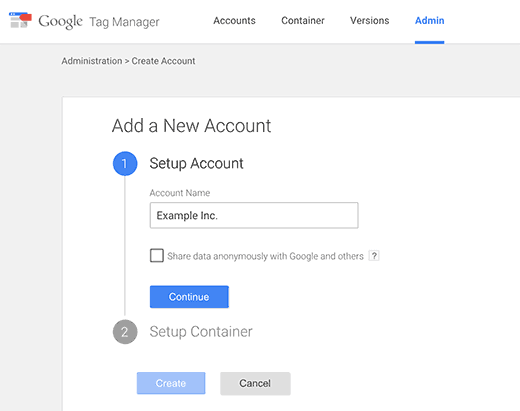
To do this, You need to go to the Google Tag Manager site. Here, sign up on the GTM by using the same Google account that you have used with Google Analytics.
Once you logged in, thereafter you will add a new account page. Just provide a name for your account and click the continue button.
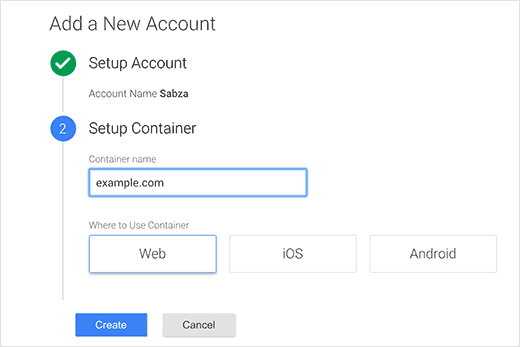
Now, add a container to your account. Now you will have a question in your mind – What is a container? – A container can be an app on Android/iOS platforms or a website. In this type of case, we should use the web.
Further, you can use the domain of your site for the container name. And add several containers for each & every account. Once completed, now press the create button to continue.
Now, with the container, the Google Tag Manager will create your account. Now you will see your container dashboard. It looks like the images that shown below:
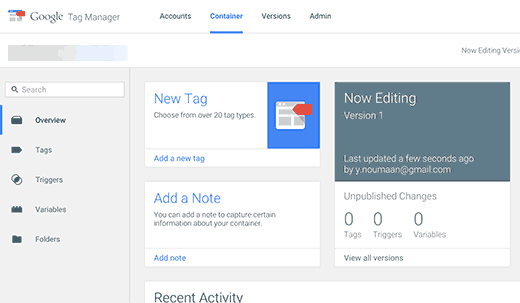
Continuously, your GTM account is ready. Now you need to add a new tag. To do this – click on creating a new tag button.
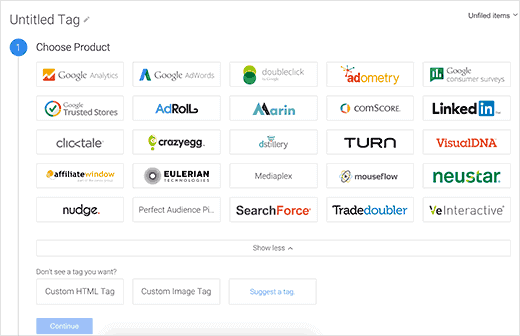
The very first thing, you have to pick a tagged product. At present, more then 20+ integration templates are available to use.
Now we will have to pick Google Analytics for some time. But, you can add extra tags regularly and choose various products in accordance with your needs. To add another custom code snippet, you need to click only on custom HTML.
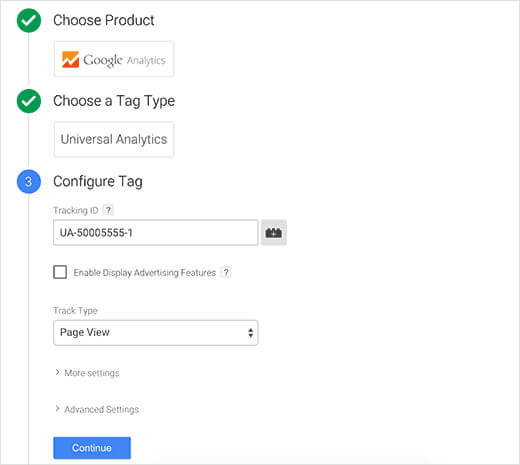
When you select Google Analytics, then you have to choose between Universal Analytics or Classic Analytics. Here choose the Universal Analysis. Thereafter, it will ask you to provide your Analytics Tracking ID.
Consequently, this tracking ID code is a unique code and it permits Google to recognize your website. You can get this ID by logging in to your Google Analytics account and going to the Admin tab.
Now choose the account & property for your site. Thereafter you have to click on the tracking information to extend it. Here you will see the tracking code link.
By clicking on it, you will go to the tracking code page and it will also release your UA tracking ID.
Thereafter, you have to copy this UA tracking ID and paste it into Google Tag Manager. Now choose Page View under the track type and press the continue button.
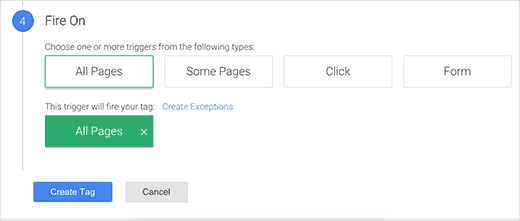
Now, you will be asked by the tag configuration wizard, when to release this tag. Choose all the pages and press the Create button.
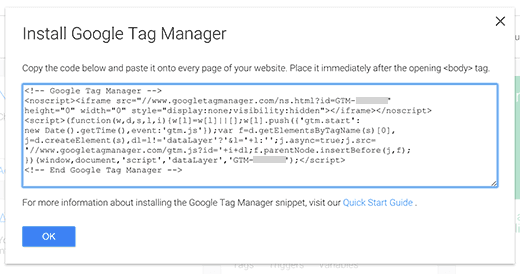
Continuously, a tracking code will now show you by Google Tag Manager – that you have to add to your WordPress site. Thereafter, you have to copy this code.
Now, we will show you – How to add tag manager code> Let’s get cracked!
Adding Tag Manager Code In WordPress
The very first thing, you will have to install insert header and footer plugins and then activate it. Once the plugin is activated, you have to navigate to the Settings >> enter the header and footers.
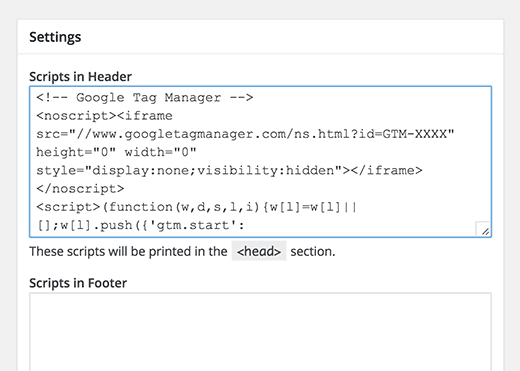
After all, this is done! Paste the tag manager code (that you have copied) in the header segment. And click the save button to store your settings.
However, if you don’t want to install the plugin, you can also add the Google Tag Manager code in your WordPress theme or child theme. To do this – You have to edit the code and paste it right after the <body> tag.
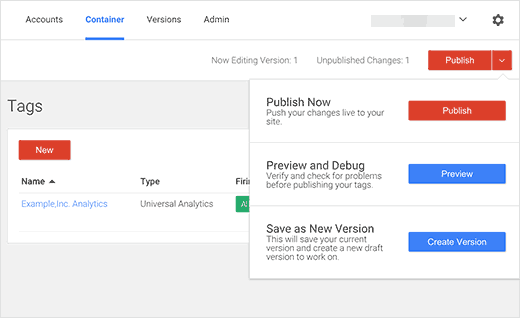
Publishing Your Container
However, until you publish the container, the tags which are in Google Tag Manager will not go live. To do this – you need to navigate to the Google Tag Manager dashboard and then click on the publish button.
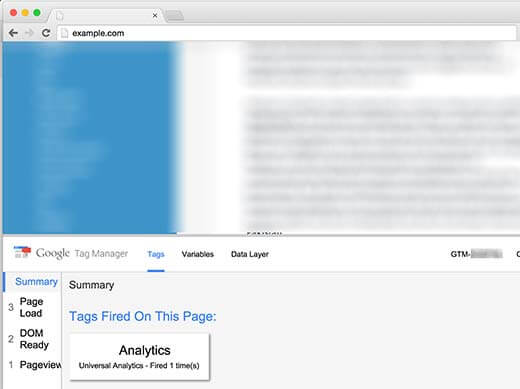
Now you can view your site. The Google Tag Manager will display you the tags that released on each & every pageview.
Bottomline
That’s it! Now, you have installed and set up the Google Tag Manager for your WordPress website successfully.
We hope, this article helped you a lot and also, you really loved this article, so please use the comment section provided below and tell us your experience about the topic and share your feedback. Also, share this article with your peer.
If you still need help contact our WordPress Technical Support Team. Please Dial +1-888-738-0846 (Toll-Free). We have a team of good professional who can resolve all your issues related to WordPress.
Thanks!
Read More Blogs: