
Are you willing to know the simple methods to add Google Web Fonts in WordPress Themes so your site can load fast? One of the easiest changes you can make to your blog is to change the default fonts that come with your theme.
For quite a few years now, Google has been an awesome resource for free fonts that are easy to implement on your own site. Google Fonts are an excellent free resource for web designers.
Read More: How to simply Add Google AdSense to Your WordPress Website?
Types And Styles of Google Font
Well, there are various kinds of font types and styles available. However, if you desire to get a suitable one style for your website. Therefore the best and easiest way is to search for them directly by typing the name of the font types in the upper right corner of your WordPress site admin page.
In such cases, if you do not know about the kinds of fonts. But merely if you want to browse or get some idea about them. Then you can also use many of the filter options available for it. Well, first of all, you can filter all these fonts by the font category.
These font categories are given below:
- Serif: This type of font is with small squiggly lines at the end. The best option for a serif font family is Times New Roman.
- Sans-Serif: These font kinds are simple without little lines. It looks at the type that we are using on this website to learn what we are talking about.
- Display: Find fonts that are usable on a very large display like we use for headings and titles.
- Handwriting: These are typography fonts that look like someone drew them by hand.
- Monospace: These fonts come with characters that all characters have the same spacing. Anyone who already used computers in the late 80s saw this.
There are some other options to sort the different fonts. Such as the date they were added, trending or popular fonts, or alphabetically by name. You can also search for fonts that include special characters used in certain languages, for example, Cyrillic. Besides that, you can also search the different fonts by their style.
There are the following options for searching for them it includes:
- The number of font styles: It includes many different style options available that the font offers to you.
- The font thickness: There are various styles from very thin letters to very thick.
- Slant font: These are the letters that are straight or slanted in style.
- Font width: You can search them by the spacing between the letters and characters.
- Font preview: This is the best thing since the redesign, Google Fonts allows you to preview exactly what the font of your choice is going to look like.
Well, to do such, all you need is just to click into the field where the font is displayed. Then mark the text, and type in anything that you want. However, another option is to use the drop-down menu to view the entire alphabet. Also, you can change the style and size of the text to whatever you want.
Search for the Google Web Fonts that You Like
- First of all, you should find a Google font that you like. Then move to Google fonts and browse via the library. If you find the font that you like tap on the “Quick-use” button.
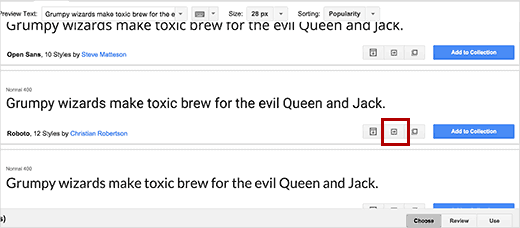
- After clicking on the quick-use button, you will be taken to a new page. Scroll down until you see the usage instruction box with a code that you can add to your website.
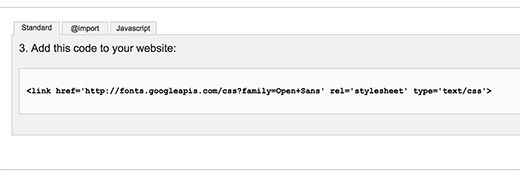
- Here you will see that there are three different tabs for adding the font to your site. The first one is the standard and suggests a method to add Google fonts to your site. The second tab uses the @import CSS method, and the last tab makes use of the JavaScript method.
Just have a look at each of these methods.
Methods for Adding Google Web Fonts in WordPress Themes
For adding Google Web Fonts in WordPress Themes the simplest way would be to open your theme’s style.css file and paste the fonts code that you got in the @import tab like this shown below:-
| @import url(http://fonts.googleapis.com/css?family=Lora); @import url(http://fonts.googleapis.com/css?family=Oswald); |
You can also combine multiple font requests into one. Just have a look below:-
@import url(http://fonts.googleapis.com/css?family=Lora|Oswald);
This method is very easy. Using the @import method blocks parallel downloads. It means the browser will wait for the imported file to finish downloading before it starts downloading the rest of the content.
Method 1: Using A WordPress Plugin
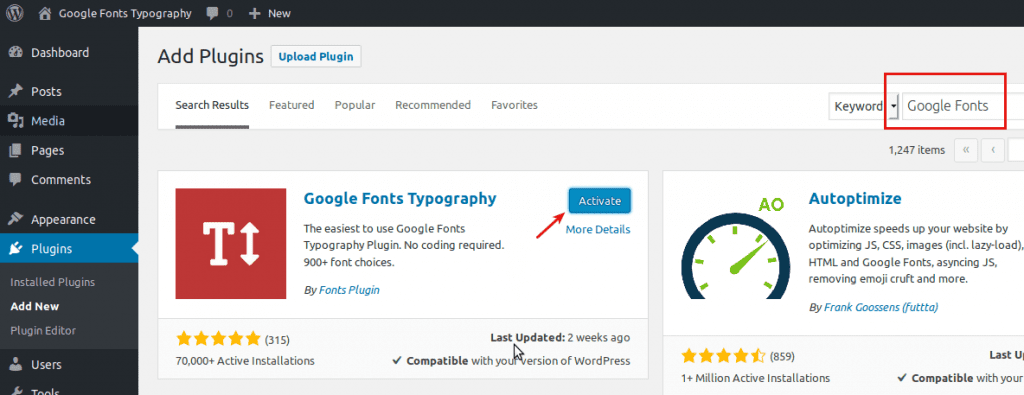
Well, in this method you don’t need to write a single line of the code. Although it is a hassle-free method to add Google fonts to your WordPress website. All you need to do is just search and install a plugin named Google Fonts Typography. However, to install this plugin we are going to give you a proper and detailed step-by-step procedure.
Just follow the given below steps to install the Google Fonts Typography plugin:
- Go to your WordPress website admin page
- Click on Plugins > Add new in the side panel
- In the upper-right search box enter Google Fonts
- Select the first result name Google Fonts Typography
- Now to Install this Click on Install Now
- After that click on the Activate button
Now go to the Plugins page from the WordPress admin page side menu and locate Google Fonts Typography and
- Click on the Settings button now
Now You will automatically redirect to the Customize screen page for your current theme.
- Click on the Google Fonts vertical tab now
Now, you will have to pay attention to the first two options: the Basic settings and is Advanced settings.
- Now Click on the Basic Settings option
Here you can configure the fonts related to the content of your site. There are 3 options available for you to customize:
- Base typography: Base typography allows you to change all the text elements inside the tag but does not change the heading tags, buttons, and input elements.
- Headings typography: This option will allow you to change the heading tags.
- Buttons and inputs typography: This last option is capable of changing the buttons and input elements.
Although you can select a different font style from each of the dropdown menus. Also, you can watch the preview of each of the font style. This can let you see the changes between the font styles. If you like you can play a little bit until you get the most suitable font combination
- Now you can click on the Back arrow button
- Then select the second option named Advanced settings
These configuration options will show you the other sections of your website. You must pay attention here because you can override the Content tab, the Base, and the headings typography too. Which you have already set in the Basic settings before. Besides that, you can target each heading level separately.
- Select the Navigation button
- Now change the font family for this page element
- Keep trying until you get the desired one
- Now just click on the Publish button
Method 2: Performance-Optimized Method of Adding Google Web Fonts
For adding Google fonts use the Standard method which utilizes the link method instead of the import method. From step 1 take the font URL that you got. In case you are adding multiple fonts, then you can combine the two fonts with a | character. Place the code in your theme’s head section.
Edit your header.php file, and paste the below-given code above your main stylesheet. The example would look like this:
| <link rel=”stylesheet” type=”text/css” href=”http://fonts.googleapis.com/css?family=Lora|Oswald” media=”screen”> <link rel=”stylesheet” type=”text/css” href=”YOUR THEME STYLESHEET” media=”screen”> |
Generally, the main goal is to put the font request as early as possible. As per to the Google Web Fonts blog, if there is a script tag before the @font-face declaration, then Internet Explorer won’t deliver anything on the page until the font file is done downloading.
After you have done this simply start using it in your theme’s CSS file like this:
h1 {
font-family: ‘Oswald’, Helvetica, Arial, serif;
}
There are plenty of theme frameworks and child themes out there. And it is not suggested to modify your parent theme’s files particularly if you are using a theme framework because your changes will be overridden the next time you update that framework. Just utilize the hooks and filters presented to you by that parent theme or framework for adding Google fonts correctly in your child themes.
Method 3: Properly Enqueuing Google Fonts in WordPress
The other way of adding Google fonts to your WordPress site is by enqueuing the font in your theme’s functions.php file or a site-specific plugin.
| function wpb_add_google_fonts() {
wp_enqueue_style( ‘wpb-google-fonts’, ‘http://fonts.googleapis.com/css?family=Open+Sans:300italic,400italic,700italic,400,700,300’, false ); add_action( ‘wp_enqueue_scripts’, ‘wpb_add_google_fonts’ ); |
At last, replace the font link with your own.
Method 4: Loading Google Fonts Using JavaScript
If you want to use this method then copy the code in the JavaScript tab in Google fonts usage instructions section. You can also paste this code in your theme or child theme’s header.php file instantly after the <head> tag.
Conclusion:
In conclusion, we provided all possible methods to add Google Web Fonts in WordPress Themes. So, that’s all on our behalf and we hope that you liked this blog completely.
If you need any kind of help specifically related to WordPress Security, you can always dial our WordPress technical number+1-888-738-0846. The door to our WordPress customer service is always open for you.