WAMP is an abbreviation name for the software stack Windows, Apache, MySQL, PHP. It is created from LAMP which stands for Linux, Apache, MySQL, and PHP. As the name suggests, LAMP is used on Linux servers and WAMP is used on Windows servers. This is because of that WordPress can’t be usually installed on Windows Servers, WAMP is the best option for the developers because it can be easily installed on windows server.
“A” in WAMP stands for Apache. Apache is server software for serving web pages.
“M” in WAMP stands for MySQL. MySQL is a database management system. It’s a job in the software stack is to store all of your website’s content, user profiles, comments, etc.
“P” in WAMP stands for PHP. PHP is the programming language that WordPress is written in. More so PHP runs in Apache as a process and communicates with MySQL to create web pages.
Basically, the WAMP provides four key elements to WordPress developers. They are Operating System, Web server, Database, Web scripting language. The combined package is called a server stack. According to this, the operating system is Microsoft window, web server is Apache, a database is MySQL, and scripting language can be PHP.
WAMP software stack can be downloaded from WAMP server project’s download page. It is very important for the users to keep in mind that if you install WordPress locally on your system then you are the only admin who can see this site. You must have a domain and WordPress web hosting in order to live WordPress site in the public.
It comes in an easy installation with cPanel for Microsoft window users. However, WAMP manager control panel starts Apache, PHP, and MySQL web services on the local computer.
Further, theme developers and designers prefer this because WAMP features are a good way to develop the site on a local machine without transferring the files to a live website.
Steps to Install WAMP Server
1. The very first, you have to download the WAMP server. You will get two versions 32 bit and 64 bit, download as per your local machine.
2. Once downloaded, install it and open the WAMP icon in the desktop and check the services in WAMP are running or not. Thereafter, go to the taskbar and check the icon is in green color.
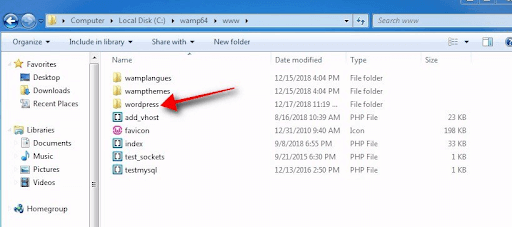
3. Now download the latest version of WordPress. This software will come in a zip file with WordPress name folder. Withdraw this file into c drive>wamp64>www.
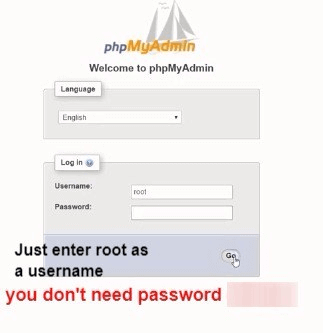
4. Here create the database. To create it – click the phpMyAdmin option from the icon, or go to localhost/phpmyadmin on your web browser. Here click the new menu that is available on the left side navigation menu. Enter your database name and press ‘create’ button. And remember that don’t create any tables because WordPress automatically create tables.
5. After the database is created, the WAMP services are running. Now initialize WordPress, before that you have to create the username and password for your database.
6. Thereafter, open your web browser and type the localhost/WordPress. And choose the language and click the ‘Let’s Go’ button.
7. Here enter the database name, username, and password that is created by you.
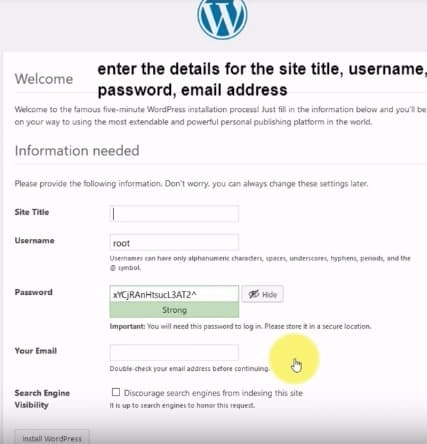
8. On the next page, you have to enter the details such as site titles, username, and password.
9. Now you have successfully installed WAMP. Here, you will see a ‘login’ button to enter into your admin dashboard.