Do you wish to restore WordPress website from backup? Website backup is the most important factor for our data management. Backup service will allow us to restore our site when it is getting down. Backup file enables us to restore our website when something goes wrong. Restoring our WordPress websites is an necessary part.
Restore feature is a part of our Backup tool, and we may include WordPress website from backup. We had to remember you that once a restore has been run on either the database or files, you will can’t retrieve the previous things so may need to create a last minute backup of your data just before you run the restore process. For restoring your website, just go to Websites screen, hover a website and tap the View Backups. So, restoring WordPress from a backup file is not simple for freshers.
Before going to start the backup process your WordPress website, you should know about two concepts: Database and the Files where you stored your data and makes up our WordPress site. In this article, we will show you how to restore WordPress Website from backup. You can simply restore WordPress from backup by following step which are given as:-
1. Understanding a Backup and restoring WordPress.
- Database of our WordPress website contains all content created by your site, including comments, posts, inquiries, etc. If your database will get corrupted ,then you will face the problem of losing the entire content, whether it is too old. All of them will be deleted if you have not backed up your website before. There are many reasons due to that we can get the worst situation that we cannot control, but the only thing you had to remember that your data is backup or not.
- The files which is related to our site’s theme, plugin, all media section that making up our site is uploaded to your site. This is worse for us that that somehow any hacker logins or enter to your site or FTP and deletes all files, especially if these files related to transactions and finance occured on your site. Thus, website backup site is very basic and important process.
- There are different ways to create website backup. But the Best way is-To create a backup is by using a WordPress backup plugin. Alternately, we can create manual backup of our WordPress database and download our WordPress files using FTP. Restore the WordPress from backups rely fully on how you created the backup.
- There are many WordPress users do not backup their complete websites. They only backup the WordPress upload directory, database, and theme. This reduces the backup size, but enhances the steps required to restore the website. Their is no matter to how you created your backup, the basic steps are the same.
- We are enclosing a second restore methods, skip the section that applies to you.
2. Restoring WordPress from BackupBuddy Backup file.
- Backupbuddy is a popular bonus to WordPress backup plugin. It is using to create backup.
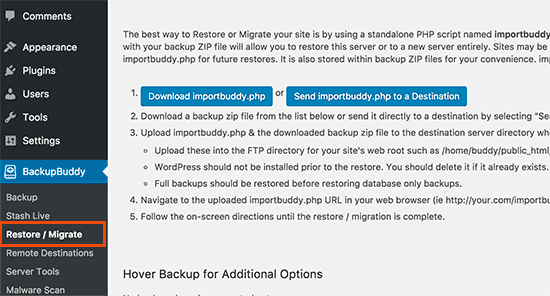
- BackupBuddy gives a way to restore your website backup. We need to login for WordPress website and go to BackupBuddy >> Restore migrate page.
- We had to download a copy of importbuddy.php file. It will just asked by you, to provide a password for importbuddy, this password will be used while restoring our website.
- And then, we required to download a copy of our backup in case we have not already done so. You can download it from BackupBuddy » Backups and destination which is use to store your backup. We are having the backup zip file and importbuddy.php stores on our computer and it connects to our site using FTP.
- If you have a full backup of the site, then remove all files and folders from our server. So, if you have only some backup, then it is needed to first download the files that you have not backed up. Once we will sure that, you have all thing backed up, proceed the deleting all files and folders from your site’s root directory.
- And then we need to upload both BackupBuddy backup and importbuddy.php files to our site’s root folder. Both of the files are uploaded at one time to the server, visit importbuddy.php in web browser. It is in our site’s root directory, so its URL will be something like this: http://www.example.com/importbuddy.php
- Now ImportBuddy will ask for the password that we created at the time when you downloaded ImportBuddy.
- At the next screen, ImportBuddy will show that backup file we uploaded. If we did not upload our backup file using FTP, tap on the upload button for uploading backup file. If we have our backups stored on iTheme’s Stash storage service, then we can join to it by clicking on stash button now.
- ImportBuddy will unzip our backup file and a success message shows, when it has extracted the zip files. On next screen, ImportBuddy will ask us to provide website URL and database information.
- In case we are restoring a hacked WordPress site or trying to remove malware, then we don’t want to use our old database. We can either drop tables to our old database through phpMyAdmin, or create a new database by cPanel. If it is done to create a new database or emptying the old database, provide our database details.
- On the other side, if we are sure our website wasn’t hacked, then we can use the old database details. Now, Importbuddy will test our settings of database and import our data.
- ImportBuddy will update our site paths, URLs (uniform Resource Locator) etc. And then we will be asked to test our website. In case all thing is working fine, after this we have successfully restored our site. On ImportBuddy page, tap the ‘Clean up and remove temporary files’ tab. This will remove temporary data in database and files created during restoration.
3. Restoring WordPress using Updraftplus Backup
- Updraft is another popular WordPress Backup plugin. Updraftplus allows you to simply restore and backup WordPress website . First of all make sure that you have a full backup of WordPress website to created through Updraftplus. And then, download the backup files to own computer. In case backups are saved through Updraftplus on a remote storage location like, Google Drive, Dropbox, etc. After that we can download our backup files from that locations in our computer. And then we need to attach to an FTP client and erase all WordPress files. Now, again we require to install/set up WordPress and login to our site.
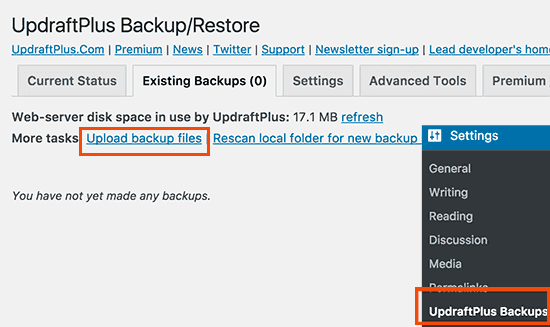
Install and activate the UpdraftPlus plugin. After activation, Visit Settings » UpdraftPlus Backups page and tap the Restore tab.
4. Restoring WordPress Database from Backup using phpMyAdmin.
- At the time of restoring a manually created backup, we can come across two possible choices. We may either create a new database and import our backup into new database, or we can empty our existing database and import backup. In case we are cleaning a hacked WordPress site, it is very important to change our MySQL username and password before creating a new database or importing it into existing database.
- For creating a new database, login to cPanel dashboard of our WordPress hosting account and tap the MySQL Databases icon. Then after you will be asked to give a name to database and click the create database tab.

- After create new database, we require a MySQL user associated with those new database. Scroll down to the MySQL users section and add a new user. Then we need to add that user to MySQL database. Scroll down for ‘Add the user to database’ and choose user with database to drop down menus, and click the add tab. Now, new database is ready. We can also use the new database for restoring our WordPress database backup.
- Go to the cPanel dashboard again and click the phpMyAdmin icon. Then after click the new database name and tap the import button.
- Click ‘choose file’ button to select WordPress database backup file and tap the go button at the bottom of the page.
- PhpMyAdmin will upload our backup and import it into database.
- You will see a success message after it is completed.
5. Restoring WordPress Database Backup using cPanel.
- In case we manually created a WordPress database backup by cPanel on shared hosting, then we can restore the database by cPanel.
- Log into cPanel account and under the files section click on Backup button.
- On backups page, scroll down to ‘Restore a MySQL database backup’. Click the select file button and choose backup file from hard disk. After this click the upload button.
6. Manually Restoring WordPress Files using FTP.
- In case you are restoring WordPress for clean up a hacked website,( see our guide at: How to fix your Hacked WordPress Site) first need to erase all existing WordPress files and directories. In case our backup is upto date, and we have everything customized, changed, or uploaded on our site. If we have all our uploads and customizations, then we can safely erase everything on our site using cpanel (way faster) or using FTP.
- For erasing all files from our site, we need to login to the cPanel of our VPS hosting and under files section click the file manager icon. Go forward and select Web root as our directory and proceed. File manager interface will now open in a new browser tab. We will need to choose all WordPress files and erase them.
- We may also delete files using FTP, but it is slower. Simply connect to our site through FTP client and choose all files in our WordPress root directory to erase them. And download a fresh copy of WordPress.
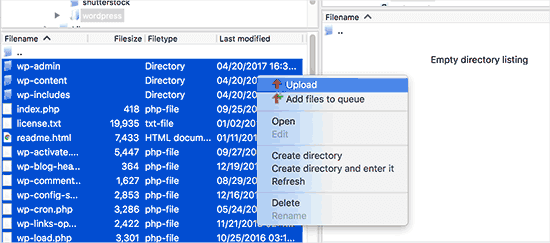
- Release our FTP client and upload all WordPress files to server.
- Don’t forget to store file and upload it back to our site. Then upload other files from our backup. We will suggest you only upload your images in /wp-content/uploads/ directory. After this, login to our WordPress admin area and start installing plugins we had on our website.
7. Troubleshooting WordPress Backup Restore Issues.
Some general problems that we can come across at the time restoring our WordPress site. We have separate suggestion for each of them.
- WordPress Error establishing a database connection.
- White Screen of Death.
- Internal Server Error.
- Login Page Redirect or Refresh issue.
- Single Posts returning 404 Error. ( Take a look at how to fix 404 error)
8. Things to do After Restoring your WordPress Site.
- We have successfully restored our site, we strongly suggest that we improve our website security. In case we have not done so already, make sure that we have a regular WordPress backup with one of these WordPress backup plugins.
- For securing our site, we will suggest you immediately change our WordPress password. If we are running a multi-user website, then ask all users to update their passwords immediately.
- We may also install a site firewall. We are using Sucuri to monitor and strengthen security of our site. It monitors for security threats, and they also offer malware removal service with their subscription plans.
In case of any assistance contact to our WordPress Technical Support Experts for this you have to dial +1-888-738-0846 (Toll-Free).