In this article, we will show you how to connect and retrieve the crawl issues step by step with Yoast search console for your WordPress Website. Crawl errors are issues they are reported by search engines because they crawl your website. Cleverly named Crawl Errors section in Search Console highlights pages on your site. Where Google has called the difficult Crawling Page and has detected an HTTP error code.
Common error codes picked by Google usually take the position of 4XX (404 etc.) or 5XX (503 etc.). Read our article on How to fix 404 error in WordPress and 503 Service Temporarily Unavailable Error in WordPress
The URL of the borders is repeatedly visited according to a set of policies. If the crawler is displaying the collection of websites, then it copies and saves information. Archives are generally stored in such a way that they can be viewed, read and navigated on the live web, but They have been preserved in the form of “snapshot.” The collection is known as the repository and is designed to store and manage the collection of web pages.
WARNING: To connect and retrieve crawl problems, you need to Set up your website to Google Search Console.
Thus, this is what we are elaborating here! Keep reading How To Connect And Retrieve The Crawl Issue?
Crawl Errors layout
A change developed in the last few years is the layout of the Crawl Errors scene within Search Console. Search Console is divided into two main sections: Site Errors and URL Errors.
It is very useful to categorize errors in this way because there is a different difference between errors at the site level and errors at the page level. Site-level problems can be more catastrophic, causing harm to the overall utility of your site. On the other hand, URL errors are specific to individual pages, and therefore are less important.
The fast way to access crawl errors is from the dashboard. The main dashboard gives you quick preview of your site, in which you show three most important management tools: crawl errors, search analytics, and sitemaps.
You can quickly see your crawl errors from here. Even if you see it every day, you’ll go ahead with most site managers.
Connecting and Retrieving Crawl Issues in WordPress
To plug and retrieve spider problems you must add your website to look for the engine.
In the Webmaster Resources section, you can link to the engine and fix Crawler problems for your WordPress Website.
Formerly Look for Engines Webmaster Tools
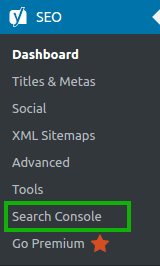
- Log in to your WordPress website. When you are logged in, you will be on your ‘dashboard’ on the left, you will see a menu. In that menu, click on “SEO.”
- The “SEO” setting will expand to provide you additional options. Here, you have to Click on “Search Console.”
- Now, Click on “Get Google Authorization Code.”
- If you are not logged in. Then sign in to your Google Account.
Please use the owner’s account. Restricted users may have limitations such as not being able to use the ‘definitely mark’ option.
- Click on “Allow.”
- Then Copy the unique code that appears.
- Paste the code into the plugin settings.
- Just click on “Authenticate” and save the change. If you have more than one profile, go to the Settings tab and select the profile for this website and click “Save Changes.”
Note: Google Search Console which is formerly known as Google Webmaster Tools. And it allows you to claim each version of your website. That includes HTTP, https, www, and non-www. However, each version is considered as a separate asset. Please select the property that matches your preferred domain format.
Read More: How to resolve “Too many Redirects Error” in WordPress
View Crawl Issues
Website crawl errors can prevent your page from appearing in search results.
A web crawler starts from a list of URLs to travel, which is called the seed. However, the crawler visits these URLs. it recognizes all the hyperlinks in the page. And adds them to the list of URLs, which is called the crawl frontier.
Some of the steps to view crawl issue are as follows:
Step 1: Log in to your WordPress website. When you are logged in, you will be on your website “dashboard.” And on the left, you will see a menu. In that menu, click on “SEO.”
Step 2: The “SEO” setting will expand. Thus, to provide you additional options. Click “Search Console.”
Step 3: All desktop crawl issues appear by default. However, filter the list by clicking ‘Not Redirected’ or ‘Ignored’.
When the debug is set to true, you can click on ‘Reload Crawl Problem’ if the list does not match the actual list in Google Search Console (formerly Google Webmaster Tools). This is not usually necessary.
Conclusion:
Here, in this blog, we have discussed How To Connect And Retrieve The Crawl Issue in WordPress?
Often we concluded its layout, its definition, its connecting and retrieving process, and at the end, we illustrated its issues. They do add value to any blog post. And, this leads to the end of the blog. We hope this blog helped you. You are on your way to getting more exposure.
Still facing issue regarding WordPress? Contact to our WordPress Customer Service Team to get best services instantly, dial +1-888-738-0846(Toll-Free).