
WooCommerce is a popular plugin for WordPress that allows you to create and manage an online store. One of the essential elements of an online store is the checkout page, where customers complete their purchases. By default, the WooCommerce checkout page collects standard customer information such as name, address, and email. However, there may be times when you need to collect additional information from your customers. In this article, we will discuss how to add custom fields to the WooCommerce checkout page.
WooCommerce is a very popular e-commerce solution across all websites powering around 42% and more of all online stores. This lets you create an e-commerce business (store), manage inventory, accept payments, and much more. It comes with almost all the functionalities that you require to open an online store. It also means that there is always something new to explore and learn in the WooCommerce domain.
You have to go to add custom fields to a WooCommerce Checkout page. As WordPress custom fields have metadata that includes some additional information regarding the page or post such as title, description, date and time, author name, etc.
In this post from the WooCommerce Checkout Page, we will illustrate the ultimate guide on How to Add Custom Fields to WooCommerce Checkout Page? One aspect that we have learned about the WooCommerce Ecosystem is that – It is an enormous pool of innovative functionality, that if used in an effective way, can prove beneficial for your E-commerce business in a variety of ways.
Why is the WooCommerce checkout field important?
WooCommerce checkout fields are important because they allow customers to provide essential information needed to process and fulfill their orders. Checkout fields typically include the customer’s name, shipping address, billing address, and payment information.
Without these fields, it would be difficult for the seller to fulfill the customer’s order and the customer may not receive their purchase. In addition to these essential fields, other optional fields may be included, such as phone number, email address, or order notes, which can help improve the customer’s shopping experience and provide additional context to the seller.
Moreover, WooCommerce checkout fields can be customized and additional fields can be added to collect other information that may be relevant to the seller’s business, such as product customization options, gift messages, or special requests. By customizing the checkout fields, sellers can create a personalized shopping experience that meets their customer’s needs and preferences, which can help increase customer satisfaction and loyalty.
Overall, WooCommerce checkout fields play a crucial role in the online shopping process, and it’s important for sellers to ensure that the checkout fields are well-designed, easy to use, and collect the necessary information to fulfill orders and provide a great customer experience.
Add Custom Fields to WooCommerce Checkout Page
Step 1: Define an Array of Fields on the Checkout Page
- However, the most important step to add custom fields to a checkout page is to define an array of fields that you want to show.
- Therefore, the field’s order that is shown on the checkout page will be the same as that defined in an array.
- The Pre-existing field’s array will also be different from the array of custom fields.
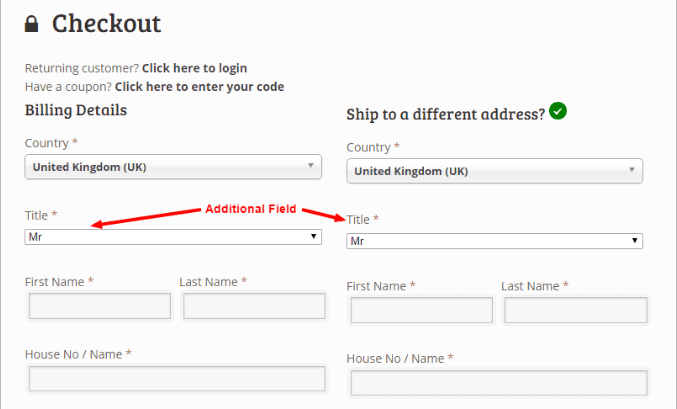
- In our example, we will remove the ‘Company’ field from the checkout page and add the ‘Title’ field before the ‘First Name field on the checkout page. Thus, the following block of code can be used to define the array.
- Block of code is the style of code box which displays code snippets in a WordPress post or page.
| //global array to reposition the elements to display as you want (e.g. kept ‘title’ before ‘first_name’ ) $wdm_address_fields = array(‘country’, ‘title’, //new field ‘first_name’, ‘last_name’, //’company’, ‘address_2’, ‘address_1’, ‘city’, ‘state’, ‘postcode’);//global array only for extra fields $wdm_ext_fields = array(‘title’, ‘address_3’, ‘address_4’); |
Step 2: Add Custom Fields to a WooCommerce Checkout Page
- The function will then have to write to add a custom field to the checkout page. However, this function should be written on the ‘woocommerce_default_address_fields’ hook offered by WooCommerce.
- As WooCommerce is an open-source e-commerce plugin that creates a medium of interaction between the user/software and clients to gain attraction with the clients to the website and provide an increment to the sales in the e-commerce platform.
- Also, a plugin contains a group of functions that can be an addition to a WordPress site where this plugin which is a type of software provides additional functionality to the application.
| add_filter( ‘woocommerce_default_address_fields’ , ‘wdm_override_default_address_fields’ );
function wdm_override_default_address_fields( $address_fields ){ $address_fields[‘title’] = array( $address_fields[‘address_1’][‘placeholder’] = ”; $address_fields[‘address_2’][‘placeholder’] = ”; $address_fields[‘address_3’] = array( $address_fields[‘address_4’] = array( global $wdm_address_fields; foreach($wdm_address_fields as $fky){ $address_fields = $temp_fields; return $address_fields; |
- Once it has been done, additional fields will now appear on the checkout page. Apart from this, the updated fields will also be displayed on the user’s account page.
- After the custom field is added to the page, the checkout page is represented.
Step 3: Concatenate Fields as per the Requirement
- Some people want to add two or more strings to display on the ‘Order Page’. For example, you might want to display the title, first name, and last name simultaneously on a single line.
- To do this, the contents of three fields will have to be added as below.
| add_filter(‘woocommerce_formatted_address_replacements’, ‘wdm_formatted_address_replacements’, 99, 2);
function wdm_formatted_address_replacements( $address, $args ){ $address[‘{name}’] = $args[‘title’].” “.$args[‘first_name’].” “.$args[‘last_name’]; //show title along with name return $address; |
Step 4: Show Custom Fields on Order Page
- By default, checkout page fields are shown on the order page.
- However, when the fields are added or removed from the checkout page, these changes should also appear on the order page. To do this, the following block of code should be used.
- With this code, the billing address and shipping address will be displayed along with the updated list of fields on the order page in the back end as well as on the single order page in the WooCommerce Dashboard.
| <?php add_filter( ‘woocommerce_order_formatted_billing_address’, ‘wdm_update_formatted_billing_address’, 99, 2);function wdm_update_formatted_billing_address( $address, $obj ){global $wdm_address_fields;if(is_array($wdm_address_fields)){foreach($wdm_address_fields as $waf){ $address[$waf] = $obj->{‘billing_’.$waf}; } }return $address; }add_filter( ‘woocommerce_order_formatted_shipping_address’, ‘wdm_update_formatted_shipping_address’, 99, 2);function wdm_update_formatted_shipping_address( $address, $obj ){global $wdm_address_fields;
if(is_array($wdm_address_fields)){ foreach($wdm_address_fields as $waf){ return $address; |
Step 5: Display Fields on the Account Page
- As we display an updated list of fields on the order page, custom fields must also be displayed on the user’s account page. It can be done with the following block of code.
| <?php add_filter(‘woocommerce_my_account_my_address_formatted_address’, ‘wdm_my_account_address_formatted_address’, 99, 3);function wdm_my_account_address_formatted_address( $address, $customer_id, $name ){global $wdm_address_fields;if(is_array($wdm_address_fields)){foreach($wdm_address_fields as $waf){ $address[$waf] = get_user_meta( $customer_id, $name.’_’.$waf, true ); } }return $address; } ?> |
Step 6: Edit Option on Single Order Page
- The second, tweak that will have to be made is to add the custom fields in the edit option on the single order page in the dashboard.
| <?php add_filter(‘woocommerce_admin_billing_fields’, ‘wdm_add_extra_customer_field’); add_filter(‘woocommerce_admin_shipping_fields’, ‘wdm_add_extra_customer_field’);function wdm_add_extra_customer_field( $fields ){//take backup of email and phone number fields as they will be lost after repositioning $email = $fields[’email’]; $phone = $fields[‘phone’];$fields = wdm_override_default_address_fields( $fields );//reassign email and phone fields $fields[’email’] = $email; $fields[‘phone’] = $phone;global $wdm_ext_fields;if(is_array($wdm_ext_fields)){foreach($wdm_ext_fields as $wef){ $fields[$wef][‘show’] = false; //hide the way they are display by default as we have now merged them within the address field } }return $fields; } ?> |
- Once the above code is applied, the changes in the single-order page of the Dashboard will appear below.

If you follow all of the above steps correctly, you should be able to add custom fields to a WooCommerce checkout page.
However, if you are still having problems then you can return to me with your questions. Also, let me know your thoughts on the post in the comments section.
We hope our blog is helpful to you.
If you are facing problem related to WooCommerce Setup talk to our WordPress Experts dial +1-888-738-0846(Toll-Free).