WordPress is an open-source Content Management System(CMS) that provides a tool by which it is easy to develop a website without any programming knowledge. Nowadays, more than 45% of websites on the Internet are developed using WordPress. It is used by individuals for blogging, big business for e-commerce sites, etc.
After installing WordPress successfully, the most important question that comes into the mind of a user is how to find your WordPress Login URL, how to change it, lock it, and apply a limit login attempt.
The most essential aspects of website development using WordPress are finding your WordPress login URL and then changing it and locking it down, how to customize the theme, and the last part how to secure the website. In this article on WordPress, we discussed this.
Why is WordPress Login URL Important?
WordPress Login URL is used for adding an admin who works on the back end of a website. The admin can install, delete and update the plugins and themes. Along with these they can also add new posts, edit the available posts by any visitors on the site, and update or delete those posts. In fact, the admin can even delete the whole website.
WordPress’s admin dashboard is a panel where you change and update your WordPress websites. To access this admin dashboard, we need a WordPress Login URL because without accessing the admin dashboard, the user can not install themes and plugins, add or update pages of your websites, publish new blog posts, update comments on your WordPress, customize your site using the theme customizer, etc.
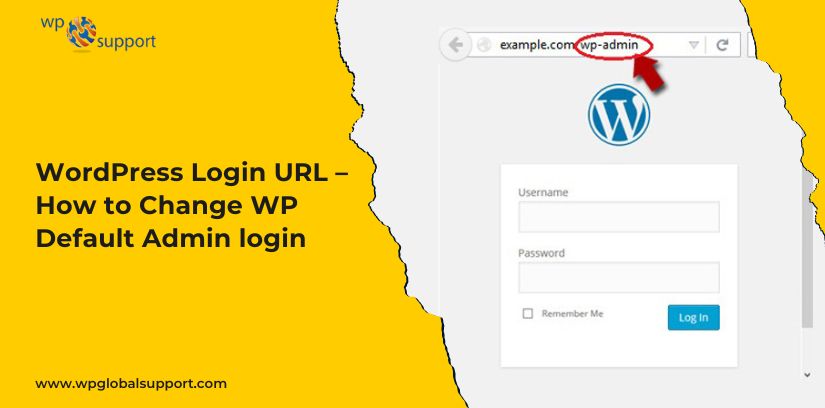
How to find your WP Default Admin login URL
Nowadays, it is mandatory to learn how to find your WordPress Login URL, you can easily find the WordPress Login URL. All you need to do is follow a few steps to find the Login URL.
These steps are:
STEP 1: Refresh the page and redirect to WordPress installation, there you can add in the address bar /wp-admin/ or /wp-login/ or /login/ or /admin. For example, if your address bar is wphelp.com, there you need to show these four URLs followed by a forward slash such as
- wphelp.com/wp-login/
- wphelp.com/wp-admin/
- wphelp.com/admin/
- wphelp.com/login/
STEP 2: After browsing any of these URLs, you can redirect to the admin page of your WordPress website.
STEP 3: Here you have to enter your credentials.
STEP 4: Now, in the credential, all you have to do is enter your login username and password in the given field.
STEP 5: To access the admin page the very last step is you need to click on the login button. In case your WordPress login URL is not working you need to check your credential again.
WordPress Login URL on a Subdomain
Sometimes, the user installs the WordPress site directly on the subdomain. A domain provides a name for your website, basically, it gives you the URL by which visitors can easily find your website. In this case, you can access the admin page similarly. For example, suppose the user hosts their website as new.subdomain.com. There you need to show these four URLs followed by a forward slash in the address bar such as
- new.subdomain.com/wp-admin/
- new.subdomain.com/wp-login/
- new.subdomain.com/admin/
- new.subdomain.com/login/
The easiest way to remember the login page
A user can type a username and password each and every time he wants to change or update a website. To avoid this there are three easiest ways by which the user can remember the login page. And the user avoids typing it again and again in the browser address bar.
- The easiest way to remember the login page is to bookmark the login page of the WordPress websites.
- Other than bookmarking, you can add the login page and link it to your website from where you can open the login page from your homepage.
- The web Hosting dashboard provides an admin page from where you can log in to the WordPress admin page.
The proper way to change the WordPress Admin URL
After finding the WordPress Login URL, one must know how to change the WordPress Login URL. It is important in terms of security, to protect your site’s resources from hackers. Changing the WordPress Login URL to a new path is an important way to protect from hackers who overload the sites.
For changing to a new path, we need to install a plugin called ‘WPS Hide Login’. This plugin is the most popular and used by 7lakh WordPress users. This plugin will hide the default URL and helps to create a new login URL.
Steps to install the ‘WPS Hide Login’ plugin:
Step 1: From the left sidebar of the WordPress admin panel, select Plugins>Add New.
Step 2: Search ‘WPS Hide Login’ in the search box.
Step 3: Install the plugins and Activate them, once found.
Step 4: After activating the plugins, go to the Setting>General from the sidebar. It will redirect you to the general setting page where you can find the option for creating a new path.
Step 5: Scroll down the WPS Hide Login option from the sidebar. There are two fields shown there: ‘Login URL’ and the ‘Redirection URL’.
Step 6: Now, you can add a new pathname to the Login URL field and just add 404 in the Redirection URL field. This 404 in the Redirection URL shows an error page when the user does not enter the correct path.
NOTE: To insure from losing the data or access, just write or note the new path URL. Another way to avoid these you can also bookmark the new login URL page.
You can now scroll down and save settings to access your login page from the new URL path. You can easily install ‘WPS Hide Login’ plugins from here.
The proper way to Lock the WordPress Login URL
If the user does not want to create the new Login URL, the user has to lock the WordPress Login URL. That is achieved by limiting login attempts. Now the important question is how to lock the WordPress Login URL. For this, you need to install a plugin called ‘Limit Login Attempts Reloaded. With the help of this plugin, you can easily limit the number of login attempts number.
Steps to install the ‘Limit Login Attempts Reloaded’ plugin:
Step 1: From the left sidebar of the wordpress admin panel, select Plugins>Add New.
Step 2: Search ‘Limit Login Attempts Reloaded’ in the search box.
Step 3: Install and Activate the plugins, once found.
Step 4: Go to the Setting>Limit Login Attempts from the sidebar after activating the plugins. It will redirect you to the limit login attempts page where you can find the option of limiting the number of access.
Step 5: On this page, there is an option of locking, by limiting the number of attempts and time after which the user is locked.
Step 6: Now, you can scroll down and save settings.
NOTE: You can easily install ‘Limit Login Attempts Reloaded’ plugins from here.
Conclusion
Finding the WordPress Login URL, changing it, and locking it down helps the user secure its WordPress Website. It is the most important aspect to secure your sites from the hackers who overload them. By installing some plugins you can easily manage your login page. With the help of this article, you can easily install the plugins and secure your sites.