
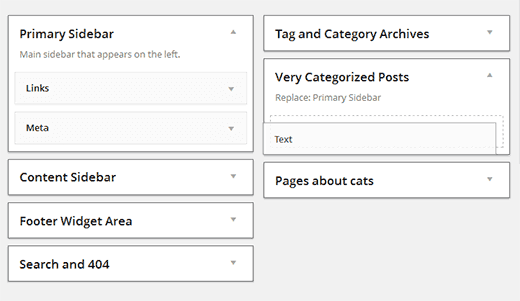
WordPress Sidebar is basically a vertical column provided by a theme for displaying information other than the main content of the web page. Themes usually provide at least one sidebar at the left or right of the content. They usually contain widgets that an administrator of the site can customize.
Typically a sidebar on the blog display throughout your site on all posts, pages, categories, and archive pages. However, sometimes you may want your sidebar content to change based on specific posts or pages like:
- Simple call
- Multi sidebars (Different sidebars for different pages)
- Simple 404 page
- Left and Right Sidebars (Two in one theme)
As the articles posted by the admin of a WordPress site are called posts and pages are like posts. Pages can be managed in a hierarchical structure in WordPress.
Since this is a long article to go through, the contents covered in this article are mentioned here pointwise for your ease to find the relevant piece of information.
Pros and Cons of a Sidebar in WordPress
Over the last few years, many designers have been challenging every assumption we have about web design. Usually, these questions spring from an exploration of a common theme of the idea of a primary objective that functions as a filter for all site-related choices, especially design choices.
The filter works like this: whenever you make a design decision simply ask yourself if that decision will help or hinder you in achieving the primary objective of your website. Often times answering that question is difficult. It may help to weigh the pros and cons, as we will do below in the case of the sidebar.
Pros
- Running Ads
- Increase email sign-ups
- Promote related products
- Organization (especially for e-commerce)
Cons
- Visually unappealing UX
- Not compatible with mobile
- Cluttered and clunky information
- Unnecessary for many businesses and portfolios
To customize your sidebar, you are not required to write a single line of code. It only takes a WordPress plugin to make the difference.
Have a glance over what custom sidebars are and how to create a sidebar in WordPress with and without plugins to customize your posts and pages.
Custom sidebars and why use them?
Without a doubt, Custom Sidebars is a must-have plugin, especially if you run a membership site. First-time visitors to your site don’t necessarily need to see the same content as regular visitors. Likewise, it makes sense to display different information (or widgets) to users who are logged into your site (such as account details), as opposed to users who are logged out.
Custom Sidebars is a free plugin that lets you easily create multiple sidebars on your site, and then decide which pages to display them on. These can then be displayed wherever your theme allows you to display widgets, whether that is the sidebar, footer, or elsewhere on your site.
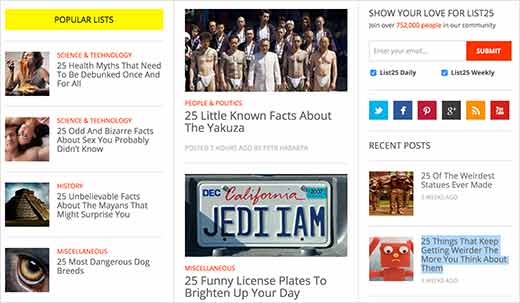
Lots of sites display information about the website in the sidebar area. However, this information isn’t very useful when the visitor is currently viewing the ‘about us’ page. Instead of wasting space, by using a custom sidebar, you could display your email newsletter sign-up form or links to your best content instead.
Another use for it could be to display links to other posts from the same category as the post the visitor is currently viewing. This makes the sidebar content highly relevant to what the visitor is reading, increasing the chances of them clicking through to more of your content.
You could even use this approach to display external links to related products or services, perhaps with an affiliate link, which will be of interest to readers based on the current post they are viewing.
Different (custom) sidebars for different pieces of content
Using different sidebars on different pieces of content is a nice way to improve your site. Here’s how you can do it for free using a plugin called Content Aware Sidebars.
Content-Aware Sidebars work with all themes and lets you create an unlimited number of custom sidebars for:
- Posts
- Pages
- Categories
- Custom Post Types
And another powerful feature is that you can chain these conditions together. For example, you could have one sidebar display on both a single category of your blog, as well as a custom post type.
When and why do you need a different sidebar on different posts?
Somehow, I bet that you have more than one type of content on your website. Thus, why is your sidebar the same on every page and post?
Well, enabling different sidebars for pages and posts allows you to offer your readers a browsing experience more than others. That becomes much more specific to their needs after enabling it.
Overall, that was my thought when I needed a different sidebar in WordPress.
When you run a site with a large number of categories, it does not make sense to show the same sidebar on posts. You may have the following situations, where it shows a different sidebar:
- Based on categories
- Archive pages
- Custom pages like 404 page
- Individual posts or pages based on the need
There are numerous plugins available on the WordPress repository for creating custom sidebars. But all the above-listed needs can be simply fulfilled with a single plugin.
Now, Here’s how to use the plugin.
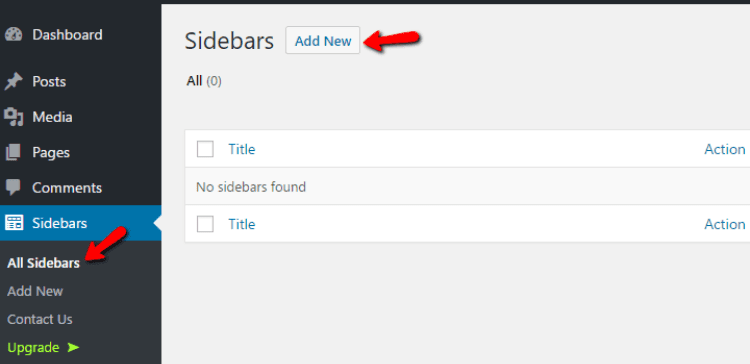
Step 1: Create your new sidebar
Once you install and activate Content Aware Sidebars, you’ll get a new link in your dashboard that you’ll use to manage all the sidebars on your site.
To get started, click on Add New button.
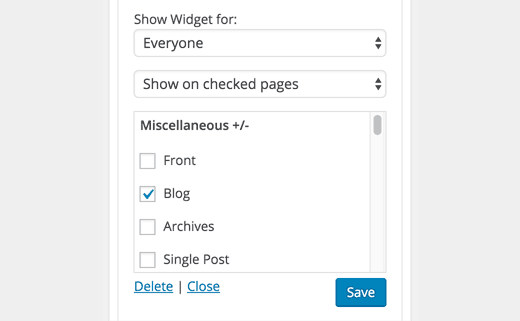
Step 2: Choose Your Conditions
Conditions are what actually trigger your sidebar. For example, if you choose a Category condition, your new sidebar will display on that category.
You can add multiple conditions – just make sure to pay attention to the difference between AND and OR.
With And, all conditions are needed to be met at the same time in order for your sidebar to be displayed. Or, it will display as long as at least one of the conditions is met:

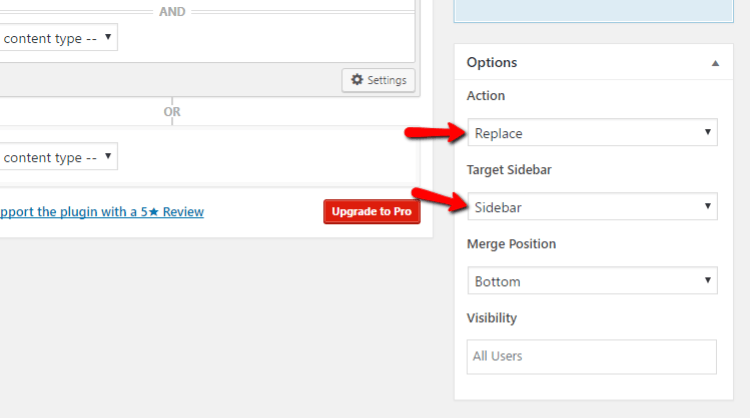
Step 3: Choose your options
Next, you need to choose your Options on the right side of your screen.
Keep four things in mind:
- Action – you can either have your new sidebar completely replace an existing one. Or, you can have it merge with that existing sidebar. This allows you to have one base and append additional content as needed.
- Target Sidebar – this is the sidebar you want to replace or merge with.
- Merge Position – if you chose Merge and not Replace, this will determine whether your new content is added above or below the existing target sidebar.
- Visibility – you can restrict by user status (or user role in the Pro version).
For example, to completely replace your existing sidebar, you’d configure it like this:
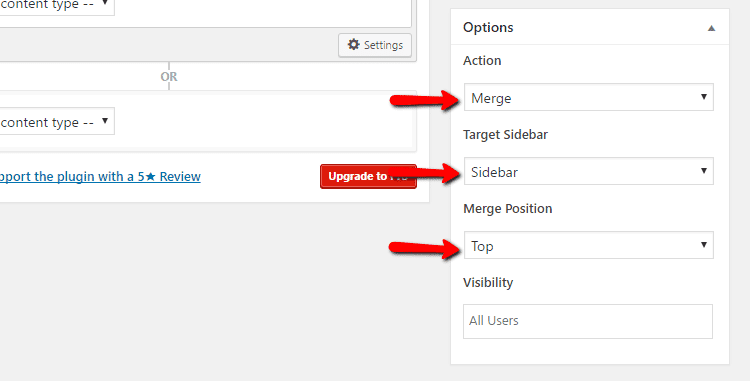
And if you just wanted to add your new content above your existing sidebar’s content, you’d do it like this:
Step 4: Choose your schedule
Another feature is that you can choose to schedule your sidebar to only run at specific times. It’s good if you’re running a limited promotion. Otherwise, you can just ignore it to have your display 24/7:
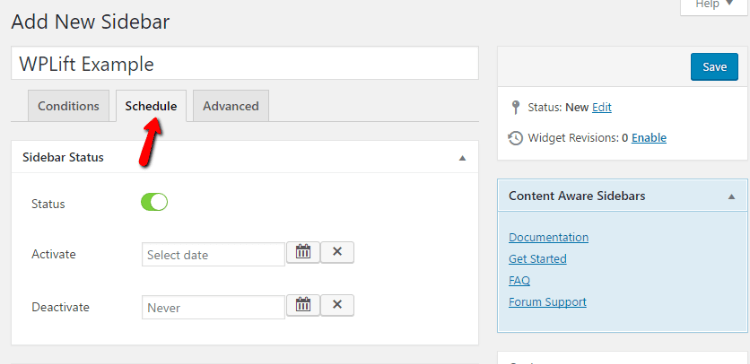
Once you finish the settings, make sure to hit the Save button.
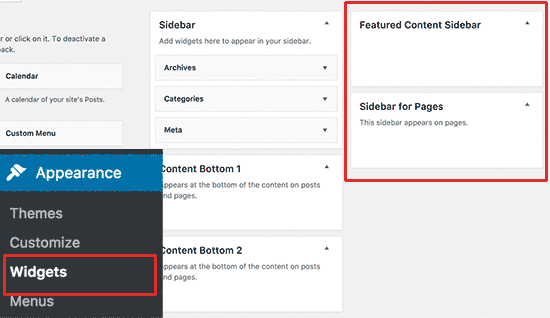
Step 5: Add content to your new sidebar
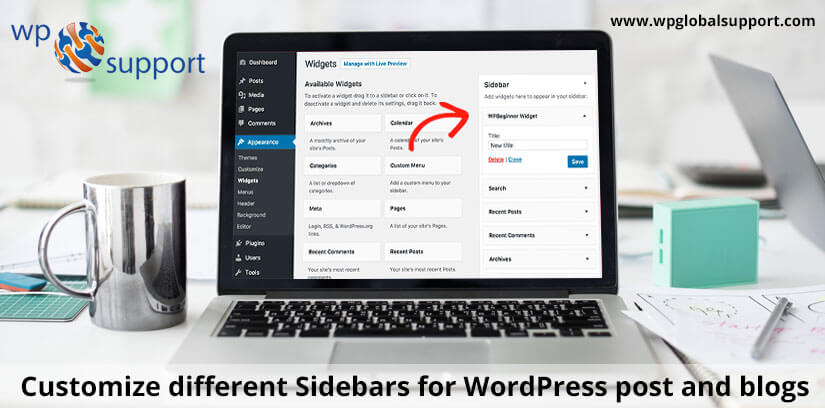
Once you’ve saved your new sidebar, you can add content to it in the normal widget interface. So head to Appearance → Widgets and you can see your new sidebar:
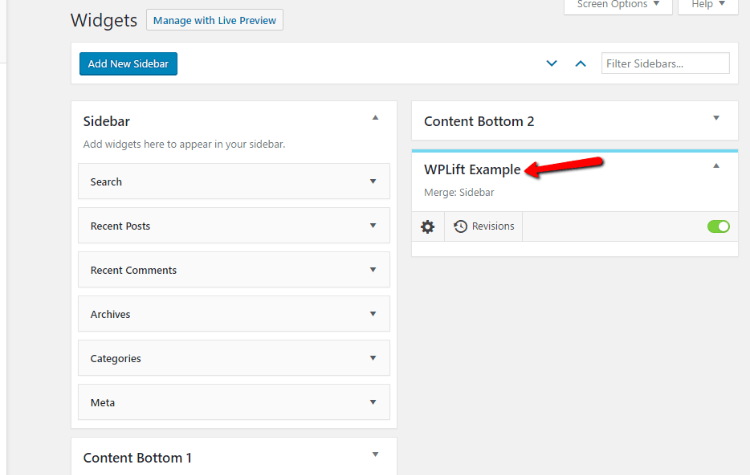
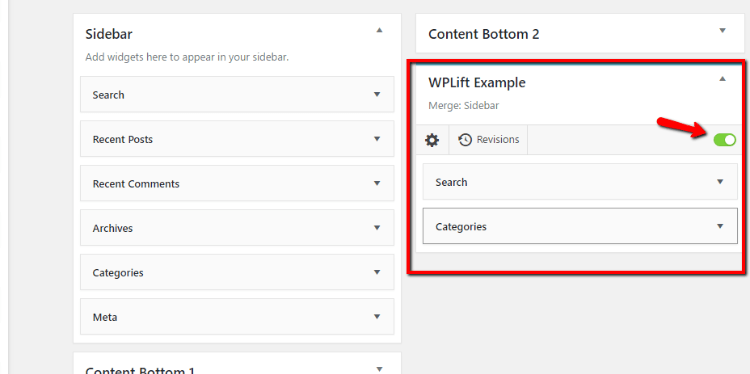
You can drag widgets over like normal – it functions exactly the same as any other sidebar on your site:
And if you want to quickly turn it on or off, you can just hit the toggle button:
And if you just want to add new content above your existing sidebar’s content, you’d do it like this:
That’s what you require to do. As said before, it lets you create unlimited sidebars for your site, so you can repeat the process for as many as needed.
Different ways to manage the WordPress sidebar
1. Dynamic widgets for the sidebar
The thing you must know is, by default, your WordPress sidebars remain the same as it was ever before. Somehow, it means that you are illustrating to users the same thing. Whether they are viewing an archive page, category, home page, or even a single page from your Website.
It only depends on the user what content they are looking at/for. Thus, changing sidebar widgets according to the user. Can make a huge impact, on how users interact with it on your WordPress.
However, using the Display Widgets plugin. You can show and hide widgets on the very posts, pages, archives, home, or blog pages of your website. Similarly, you can also represent or hide the widgets to users based on their login status from your PC.
2. Email Subscription

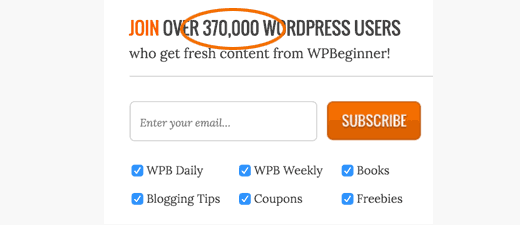
Have you ever wondered why email signup forms are often the first item in sidebars? Mostly on popular blogs? Here is the answer, That’s email is still the most successful way to communicate with your readers as compared to others.
Most of the email service providers as MailChimp, AWeber, etc. Will provide you with a simple code that you can add to text widgets. Whereas, these signs up to such mails service providers are not very effective in terms of conversion as of the Email.
However, by choosing OptinMonster to develop beautiful and highly engaging option forms. You can significantly increase your conversions more than any other email.
This email allows you to A/B test your sidebar option forms. And thereby, you can make data-driven decisions about what’s working and what’s not in this field.
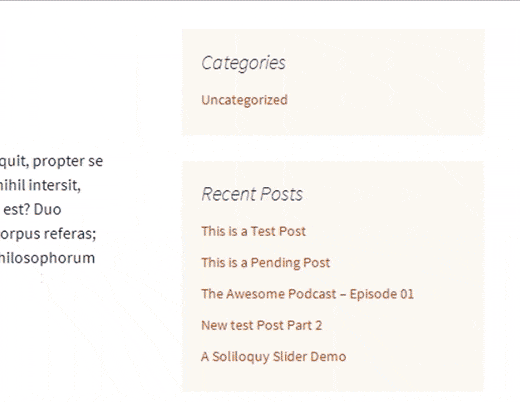
3. Showcase your best content
Nowadays WordPress arrives with a built-in recent posts widget. Often this widget doesn’t perform well.
The reason for not performing well is, your recent posts may not always be the best content. To describe your website to a new user.
However, you should use a popular posts plugin. To display the most popular content of your site. As a plugin is defined as a type of software that contains a group of functions that can be added to a WordPress website. The plugins are used to provide additional functionality to the application.
Thus, you may also join it with a related posts plugin. For showing the most relevant content to new users of the very working site.
4. Multiple sidebars
A multiple Sidebar is an approach for creating smart sidebars. And using them at once on your website. However, it is based on criteria that you have selected very before.
Now, you just have to install and activate the Content-Aware Sidebar plugin on your PC. thus, it allows you to create smart sidebars on your WordPress Website. Despite showing or hiding widgets for specific pages. You may create a totally new one.
5. Sticky sidebar widgets
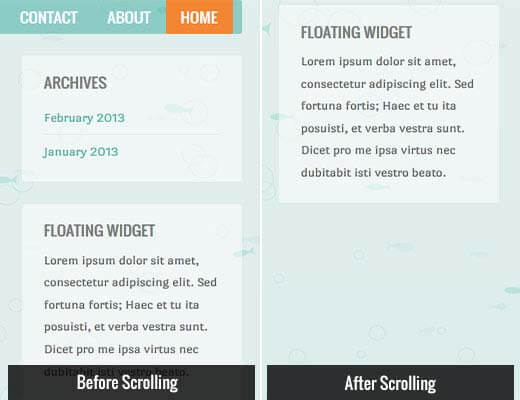
In this, the content column of your WordPress site becomes a bit lengthier than your actual one. Somehow, this means that when users scroll down then there is nothing to look at in the column from the working window.
Thus, you may add sticky floating sidebar widgets. To make sure that there is always a call for action. Which is visible to your readers as he/she scrolls down the working window.
6. Use images
As we know that images are much more engaging than that plain text. Thus, if you want to grab the user’s attention. Then use images as banners and buttons on your website. Even, you may link those banners and call to action in different areas.
However, you can simply upload an image by using the media uploader. And the HTML code to display the image in a text widget on your website. Whereas, if you are not very aware of HTML. then you may use an image widget to add images to your WordPress sidebar.
Here, a sidebar is a WordPress theme feature, which is basically a vertical column provided by a theme for displaying information other than the main content of the web page.
Also, there is a group of stylesheets and templates that are used to describe the appearance and display of a WordPress site. A WordPress theme changes the layout & design of your site. And templates are those files that control how your WordPress site will be displayed on the Web.
7. Showcase social proof
Showcase Social Proof this arrives with a question. Have you ever seen How popular blogs brag about their follower count in sidebars? Thus, displaying your follower count is known as social proof.
In other words, it is a marketing technique. That helps you gain trust by showing people the number of followers you already have on your site.
However, you may use the Social Count Plus widget. To display your follower count on your website. Thereafter, you may also represent your MailChimp subscriber. After that, count to encourage more and more users to signup for your email list from your PC.
8. User engagement tools
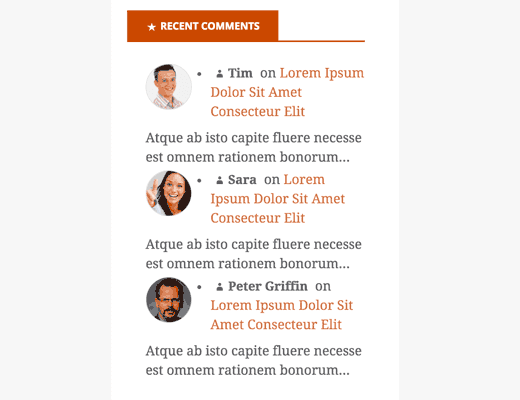
The recent comments, polls and surveys, user rankings, and points system are just some of the ways to boost user engagement.
Thus, displaying them in your sidebar helps to boost user engagement. Somehow, this increases your page views and the time that each person spends.
9. Fade in the last sidebar widget
Fade In Last Sidebar Widget this nifty little trick is used on many popular blogs. And even on many of the websites.
Somehow, it simply fades in the last sidebar widget of your website. Thus, the animation makes the widget eye-catchy and noticeable. This thereby dramatically increases the click-through rate which in short stands for (CTR).
10. Use custom styles for widgets
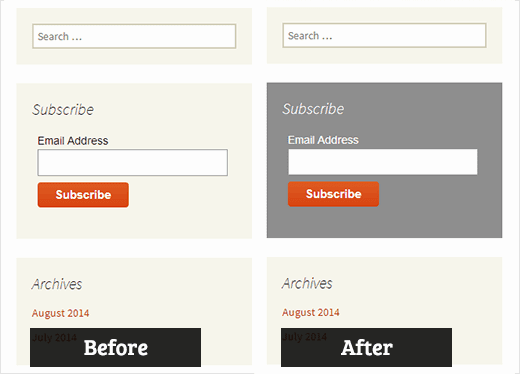
As we know, sidebar widgets use the same colors and style defined. That’s why they appear the same!
However, you may use the custom styles. For using different colors, on your widgets to make them more noticeable as compared to others.
Add widgets to your custom sidebars
Now, it’s time to add widgets to your custom sidebars. Follow each path to add widgets as Appearance >> Widgets page. As widgets allow you to add content and features to your sidebar without writing any code.
Here, you will find your newly created or developed sidebar among your themes on default.
Move along with this and you will be able to add the widgets. However, the plugin will represent the sidebars based on your website settings.
Further, you can visit your selected pages to see the things in action or working mode.
Create a sidebar template for your WordPress blog
You can create separate sidebar templates for different pages of your site by using a simple include statement. When you write an include statement, you’re simply telling WordPress that you want it to include a specific file on a specific page.
The code that pulls the usual template (sidebar.php) into all the other templates, such as the Main Index template (index.php), looks like this:
| <?php get_sidebar(); ?> |
If you create a page and want to use a sidebar that has different information from what you have in the current template (sidebar.php)? Follow these steps:
1. Create a new template in a text editor such as Notepad.
2. Save the file as sidebar2.php.
3. In Notepad, choose File, and Save. When you’re asked to name the file, type sidebar2.php and then click Save.
4. Upload sidebar2.php to your themes folder on your Web server.
5. The template is now listed in your theme files on the Edit Themes page (log in to your WordPress Dashboard, click the Editor link on the Appearance menu).
6. To include the sidebar2.php template in one of your page templates, find this code
| <?php get_sidebar(); /> |
7. Replace it with this included code:
| <?php include (TEMPLATEPATH . ‘/sidebar2.php’); ?> |
8. Using that include (TEMPLATEPATH statement, you can include virtually any file in any of your WordPress templates. You can use this method to create footer templates for pages on your site, for example. To do this, first, create a new template with the filename footer2.php. Then locate the following code in your template:
| <?php get_footer(); ?> |
and replace it with this code:
| <?php include (TEMPLATEPATH . ‘/footer2.php’); ?> |
How to create custom sidebars with Plugins
There are many WordPress plugins available for creating custom sidebars but the best one is Sidebar Manager.
Side Manager
The Sidebar Manager plugin is a WordPress sidebar plugin that allows you to easily create and manage custom sidebars (also known as widget areas) on your WordPress website. With this plugin, you can create as many custom sidebars as you need and assign them to specific pages or posts on your site.
It works by creating a new menu item in your WordPress dashboard, where you can create and manage your custom sidebars. You can also choose which widgets to display in each sidebar, and you can even set specific rules for when each sidebar should be displayed (such as only on certain pages or only for certain user roles).
Using a plugin like Sidebar Manager can be especially useful if you have a complex website with many different pages and sections, and you want to display different content in the sidebars of different pages. It can also help you to keep your website organized and make it easier for your visitors to find the information they need.
Features
- Create and manage custom sidebars
- Customize sidebar content
- Conditional display rules
- Easy drag-and-drop interface
- Compatible with most themes
- Import/export functionality
Some steps to install the plugin and create a sidebar
- Install and activate the plugin: Once you have chosen a plugin, install and activate it on your WordPress site.
- Create a new sidebar: Depending on the plugin you have chosen, you should be able to create a new sidebar from the plugin’s settings page or from the WordPress dashboard. Give your new sidebar a name that makes it easy to identify.
- Create a new sidebar: Depending on the plugin you have chosen, you should be able to create a new sidebar from the plugin’s settings page or from the WordPress dashboard. Give your new sidebar a name that makes it easy to identify.
- Save the changes: Once you have configured the settings for your new sidebar, be sure to save the changes.
- Add the sidebar to your website: To add your new sidebar to your website, you will need to use the widget functionality of WordPress. From the WordPress dashboard, navigate to Appearance > Widgets. Drag and drop the new sidebar widget into the appropriate location on your website.
- Customize the widget settings: Once you have added the new sidebar widget, you can customize its settings. You can choose which widgets to display in the sidebar, and configure their settings.
How to hide or remove sidebars
The 3 most common cases of how WordPress themes handle inactive sidebars are:
Remove the sidebar from individual page
- In the Admin Dashboard, go to Sidebars -> Add New.
- Click on “Select content type” and select Pages.
- Click on the new input field and select the pages you want to remove it from (leave it empty for all pages).
- In the Options box, select Action: Replace and pick the Target Sidebar you want to hide.
- Give it a new title and click the Save button.
Remove sidebar from blog or posts
- On the Edit Sidebar screen, click on the bottommost “Select content type” and select Posts.
- Leave the new input field empty.
- Click the Save button.
Remove the sidebar from custom post types
With the powerful conditions in Content Aware Sidebars, you can also remove it from any custom post type, any custom taxonomy, and other content created with plugins.
For example, you can hide the sidebar on posts by a featured author, on posts in a select category, etc.
Summary:
Here, in this blog, we have discussed How To Create Sidebars For Different WordPress Posts?
Often we concluded the overall process of Custom Sidebars Installation and Configuration. They do add value to any blog post.
We hope this blog helped you. If you find the blog useful, do not forget to use the comment section provided below. Also, share the blog with your peers. You are on your way to getting more exposure.
Talk to our WordPress Migration team to get instant support from our Experts. If you need any help then contact us and fix all your problems, dial +1-888-738-0846 (Toll-Free).