It is a well-known fact that – The best-looking website attracts more users. That’s why it is advised to learn WordPress CSS and make your site more and more engaging! Learning WordPress CSS and HTML can be amazing, generally, when you don’t know from where to start and what terms to search for when you get stuck.
A few days back, we were entirely dependent on programmers and developers to update the websites. But in this modern era, things are changed and we don’t need to do it anymore. By using WordPress custom CSS and HTML you can do it by yourself.
CSS – An Overview
CSS stands for Cascading Style Sheet. These are the documents which contain the styling rules that can be applied to HTML or XML, (along with some structural formats). Furthermore, several style rules can point to one HTML element. In this case, there should be a way to determine which rule should take effect.
Additionally, CSS is a styling language, not a full-on programming language like Javascript or PHP. It’s very simple to learn more specifically if you have some HTML knowledge under your belt.
The word cascading expresses the process of filtering down from general rules until the most specific rule is encountered. That rule is selected to do its work.
However, the presentation can be separated from structure throughout CSS. It resolves the need for mashing styling rules in between HTML, Like this:
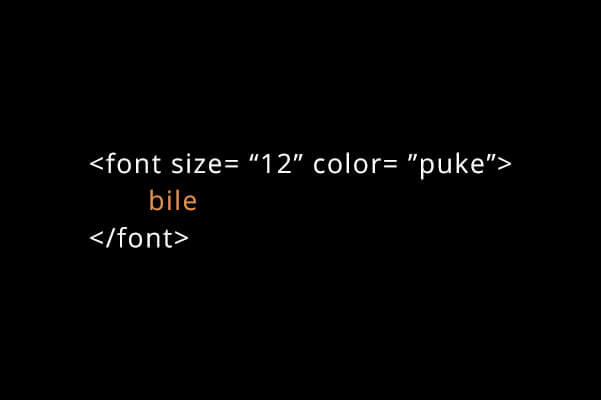
It keeps documents dryer and neater.
However, CSS is read by web browsers. Fast forward – they take the markup document, and within that document, they apply the styling rules to the elements.
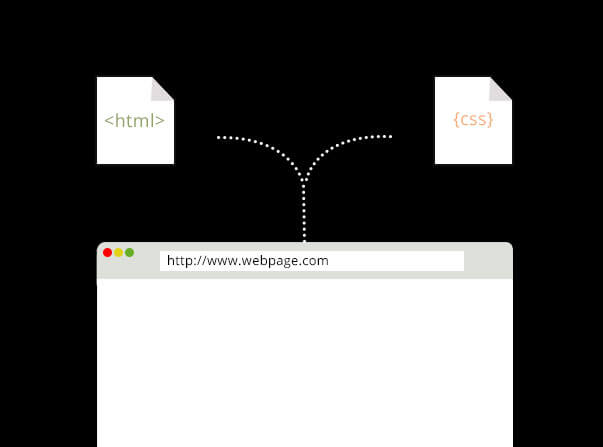
They don’t always clarify style rules similar to each other. And as soon as the browsers develop, they also support newer styling proposals. Very often it’s browser manufacturers itself who experiment with WordPress CSS properties.
Eventually, it is down to the W3C (World Wide Web Consortium) whether the CSS properties are standardized or not.
Now we will show you some CSS syntax that you need to learn. They all are good for your knowledge.
Some basic CSS syntax
However, CSS syntax involves some fundamental pieces such as rules, selectors, declaration, properties, and values.
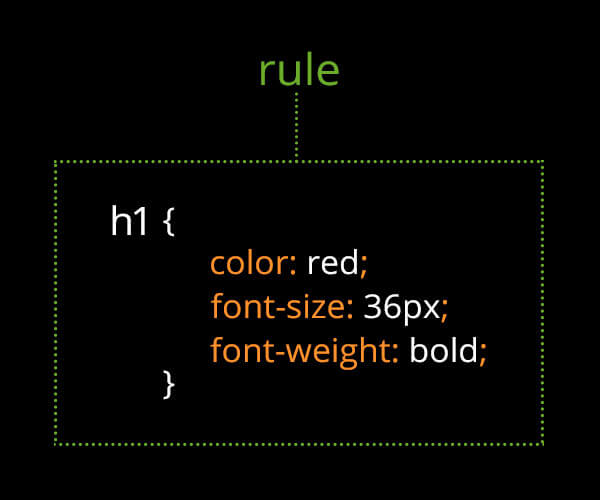
This CSS rule includes all other bits and bobs which we mentioned.
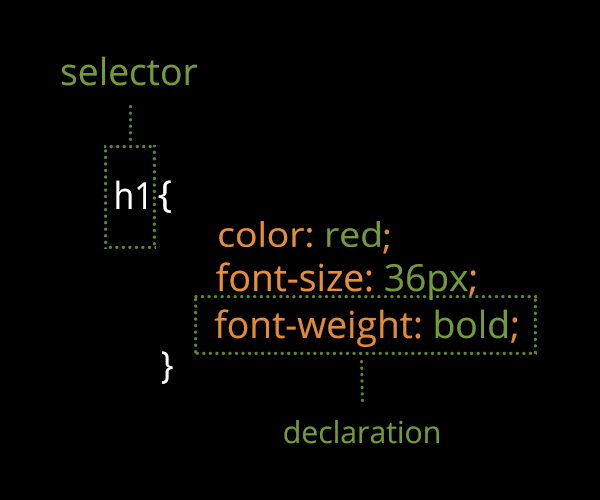
Within the HTML markup selectors point at elements, thereafter the declarations which are in the curly braces define that – how those elements should be styled.
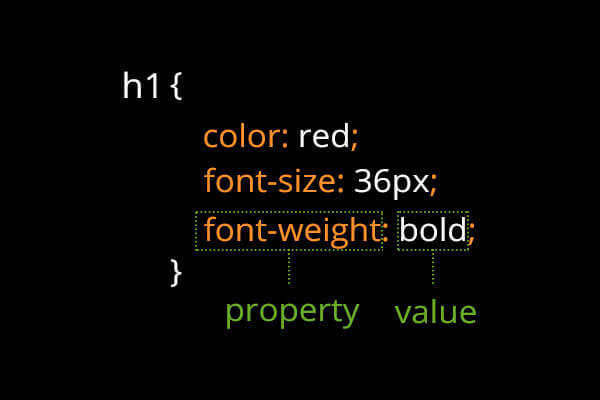
However, there can be many declarations within a single rule. Each & every rule includes property with an associated value.
Many ways to choose HTML elements from straightforward type selectors:
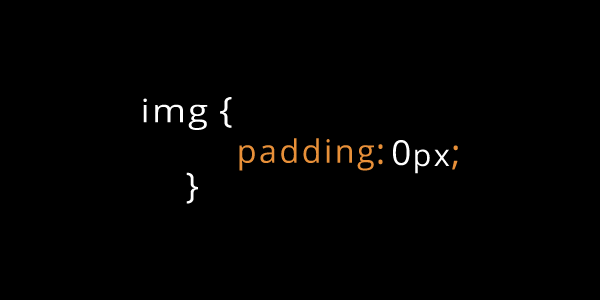
This will choose all images and apply zero-padding to all of them.
We have class selectors that point to all elements with a particular class that is applied to them. Now have a look towards this markup with its corresponding CSS:
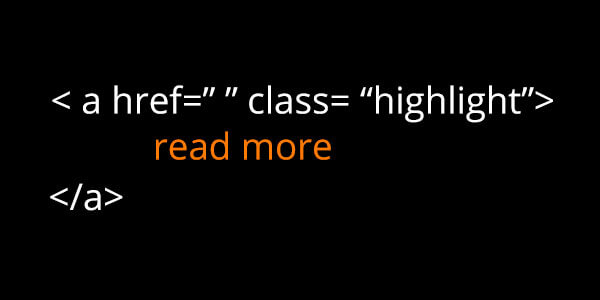
Here’s an anchor, of which there could be many…
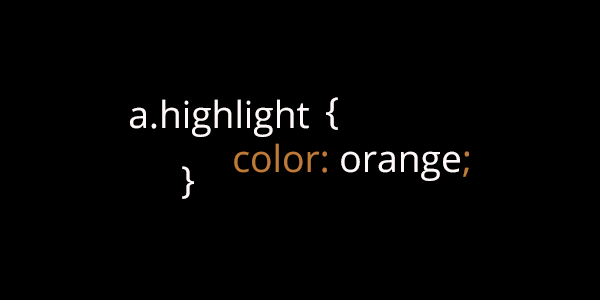
..thereafter this will choose all anchors along with a class of “highlight” and make them orange.
Tilted to the point – Take a look at some great tips for learning CSS tutorial:
Best tips to Learn WordPress CSS and HTML
- Basic Construction
- Pay Attention To What You See
- Start With Font Styling
- Use reset.css
- Use Shorthand CSS
- Understanding Class and ID
- Power of <li>
- Forget <table>, try <div>
- CSS Debugging Tools
- Avoid Superfluous Selectors
- Knowing !important
- Replace Text with Image
- CSS @import vs <link>
- Designing Forms in CSS
- Keep CSS Codes Clean
- CSS Browsers Compatibility Table
- Get a Free CSS Editors
- Understanding Media Types
- Memorize the Box Model
- Arrange Content by Width and Height
- Floats and Positioning
- Advanced CSS
- Using A Compiling Language
- Preprocessors
- Frameworks
Basic Construction
As you might have heard that the first thing happens first. This is the best quotation that can be applied here.
So at first, you must know how to write your own CSS and format it properly as well. However, to do this, there are two good ways, but one of them will help to keep you more organized.
It is common for HTML to be the prior language that people learn when they wish to work with WordPress (blogging platform). It helps to learn CSS syntax by first writing it out in the same way at HTML.
The Basic structure that CSS takes:
| 1 .class selector{property:value;} 2 #id selector{property:value;} |
It is sufficient when there aren’t a lot of styles that you want to implement for an element on your WordPress website. But in the case when you start getting more familiar with CSS, then you are going to require many more than one style for an element and that’s where a structure like this can get messy, fast.
Therefore, there is a well-organized way to write your CSS:
| .class selector{ property:value;property2:value2;property3:value3;}#id selector {property:value;property2:value2;property3:value3;} |
Now you can start working into the terms that are used herein this example. However, each of these terms is the basic building block of CSS such as class, ID, selector, property and value. The properties and values also make up which is called a declaration.
According to our point of view, it’s the best starting point to learn how to write your own WordPress CSS. Once you start it out, you may think that where you should write down all this in your WordPress files.
As you have already guessed – any of the files in your WordPress installation that ends with .css is a CSS file. And the main file that you need to see is your stylesheet, which is labeled as style.css. This is the place where most or all of your theme’s design is held in terms of fonts, colors, basic images and perhaps some of your theme’s layout.
You may also observe a file in a pre-made theme called custom.css. And this is commonly where they would like you to make any changes to the theme. It should overwrite the existing styles in the theme’s stylesheet whenever you make changes in this file.
In case you add WordPress plugins to your theme, they may also come with WordPress CSS files in their folder and are used to style the plugin’s look and feel.
Pay Attention To What You See
Many times we just jump into creation mode without spending enough time learning. It is important to keep in mind that every website is built on HTML and CSS. You should actually be able to view the code on any given page with a few simple tools. You can select a lot of information fastly by making a habit of viewing and learning from the code that others have written.
It is definitely worth observing that while these compiling languages are at an advanced level of CSS development they are vital to know and understand as fast as possible.
Start With Font Styling
The simplest thing to do in CSS is to set new styles for fonts. With CSS you can change the text color, font and font style with a set of basic commands.
| .yellow-Helvetica { font-family: Helvetica, Arial, sans-serif;color: yellow;font-style: italic;} |
This type of styling is really simple to learn and implement. However, CSS can and should be used for positioning elements on a page. It is necessary to get some quick wins under our belt and this simple bit of success is the best way to start.
Use reset.css
Whenever it comes to rendering CSS styles browser such as Firefox and Internet Explorer. They have various ways to handle them. However, reset.css resets all fundamental styles so that you can start with a new blank stylesheet.
There are some commonly reset.css frameworks that are used here such as Yahoo Reset CSS, Eric Meyer’s CSS Reset.
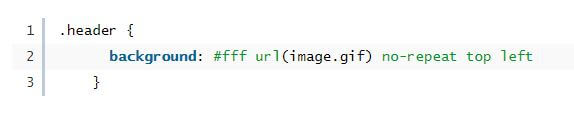
Use Shorthand CSS
Usage of Shorthand in CSS is a great possibility that lets you describe many properties by using only one. Furthermore, it makes it simpler for you to implement the style to your markup and make your CSS code more abbreviated.
Fast forward – Shorthand CSS provides you a short way to write your CSS codes. And the most important thing – It makes the code cleaner and simpler to understand.
Instead of creating CSS like this:
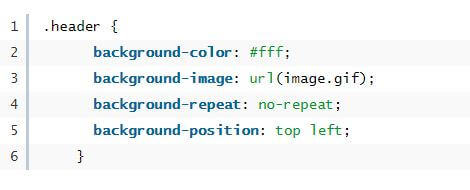
You can write short-handed into the following:
For More – Introduction to CSS Shorthand
Understanding Class and ID
Class and ID are two selectors, they often confuse beginners. That’s why you need to take a deep look here:
In CSS, a class is represented by a dot “.”, on the other hand, ID is represented by hash “#”.
So the CSS might look something like:
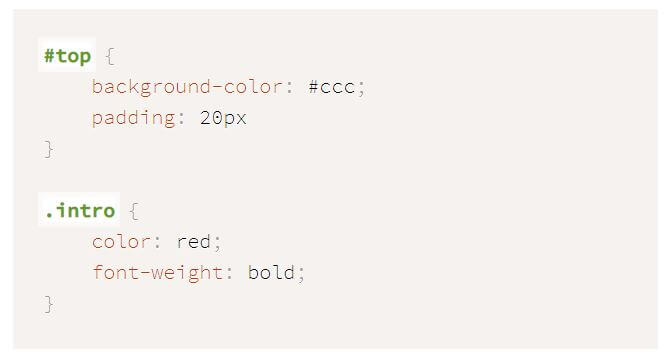
In a nutshell, the ID is used on a style that is unique and doesn’t repeat itself. On the other side, a class can be re-used.
For More – Class vs. ID | When to use Class, ID |
Power of <li>
<li> – is a HTML element that is used to represent an item in a list. It is very useful when they use correctly with <ol>: means an ordered list or <ul>: means an unordered list particularly to style a navigation menu.
Forget <table>, try <div>
Use of <div> is the best advantage of WordPress CSS to attain total flexibility in terms of styling. <div> are unlike <table> where content are ‘locked’ within <td>’s cell. With the use of <div> and proper styling, most <table> layouts are achievable, maybe except massive tabular contents.
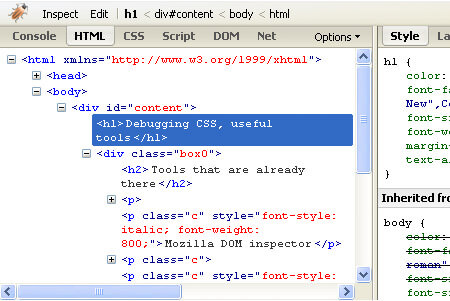
CSS Debugging Tools
While tweaking the CSS, getting instant layout preview is always a good thing because it helps in understanding and debugging CSS styles better. There are several CSS debugging tools that you can install on your browsers such as Internet Explorer Developer Toolbar, Firefox Web Developer, DOM Inspector, Firebug and much more.
Avoid Superfluous Selectors
Sometimes your CSS declaration can be simpler in case you find the following coding on your own:
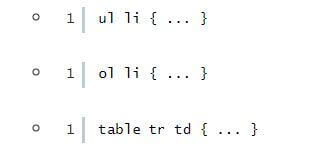
They can be shortened down to just

Clarification: <li> will only exist within <ul> or <ol>. And <td> will only be exist <tr> and <table>. So, it is not actually necessary to re-insert them.
Knowing !important
In case there is an overwriting rule below to the! important mark, then any style marked with it will be taken into use regardless.

In the above example, you can see background-color: blue is marked with ! important, that’s why it is adapted, while there is a background-color: red; below it.
!important is used in that situation where you want to force a style without something overwriting it. Remember that it may not work in Internet Explorer.
Replace Text with Image
Replacing <h1>title</h1> from a text-based title to an image is a common practise. Here we will show you with the help of an image – how you can do it:
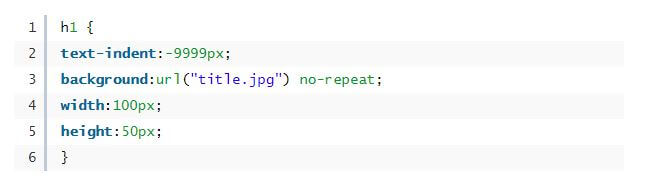
Simplification: text-indent:-9999px; throws your text title off-screen, replaced by an image declared by background: {…} with a fixed width and height.
CSS @import vs <link>
There are two methods to call an external CSS file such as; @import and <link>. Take a look we will show you which method to use:
Before deciding which method to use, let’s get a bit information about @import and <link>
@import: With the use of @import, you can import one style sheet into another. This is a bit different from the linked scenario because you can import style sheets into a linked style sheet. In case you include an @import into the head of your HTML document, so it is written like this which is shown in the image below:
<link>: When we come to the link, it is the prior method for including an external style on your web pages. However, it’s aim is to link together with your web page with your style sheet. It is added to the <head> of your HTML document like this which shown in the image below:

Now bending towards the point!
Why Use @import?
Sometimes ago, one of the best reasons that were given for using @import instead of using <link> is – because old browsers did not identify @import, so you could hide styles from them.
Fast forward – By importing your style sheet, necessarily you would be making them available to more modern, standard-compliant browsers during “hiding” them from the older version of the browser.
Why Use <link>?
The best reason for that the <link> to be known is – To provide alternate style sheets to your customers. Many browsers such as Safari, Firefox, and Opera support the rel=” alternate stylesheet” attribute. When there is one available so it will allow viewers to switch between them.
Not only this but you can also use a JavaScript switcher to switch between style sheets in IE. Often, most of the cases, it is used with Zoom Layouts for accessibility purposes.
Designing Forms in CSS
With CSS you can easily design and customize web forms. To know how to design forms, follow the articles which we have given below:
More – Table-less form
Keep CSS Codes Clean
If your CSS codes are dirty, so you can end up coding and having hard work to refer to the previous code. For beginners, you can create the actual indentation, and properly comment on them.
Here we will show you 5 principles to keep your code clean:
1. Strict DOCTYPE
If you are going to do this, just do your code right. However, both HTML 4.01 or XHTML 1.0: offer a strict version, that’s why you need not discuss the use of them. They will keep us good and honest as we write our code.
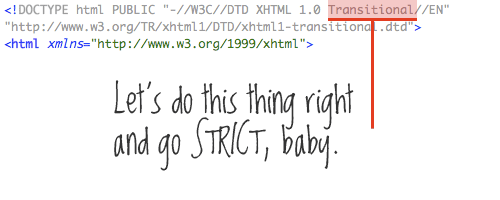
Furthermore, the code does not use any tables for layout. Therefore, in actuality, there is no need for a transitional DOCTYPE.
2. Character set & encoding characters
The very first thing that should be declared in the <head> section is – the declaration of our character set. Here, we use UTF-8, which swells but it is listed after our <title>. So move it up so that the browser knows that what character set it’s dealing with before it starts reading any content at all.
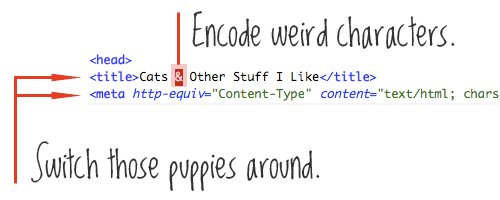
Ensure that any funny character which we are using is properly encoded. We have an ampersand in our title. We will convert it into & to avoid any misinterpretation.
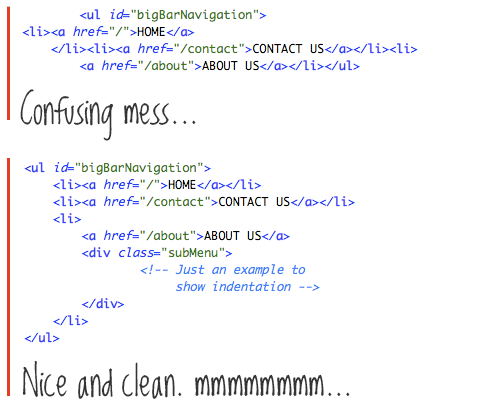
3. Proper indentation
Indentation has no effect on how the page is rendered, but it has a great effect on the readability of code. When you are starting a new element that is a child element of the tag above it, standard procedure is to indent a tab or a few spaces. Thereafter, if you are closing that element then move back in a tab.
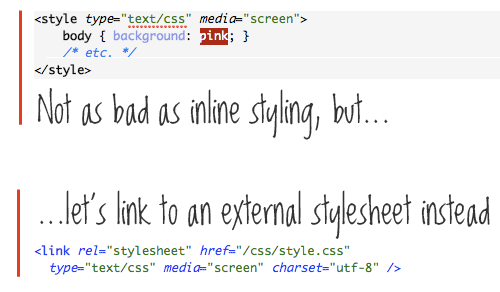
4. Keep your CSS and JavaScript external
When some CSS snuck into the <head> section, so it is not good because it does not only destroy our markup but it can be applied on to the entire HTML page. Keeping your CSS file different means future pages can link to them and can use the same code. Hence, it becomes easy to change the design on multiple pages.
This may have happened as a quick fix at some point which is understandable and happens to all of us.
5. Nest your tags properly
The title of our site is properly inside <h1> tags, that is best. But as per user, the title is a link to the home page. While the anchor link <a> wraps the header tags. It is a minor mistake, most of the browsers will handle it properly, but as per the technical point of view, it is a major mistake.
An anchor link is an “inline” element. On the other hand, header tags are “block” elements. And remember that block should not go inside inline elements.

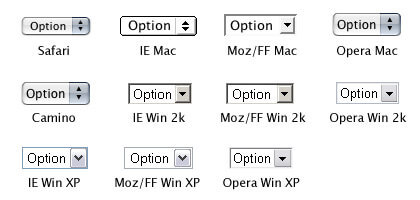
CSS Browsers Compatibility Table
Each & every browser has various ways of rendering CSS styles. Having a reference, a chart, or a list is a good thing that displays the complete CSS compatibility for each & every browser.

Get a Free CSS Editors
Dedicated editors are always better in comparison to notepad. There are many recommended and free CSS editors such as Simple CSS, Notepad ++, A Style CSS Editor.
Understanding Media Types
There are several media types when you declare CSS with <link>. Further, there are some commonly used types such as print, projection, and screen. Understanding and using them in a good manner allows better user accessibility.
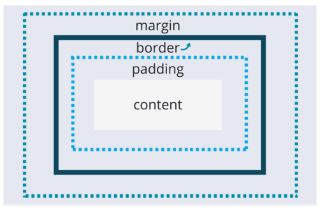
Memorize the Box Model
Box Model is essentially the basic layout elements in CSS that you need to make sense of many properties. It also contains a lot of basic places that you can style with CSS.
Fortunately, it is very easy to learn. In essence, it also includes some parameters such as padding, content area, and margin.
Arrange Content by Width and Height
You can arrange the layout by entering different lengths and widths of content areas and selectors. Further, it gets you familiar with various layout areas in a WordPress theme.
Floats and Positioning
This is the place where CSS gets a bit tricky because you can create a layout completely with CSS and particularly floats and positioning. But there is a problem is that – these properties are not designed to create complete layouts. Further on to update the CSS layout, there is a draft out there.
Advanced CSS
Here, you are going to get a bit of knowledge of advanced CSS. But there are many more things to discover.
Pseudo Classes: Pseudo-classes are used to define a particular state of an element. For example, on mouse hover and positioning images in a particular place related to other elements.
Complex selectors: By using more advanced selectors you can get more specific with the aspect of styling.
CSS3 animations: While you mouse over images and buttons, creating a fade, pop or other transitions called CSS3 animations.
Responsiveness with CSS3 media queries: Creating a responsive theme by using media queries is one of the simplest ways.
Transform: It controls the shape and size of the selected content areas.
At-rules: Importing things such as fonts and stylesheets into your WordPress theme.
Gradients: Without using an image adding a gradient into your WordPress theme.
These are many elements, by using them you can really start observing your theme’s design take shape.
Using A Compiling Language
These are additional languages or syntaxes that can be used for simplifying the process of writing CSS. This is especially useful once you start learning CSS3 and begin using some of the more advanced techniques. Compiling languages like LESS or SASS help speeding things up for you. It also makes it possible for you to avoid the headache of writing custom CSS.
Preprocessors
When you will get properly aware of the ins and outs of CSS, then learning preprocessors, and especially SASS & LESS becomes very easy. Both of these succors to organize the CSS. Therefore, it’s much easier to write and it becomes more accessible for future edits.
Preprocessors make your CSS clean and easy to follow. It has quickly become an important skill among web developers. If we talk about which preprocessor is best, so we prefer SASS because it is a preprocessor that is the most used to date.
Frameworks
In the world of web development, frameworks are the structure to create dynamic sites. Further the aim of the framework – is to make sites faster without losing functionality.
Once you have CSS down, you can speed up your theme development throughout the framework.
Twitter Bootstrap – there is one of the most popular frameworks. It is created to be responsive right out of the box. It uses both SASS & LESS and also much more custom CSS components
Final Thoughts
CSS isn’t a scary language and it is one of the most powerful tools at your disposal for customizing or creating a new WordPress theme. It can handle the look and feel of your Website in addition to provide some basic and not so basic animation and movement. It is one of the first places to start if you are new to designing, developing or modifying a website.
So this leads to the end of this blog and we hope you get the best for Learning CSS here For any queries related to WordPress Migration, you can contact our WordPress Technical Support team to avail our services. Dial our Toll-Free number +1-888-738-0846.
That’s all, thanks!